Page 5
Common Pests In Herb Gardens
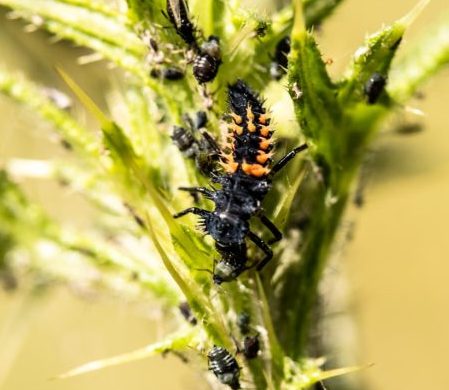
Larval stage of ladybug, in center, feeding on aphids.
For most of the growing season, insects and diseases on herbs are not major concerns. It isn’t the end of the world if you spot aphids or spider mites among your plants.
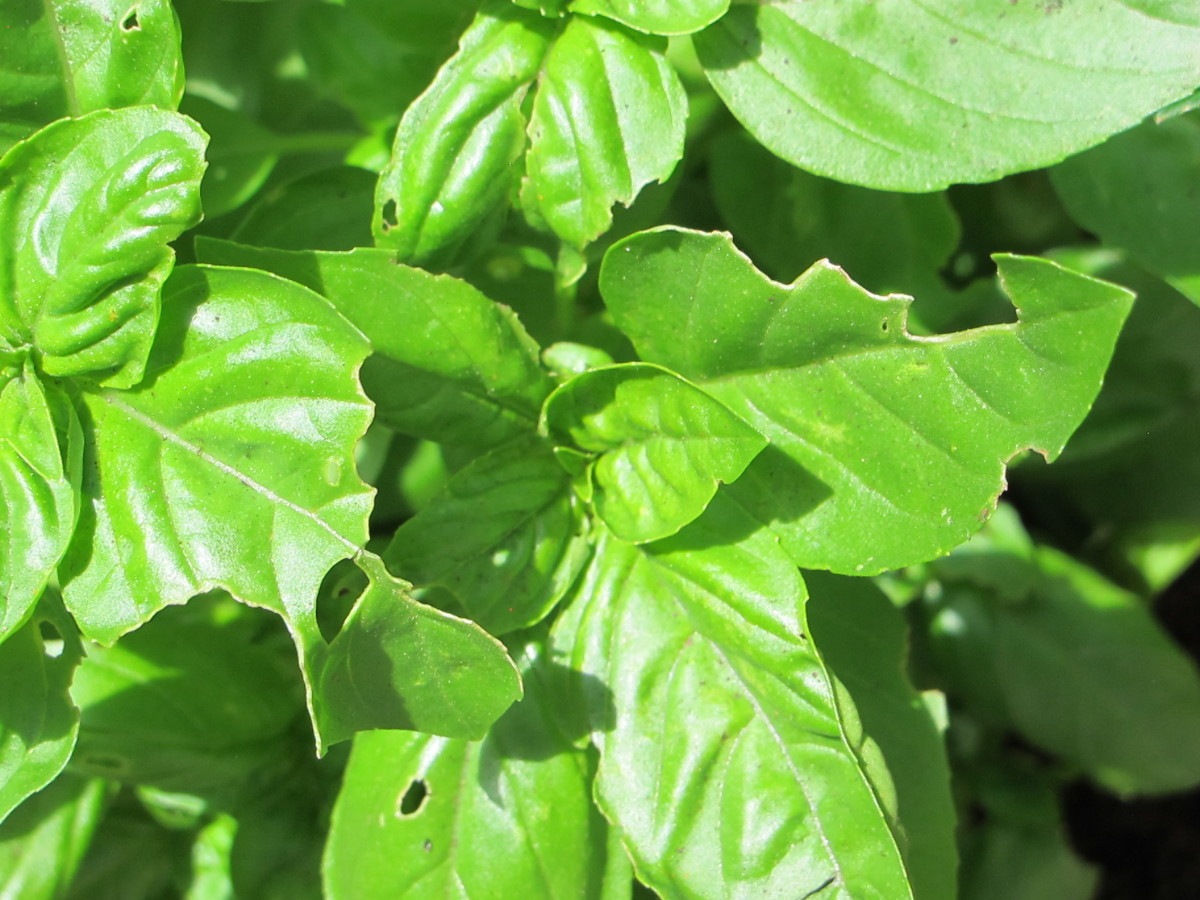
Once you identify which problems routinely affect particular plants, you’ll know what to look for in the future. Chives, for example, sometimes hosts black onion aphids early in the season, and I often find slugs on the basil. Powdery mildew and spider mites are found on thyme and rosemary more than on other herbs. Spider mites also favor parsley growing indoors, and bay might get scale. Basil downy mildew has been a particularly loathsome disease!
Using good horticultural practices will maintain healthy plants. Keep foliage dry and space the plants properly to avoid stressing them. If you see problems beginning in your herb gardens, apply a remedy (sometimes, it’s just water) early on so you won’t have to remove damaged foliage.
Better Options To Eradicate Pests
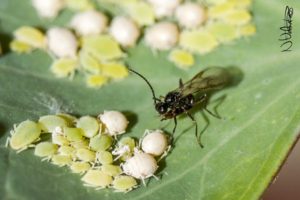
Female braconid wasp and aphids.
Certainly, avoid using chemical pesticides on plants you intend to consume later in the day. I don’t use any products other than those described below. By not spraying for every little “bug”, I’m not killing off both the good and the bad. Beneficial predatory insects populate my gardens and eliminate most of the pests.
Grow lots of flowering plants, year-round if you can, to attract the tiny and underrated braconid wasps, hover flies, and other garden helpers. Ladybugs, green lacewings, praying mantises, birds, lizards, and toads also help rid the garden of pests.
Bacillus Thuringiensis
-

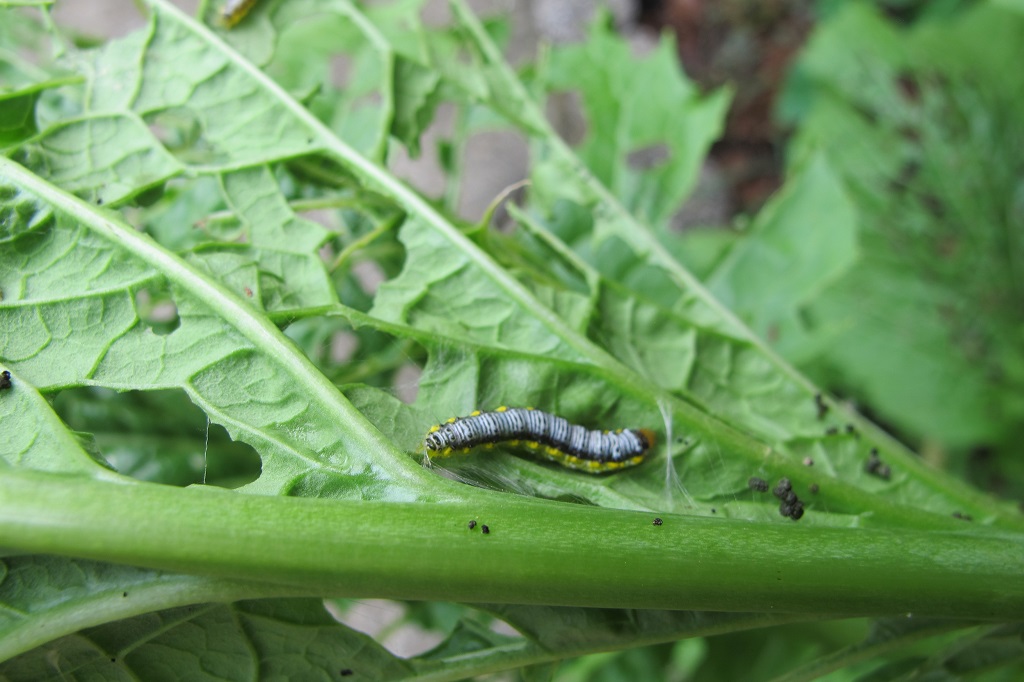
- Cross-striped cabbageworm, becoming more common here, on mustard greens. Expect several generations per season. Look for clusters of white woolly eggs.
-
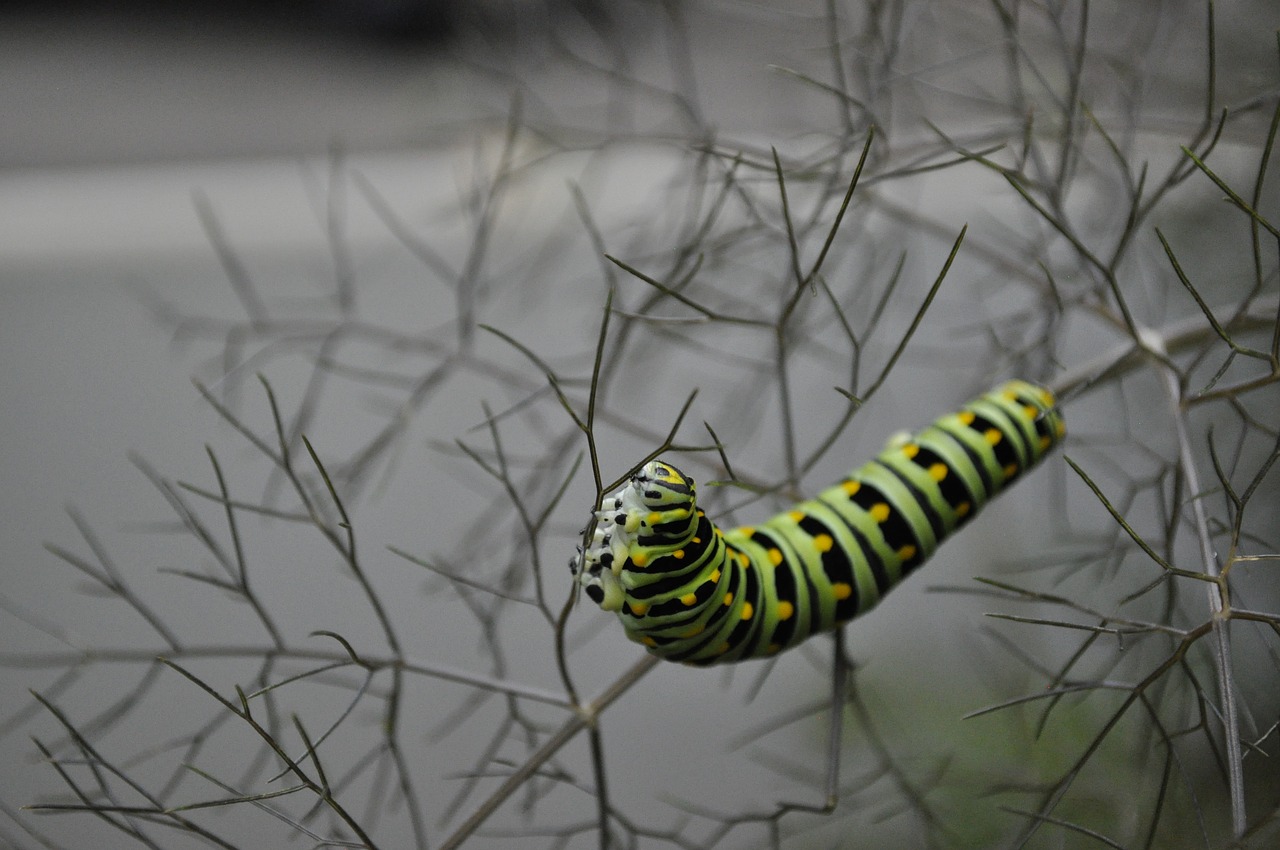
- Larva of black swallowtail butterfly on bronze fennel.
Bt (Bacillus thuringiensis) is essential for controlling cabbage worms and other caterpillars that commonly attack the brassicas. I depend on many plants in the Brassicaceae family, including broccoli, kale, arugula, cauliflower, and mustard greens. A few species of moth and butterfly larvae can ruin the crops in just days.
Bt, available under a few trade names (Dipel, Thuricide), is a naturally occurring bacterium that effectively controls larvae of moths and butterflies. And nothing else. Sometimes, in the herbs, you’ll see webbing that a caterpillar wraps around itself and from where it feeds. Bt works by distressing the caterpillar’s digestive system, causing it to stop feeding, and killing it within a day. Alternatively, you could hunt them down and squish them.
Always read the label.
The Black Swallowtail Butterfly
The beautiful caterpillars of the black swallowtail butterfly (photo above, right) feed on herbs in the Apiaceae family, including parsley, cilantro, dill, and fennel. Young caterpillars resemble bird droppings, which make hungry birds think twice.
Instead of killing the caterpillars, I pluck them off the herbs and place them on large bronze fennel growing in the garden. There, they can reach maturity in peace. Planting extra parsley or dill also will ensure enough for everyone. You could use fine screening around the plants to prevent the butterflies from getting close to the foliage.
Horticultural Oil

Scars on Italian oregano, caused by thrips when they scraped the leaf surface and fed on the fluids.
Horticultural oil is an insecticide, a miticide, and a fungicide, but it is not a poison.
This refined oil works by smothering insects (aphids, scale, mealybug, white flies, thrips), spider mites, and their eggs. These organisms have a series of breathing pores, called spiracles, running down the sides of their bodies. When those pores become clogged with the oil solution, the pests die. Additionally, the oil disrupts fats in their cells.
Powdery mildew looks like a dusting of white flour on leaf surfaces. This disease can distort leaves as they expand, and you’re more likely to notice it in humid weather. It targets certain plants, namely rosemary, thyme, sage, and sometimes mint and lemon balm. Spray a vigorous stream of the horticultural oil solution on the leaves.
Be careful not to use a highly concentrated spray, which can cause oil-soaked spots. Cut back damaged stems if the infestation or the mildew is severe. I often rinse lightly with clear water a few minutes after spraying herbs; letting the oil solution evaporate from the leaf tips can turn them brown. Don’t cut back rosemary to older wood; there might not be any dormant buds in the stem to sprout after pruning.
Horticultural oil will cause slippery surfaces. Always read the label.
Organic Sluggo
-
- Sweet basil with slug damage.
-
- A slug.
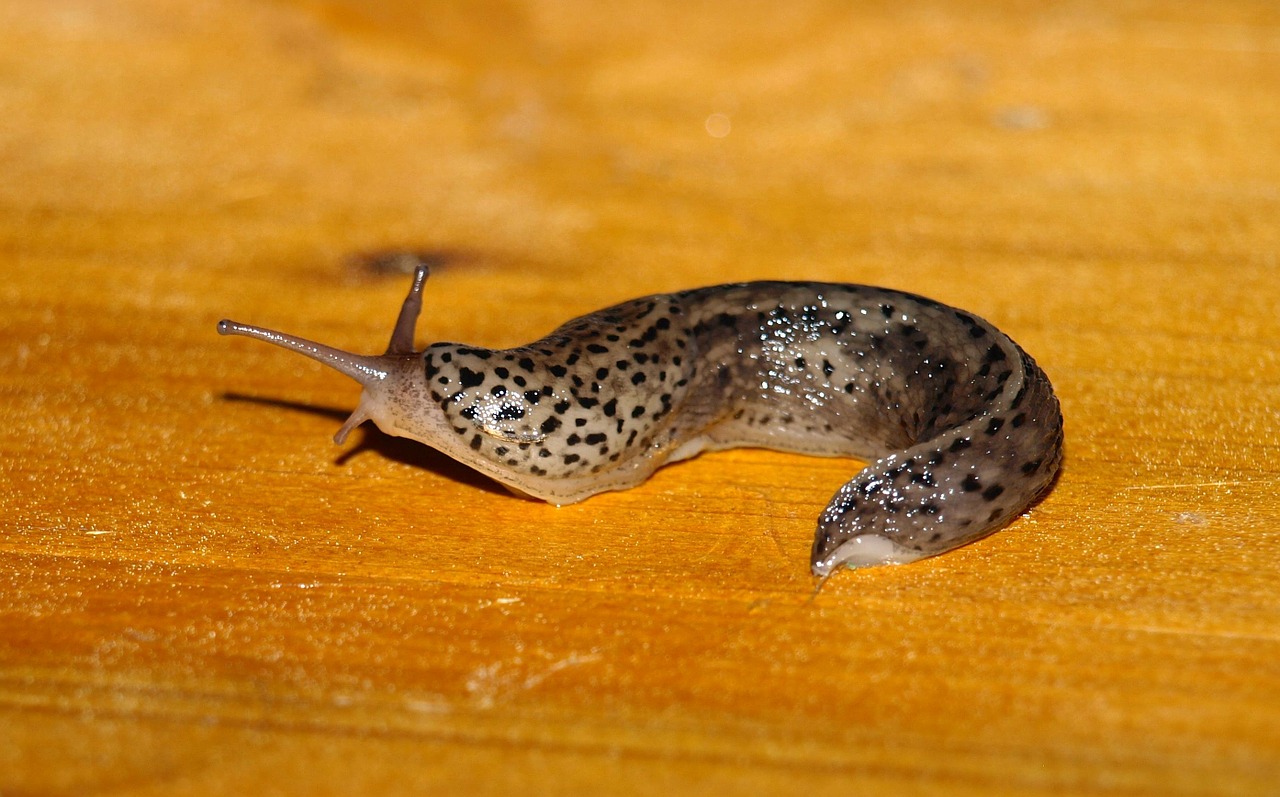
Slugs and snails love tender young leaves and seedlings. I find them on basil, parsley, and other soft-leaved herbs, especially during rainy weather. Yesterday I sprinkled organic Sluggo pellets around the young plants outside after I noticed damage on the ‘Obsession’ basil in the tomato pot.
This organic version of the product is iron phosphate, which breaks down and provides nutrients to plants. It is OMRI listed and not to be confused with the other form of Sluggo, which can’t be used around edibles. Read the label.
Another way to deal with slugs is to lay a board on the surface of the soil near the herb gardens. After feeding through the night, slugs congregate under the board, where you can slice them in half in the morning. Also, look under pots where you’ll undoubtedly find more of them. Don’t salt them; never use salt in the garden.
Plain Water
Spider mites and their damage on Alocasia, a tropical plant (not edible).
In hot, dry weather, spider mite populations multiply exponentially. This is especially true indoors, where there are no predatory insects, wind, or rain to keep their numbers down. Luckily for us, mites drown easily. So, periodically take the herbs to the sink or to the hose outside and give them a thorough spraying all over the leaves.
No, they don’t just materialize, but a few pests or their eggs might have been on the plants when you brought them indoors. And mites can float on the breeze any time it’s above freezing.
Spider mites pierce plant cells, usually from the bottom of the leaf, and suck out the sap. This kills the cells, which turn into tiny light-colored dots on the leaf surface (photo, above). Even after the mites have been removed, that stippling remains.
When you first see the tiny dots or very fine webbing close to the leaf, act quickly, before the mites get out of hand. You might need a magnifier to see them or tap the leaves over white paper and watch for tiny crawling specks.
Aphids congregate on stems, leaves, and tender tip growth. Beneficial ladybugs, and especially their larvae (photo, top of page), consume huge numbers of aphids. If ladybugs have not yet shown up on outdoor plants, either rinse away the aphids with a strong splash of water or use a solution of horticultural oil.
Girth Control
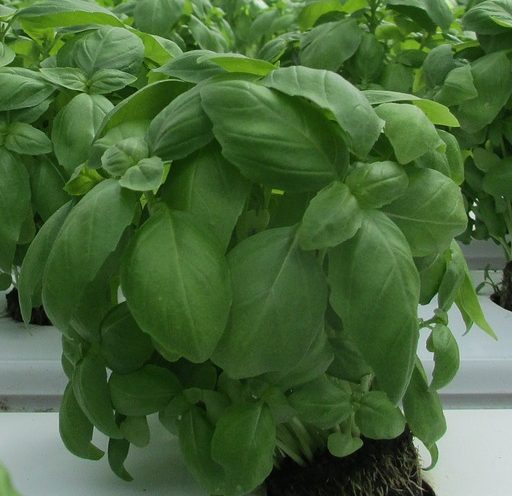
A full basil plant.
Herb gardens enjoying your expert care will reward you with copious amounts of foliage for the kitchen. There’s no point at which you must begin harvesting. Just pick the herbs fresh when you need them.
There are, however, a few reasons for not waiting until the end of the season for harvesting the bulk of your herbs:
- Some herbs attain larger proportions early on, impacting the survival of their more diminutive neighbors.
- As plants develop more foliage, they dry the soil at a faster rate. This could become troublesome for small herb gardens in summer.
- Here in North Carolina, hardy herbs grow exuberantly from late winter through early summer. Spider mites and insects, such as thrips and aphids, cause foliage to deteriorate during our stressful summers. The leaves can become spotted or scarred, and mildew can further reduce their desirability.
The next step is to reduce the amount of foliage, harvesting the herbs in their prime. Most herbs will grow back later for more fresh clippings.
Let’s take a full thyme plant, for example. It’s in a 6″ rose pot and has grown huge. So, what do we do next?
It’s Thyme For Drying
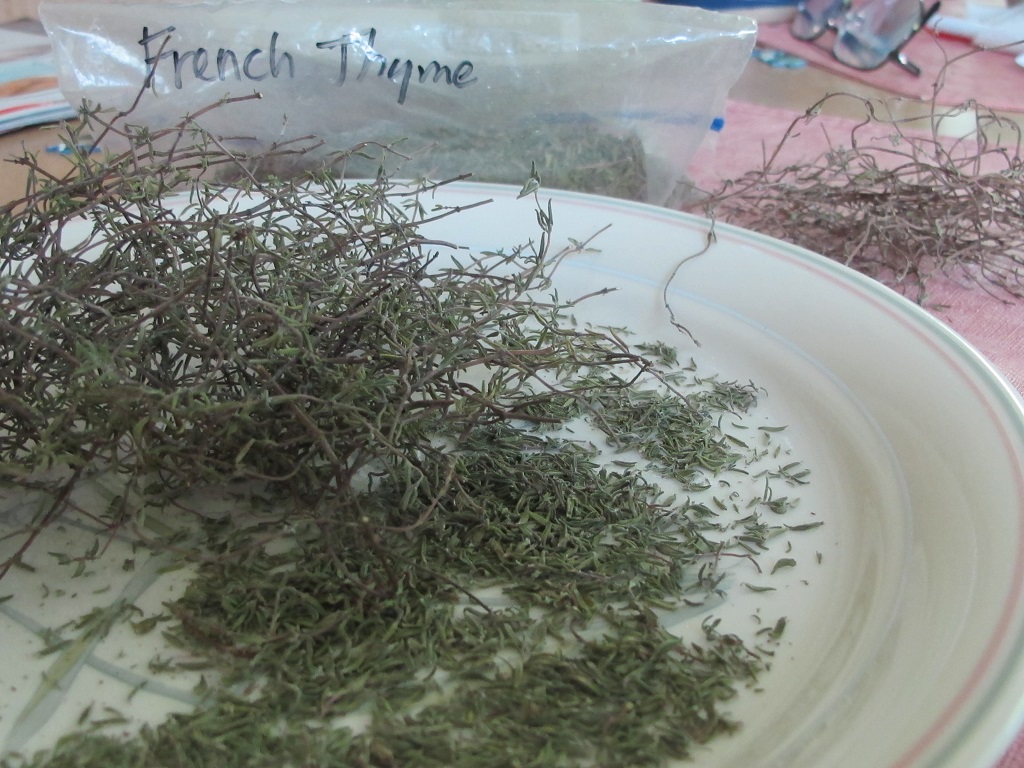
Separating dried thyme leaves from stems.
- Assuming the foliage is healthy and not hiding insects, cut the thyme down to 2″ or 3″. Gather all the stems in one hand, and, with the other, snip it right through the clump.
- Rinse the clippings and shake out the excess water.
- Remove yellow leaves and leafless stems to the compost pile, the fire pit, or the grill.
- Lay the leafy stems on a cookie rack or a platter lined with paper towels. Spread out the stems to dry them faster.
- Place them where the air is warm and dry, but not in sun. In a week or two, the stems and leaves will become crispy dry. Some herbs take longer to dry, and it helps to turn the stems over every few days.
Now That They’re Dry
- Don’t pulverize or chop dried herbs. This exposes more cut surfaces to the air, wasting flavor. Store the leaves whole to retain full flavor and crush them when they’re needed for cooking.
- You can temporarily store the twigs with their leaves in a plastic bag. When you need thyme, simply squeeze the bag and gather leaves that fall to the bottom. (Glass jars are more satisfactory for longer term storage, as plastic is semi-permeable.)
- Strip dry leaves off the stems and store them in a jar, in the dark. It might be easier to hold the tip of the stem while you strip leaves off toward the base. This can take some…time.
- Label the jar with the name of the herb and the date: “French thyme, June 14, 2020”.
Which Herbs Dry Well?
Many herbs retain good flavor when dried, including bay, dill, French tarragon, marjoram, oregano, rosemary, sage, savory, stevia, Thai basil, and thyme. When cooking with them, use smaller measurements of dried herbs compared to their fresh counterparts. One teaspoon of dried oregano, for example, is equivalent to 2 or 3 teaspoons of the fresh herb.
I add bay leaves early in the cooking process, at the beginning of making the soup or sauce. Woody herbs (thyme, sage, and rosemary) are added about 10 or 15 minutes before finishing, and the soft, leafy herbs (basil, parsley) are added 5 minutes before the end of the process. Herbs cooked for a long time, other than bay, lose their volatile oils and, therefore, much of their flavor.
Herbs that have better flavor used fresh include arugula, basil, bronze fennel, chervil, chives, cilantro, mint, Par-cel, parsley, and sorrel.
Growing a wide variety of herbs for picking fresh is my first choice. My second choice is dried herbs that grew in my own garden.
Drying Basil
Dry basil leaves in a single-layer thickness. Their leaves can mat together, slowing the drying process. Keeping foliage attached to the stems for a while helps air flow through the leaves, drying them evenly. Turn the stems over now and then.
Once the leaves wither and curl, I pull them off the stems and return them to the platter to finish drying. Thai basil ‘Siam Queen’, great with salmon, retains good flavor when dried. I grow sweet basils for fresh cutting all year, but always dry a small amount just in case.
You could also gather a few stems with a rubber band and hang them in a warm place until crispy dry (photo, below). Remove the leaves and place them in labeled jars before they collect dust.
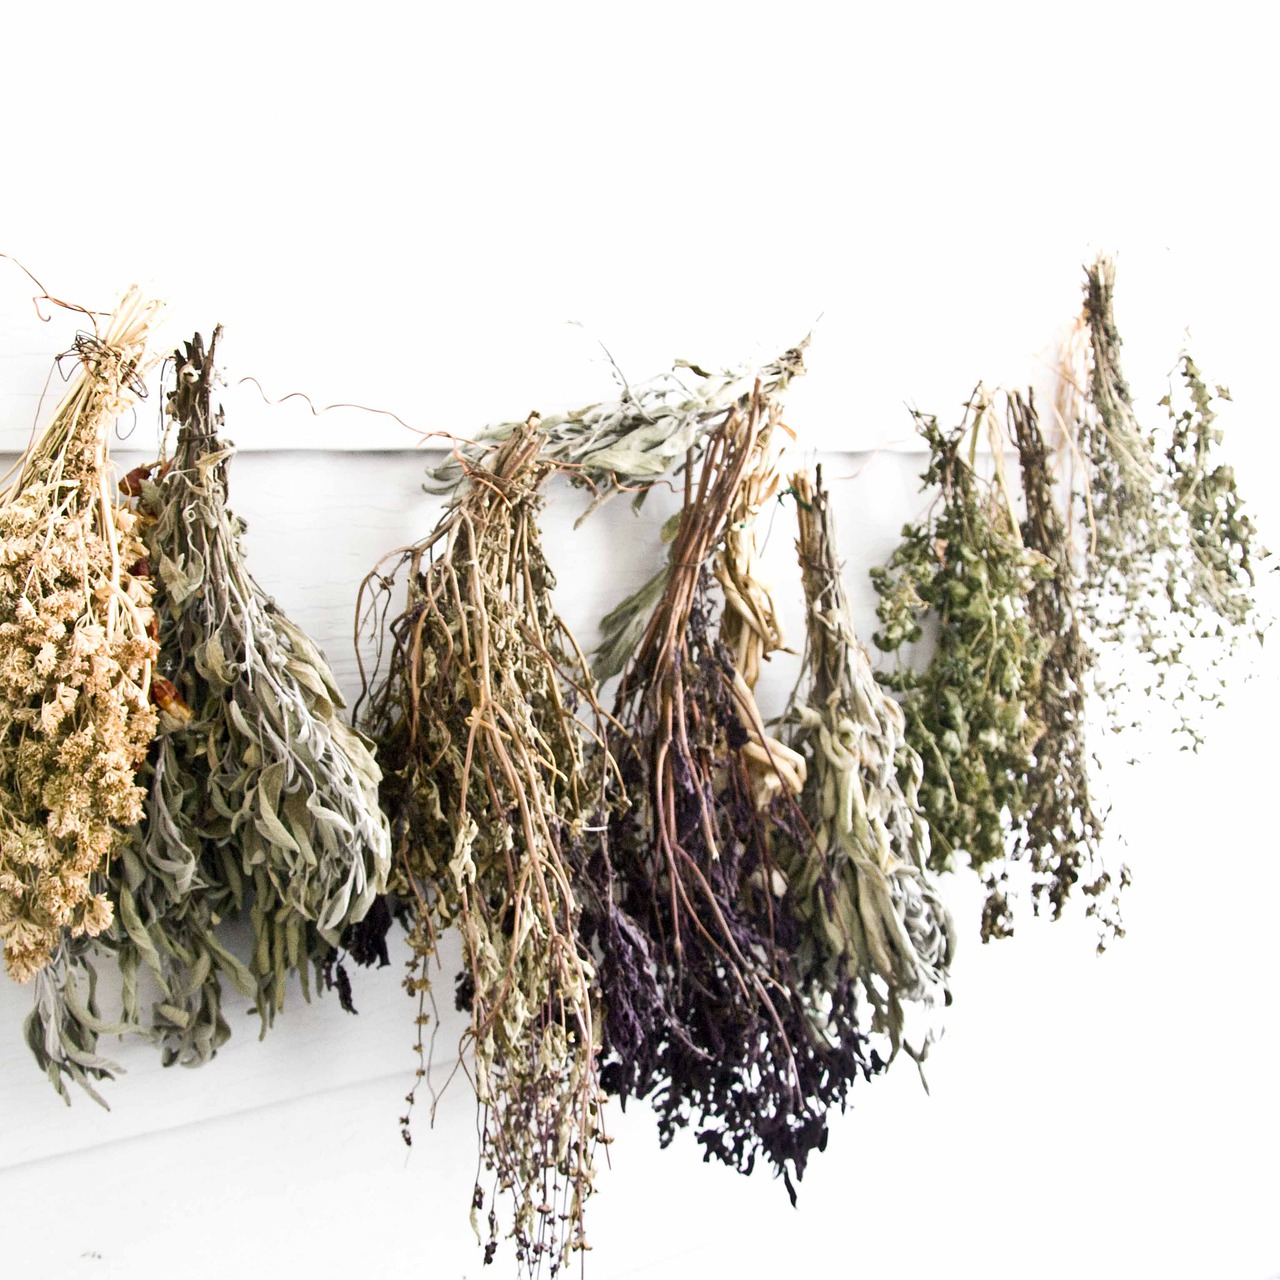
Drying herbs.
In Storage
If any moisture remains in the leaves, your herbs will mold in storage and should be discarded. Condensation on the inside of the jar (easily visible when the closed jar is slightly chilled) indicates the presence of moisture. If it’s only a day or two since noticing the condensation, remove the herb and dry it for another few days or a week. I prefer air drying instead of microwaving or using a slow oven.
Rarely, insect eggs hiding in the leaves hatch inside the jar. Look for fine webbing that’s gathering a few leaves together and remove the clump. I occasionally briefly place drying herbs in a slightly warm oven, hoping that’s enough to kill insect eggs, but never hot enough to cook the foliage.
Once a new batch of dried herbs is ready, I discard the old one outside under the shrubs or into the compost.
Renovating Herb Gardens
Adding Or Subtracting

Imagine a clay window box measuring 17″ long and 8″ wide. The back of the box is planted with, left to right, parsley, rosemary, and cilantro. In the front, oregano and thyme cascade over the edge. The 5 herbs form a pattern shaped like the letter “W”. The middle 3 are perennials, which you want to keep.
At some point in the growing season, one or a few herbs in your herb garden will begin to decline. But that’s expected of the annuals and biennials. Parsley and cilantro that have started flowering are essentially done (no, they won’t come back). Pick the remaining deep green leaves and make a batch of salsa and freeze the parsley leaflets. Don’t save pale green or “buggy” leaves.
Remove and Replace
Remove the tired herbs using an old knife to carve out a core around the base of the plants. Cut all the way to the bottom of the pot, if possible. In deeper pots, cut down several inches, and then carefully use a trowel to dig them out. Simple!
The oregano, rosemary, and thyme still look okay, although they’ve grown large. Cut them back and dry the good leaves according to the process described in the previous section. Don’t cut rosemary back too far; it doesn’t have dormant buds in old woody stems.
Before you move the herb garden to its winter location, fill the holes with potting soil. You might choose to add a couple of young herbs and move the pot to the new sunroom.
Keeping the Pot Outside
If you want to keep the remaining hardy herbs in the pot outdoors, find a sunny spot out of strong wind. In cold climates, maybe they’ll fit in a sunny window in the garage or a shed. You could overwinter them in a cold frame or heel the pots into the soil under a covered low tunnel. Plants that retain foliage in winter need direct sunlight. Where winters aren’t severe, you’ll be able to pick many kinds of evergreen or semi-evergreen herbs.
They won’t grow much, if at all, in the winter, but they’ll start growing again in early spring. Although the soil dries slowly in the cold, you should check them periodically and water when necessary.
Propagating Herbs
Division
Most types of herbs that have grown too crowded in their pots can be rejuvenated through division. Herbs with many stems coming from the soil can be propagated this way.

Dividing a clump of chives.
Chives, a herbaceous perennial, is probably the easiest plant to divide. After 2 or 3 years in a pot, those little bulbs in the soil might become so crowded that the plant refuses to grow another season. You might need a new pot of chives if it hasn’t sprouted by mid spring.
Chamomile, lemon balm, marjoram, mint, oregano, thyme, and winter savory also can be divided. A good time to divide hardy herbs is late winter, before or as new growth begins, although mint and chives can be divided just about any time.
Cut off old foliage and remove the plant from its pot. Now, carefully use an old knife to slice down through the middle of the clump, so each part has some roots attached to the crown. Set the division into a fresh pot of soil, and water it in. The pot should be on the small side, perhaps 4″ wide. Don’t bury the crown deeper than it was growing before.
If the weather outdoors is less than springlike, place the new divisions in a cold frame or in a cool, sunny window indoors while they adjust.
Air Layering
Plants creeping along the surface of the soil often take root when a stem touches the soil. Take a smaller division by separating the rooted stem from the parent plant. If the young part is more leafy than the damaged roots can supply with water, cut off half the foliage to ease the burden.
When transplanting, don’t plant the root ball deeply into the soil, and use a small pot. Large pots dry out slowly and that wet soil can rot the roots.
If it’s cold outside, place the pots in a cold frame or in a cool, bright window indoors until they’ve recovered.
Seeds
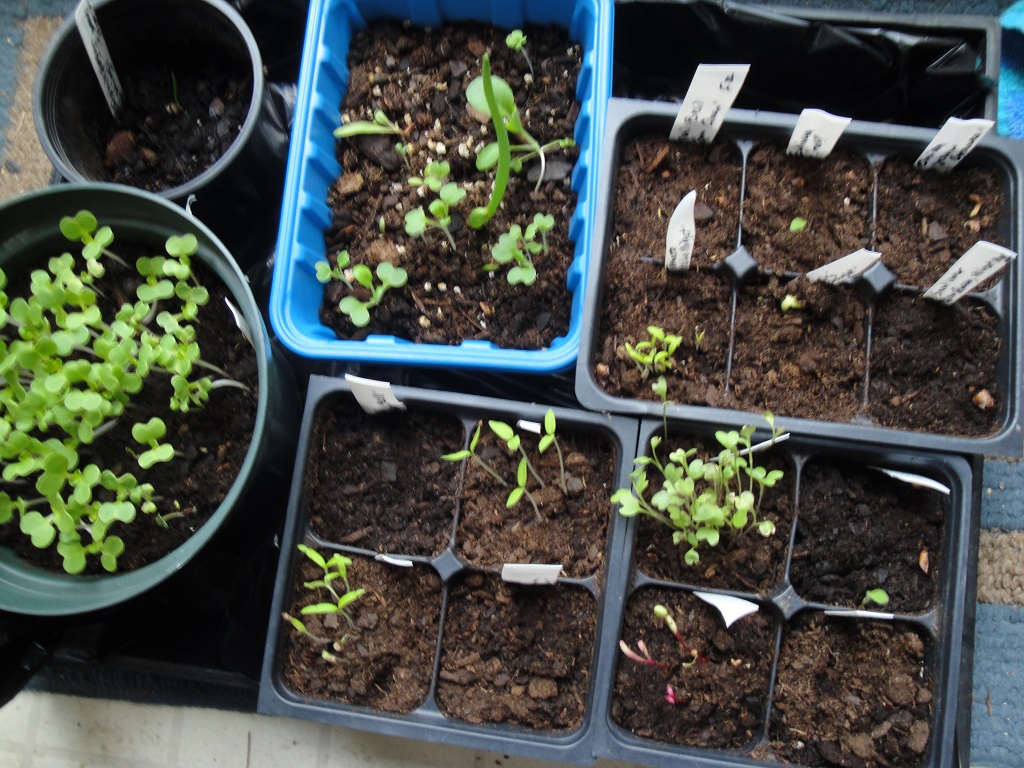
Cleaned and reused cell packs for seedlings.
Most herbs can be grown from seeds, and suppliers stock many varieties that aren’t offered locally. Look online, in print catalogs, and in garden centers for basil, chervil, chives, cilantro, cutting celery, dill, parsley, savory, and most other herbs commonly used in the kitchen.
Follow instructions on the seed packet to the letter. Tiny seedlings are susceptible to damping off and other fungal diseases, so you’ll need clean materials and adequate growing conditions. Basil, in particular, requires very warm temperatures.
If your windows aren’t sunny enough, or if the weather has not warmed up, I highly recommend artificial lights. Under 4′ long 2-tube shop lights, you can grow just about anything. Place the pots only a few inches below the tubes and keep them on for 16 to 18 hours per day. Plants propagated by other means also can be grown under the lights.
Cuttings
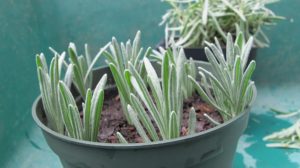
Lavender cuttings.
Test your horticultural skills by propagating cuttings from lavender, thyme, rosemary, tarragon, sage, and others. Use rather small cuttings, only 2″ or 3″ long. Propagating them outdoors in higher humidity will prove to be more successful.
This is accomplished from mid-spring through summer, using semi-hardwood cuttings from shrubby types of herbs. Remember to allow enough time for the cuttings to root and to become established before chilly autumn weather returns.
Consider propagating herbs to rejuvenate the herb gardens before the plants grow old and woody. Any extras make wonderful gifts or donate them to your local school or senior center.
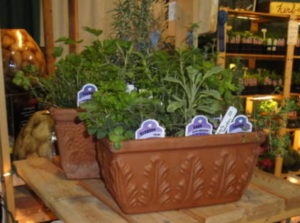
Herb gardens, Maryland Home and Garden Show.
Concluding
When it’s time for spring projects, see if your herb gardens need to be entirely replanted or just tweaked a bit here and there. Either way, it’s wonderful to be out in the sunshine again, listening to the birds and dreaming about the tomatoes you’ll soon be planting in the garden…and all those flavorful herbs that will pair with them just perfectly. Enjoy!
Headings:
Page 1: The Gift That Keeps On Giving, Choosing the Right Containers for Herb Gardens (Style and Size, Window Boxes, Long Toms, Plain Pots, Pot Color), Choosing the Right Plants for Herb Gardens (A Proper Fit, Seeds and Transplants, What’s the Difference Between Herbs and Spices?)
Page 2: Which Herbs Are Annuals? Biennials? Perennials?
Page 3: Herb Gardens Close To the Kitchen, Combination Pots, Potting Up Herb Gardens, How To Maintain Herb Gardens (Light, Natural Sunlight, Artificial Light)
Page 4: Tips For Watering Herb Gardens (Transpiration, Why Plants Wilt, Testing for Moisture, From Season To Season, Water Temperature), Fertilizing Herb Gardens (Organic or Synthetic?, Macronutrients and Micronutrients, How Often To Fertilize Herbs, When We Don’t Fertilize, The Taste Test), Temperature (As Temperatures Change)
Page 5: Common Pests (Better Options To Eradicate Pests, Bacillus Thuringiensis, Horticultural Oil, Organic Sluggo, Plain Water), Girth Control (It’s Thyme For Drying, Which Herbs Dry Well?), Renovating Herb Gardens (Propagating Herbs)