Page 2
Enclosing the Porch: Second, Wrapping It Up
Because I intend to reuse the plastic a few times, attaching the 3 plastic sections to their own 1 x 2″ posts seemed feasible. Then I could simply unscrew the panels and store them for the summer. That should cause less wear and tear on the plastic. I’ll label the sections for easy identification.
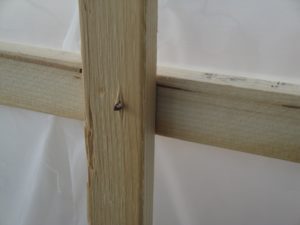
All the vertical supports are on the inside of the porch and all horizontals were screwed to the verticals from the outside. This will create a better seal when I install the plastic panels.
The sharp ends of the deck screws protrude into the interior of the porch. Not a problem.
The West Side
Starting on the west side, I needed 8′ of plastic plus another 18″. That extra length accommodated a windproof seal against the house and the slightly longer dimension at the bottom to wrap around the corner. It also provided material to join the west side with the south side.
After tightly wrapping the top edge of plastic 2 or 3 times around the 8′ post, I used a staple gun every 3″ to secure the plastic.
Back on the ladder, I screwed the wrapped post as close as possible to the top of the post next to the house. Propping up the far end on a 2 x 2″ x 8′ post at the corner timber helped stabilize this awkward thing. Also, draping the bottom half of the plastic sheet on the middle post made it easier to secure the top. Then I could screw this horizontal piece to the top horizontal support member in a few places, working from the outside.
Next, holding the bottom of the plastic firmly in place, I attached the plastic to the existing middle horizontal post with another 1 x 2, preventing the plastic from flapping around in the wind. I weighed part of it down but let the air pass through and waited for calmer conditions before adding the bottom horizontal post on the west side.

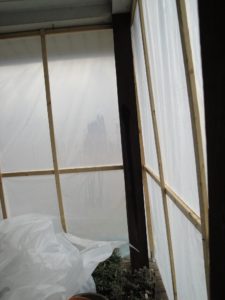
East side of the porch. A warm microclimate surrounds the base of the structure.
The East and South Sides
Same procedure for the east side, using two 2 x 2 x 8 props. But this time I stapled one long piece of plastic to two lengths of 1 x 2″ posts—8′ for the east side (photo, above), another 8′ around the corner for part of the south side, and 2′ more for the ends and the gap. I left a gap of a few inches where there was no post inside so the panel could turn the corner.
I could have worked in smaller sections, but fewer edges of plastic sheeting admit less air infiltration. Not easy, no. But it worked. Again, I draped the bottom half of the plastic panel on the existing horizontals (taking some of the weight) to make it less cumbersome while fastening the top horizontal post.
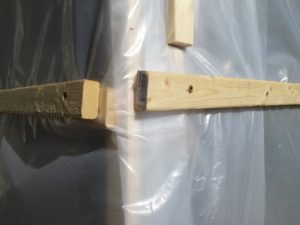
Then I attached middle and bottom horizontal posts, sandwiching the plastic in between. With smaller pieces of 1 x 2’s, excess plastic was folded and secured to the corner timbers (vertical piece in photo, below). Not so pretty, but it’ll do. (Enclosing the porch like this would not be acceptable in most communities. So glad to be out here in the country.)
How?
Family and friends have reminded me that I tend to be stubborn. If I had a motto when doing battle with a difficult task, it would be, “It’s not if I can do it, but how I will do it.”

Clips secure the opening on the south side until I come up with a better plan for a door.
I was able to complete enclosing the porch on my own, except for the last day. The one remaining panel was another 14′ of plastic stapled to 2 pieces of 1 x 2’s for the other part of the south side. James from across the street very kindly offered to hold it up while I secured it. By then, my right rotator cuff was very upset with me, and could barely lift the drill. (Thank you, James!)
Once the top had been secured, it was easy enough to finally finish adding the last horizontal posts across the middle and the bottom.
Soon, I’ll devise some sort of a door. For now, the left and right sides of the south face overlap 2′. The left end of the plastic overlaps the right side, preventing prevailing west winds from blowing into the space. Four or five strong clips hold the plastic after rolling the edges together. That eliminates most air from entering. Lettuce planters weigh down the flange of plastic on the step.
A piece of quarter-round molding slides into place on the horizontals and behind the verticals. This supports the door’s plastic in high winds.
Even though there are few visitors or packages expected, I might need easier access. All in all, the door hasn’t been that difficult. (The back door is getting used more often.)
Warming Up to This
With home heating costs on the rise, another reason for enclosing the porch was the heat gain for the house. I’ve been opening the front door on sunny days to admit the warmth.
A window fan in the front bedroom blows comparatively cool house air out to the porch while it moves hot air indoors to the living room. Closing the door separating the two rooms forces a circular pattern of air flow through most of the house, and—bingo—lower electric bills! The furnace doesn’t come on until early evening (on a really cold day) or close to dawn when it’s above freezing and calm outside.
After completing the project, the afternoon sun heated the space to 94°F! Admittedly, it wasn’t cold outside—maybe 58 or 60°—but to see how quickly the temperature rose was gratifying. Subsequent days were not as warm, yet the porch heated up into the 90’s. The house thermostat registered temperatures up to the middle 70’s from a low of 60°.
I saved many empty milk jugs to fill with water for passive heat storage. Painting them black will work better, but that’s an experiment for later.
Enclosing the Porch: A Winter Retreat for Succulents

Flats of succulents sitting on 2 x 2’s, with miniature Christmas lights underneath.
The succulents are enjoying blissfully warm sunny days on the porch. They don’t mind cooler nights as long as they don’t approach freezing.
Flats of plants sit on parallel pairs of 2 x 2″ x 8′ posts. The gap provides space for strings of miniature incandescent Christmas lights running under the plants. For decades, I’ve used Christmas lights to provide gentle warmth for plants growing outdoors. Indoor/outdoor lights and extension cords prevent mishaps. They can tolerate some moisture.
Sheets of clear plastic cover the plants, just a few inches over their tops and flattened to the deck on the edges. This plastic bubble traps warmth as it rises from the lights. Avoid placing the bubble too high, which necessitates heating a greater volume of air.
During the coldest weather, old sheets and blankets over the 2 bubbles add extra insulation. An easy option is to place another string of lights over the plants, temporarily, during the coldest weather.
There are no electrical outlets on the exterior of the house. An adapter added to the porch light accepts 2 extension cords, which feed power to the lights on both sides of the front door. The lights stay on all night. Once the morning sun has warmed the porch, I turn off the lights and pull back the plastic. On colder overcast days, I’ll keep the lights on, for warmth, and the clear plastic over the plants.
An Arctic Blast, and I Don’t Mean Fun Times with Santa
***Update***: This section added December 24, 2022.
Three-fourths of the United States has been in the grip of bitterly cold weather this past week. To make matters worse, high winds are creating once-in-a-generation wind chill readings, challenging our home heating systems and our comfort. Thursday morning, Elk Peak, Montana registered the lowest wind-chill temperature in the lower 48 states at -50°F.
Gardeners check weather forecasts every day. I decided to bring all the tender plants indoors after hearing the temperature would fall to 5-7° (actual: 4°) with a wind-chill factor at 0°. They would have survived normal temperatures with extra warmth from Christmas lights, but high winds and extremely low temperatures proved a risk too great to bear.
The cold front brought wind gusts of 50 mph, and the temperature dropped all through Friday, the 23rd. I expected damage to the greens growing in the gardens but covering them with plastic might keep them alive. Then I picked all the broccoli, which had frozen solidly in the 15 minutes I’d spent outside. Their stiff leaves shattered like broken glass with the lightest touch. Once the loosely secured plastic had blown off the ‘Sugar Snap’ peas in the garden, it was all over for them—gone in minutes.

Two mixed lettuce planters (18 x 7.5″) in January 2023.
Blown Away Or Not?
Fortunately, the porch enclosure remained intact. After bringing in all the tender plants, I moved the potted greens (lettuce [photo, above], brassicas, green onions, half-hardy herbs) to the porch, covered them, and turned on the mini lights. Although these plants are hardy, they do have limits, particularly because they’re in pots. Their roots are not surrounded by large volumes of soil, which help insulate them from severe cold.
This morning, just before dawn, the porch plastic was coated in ice. Most of the greens were frosted, and the small pots were frozen solid, but they’ll recover. When the sun warms the porch…no problem.
Then the power went out… no lights… right around dawn, after plugging in the Christmas tree. Thank goodness my dear succulents, bay laurel, and other tender plants were indoors. I had turned the thermostat a bit higher for the night—to 63°—“just in case”.
The power was restored around 9:30 a.m. (Cause: rolling blackouts, courtesy of our power company, to avoid a potentially worse blackout.) A few hours after dawn, at 15° and wind gusts at 10-15 mph, the sun has warmed the enclosed porch to 80°. All is right with the world.
Why Not LED’s?
The lights must be incandescents because LED’s don’t generate enough warmth. Each 100-bulb string of incandescent mini lights gives off warmth approximately equivalent to a 40-watt light bulb. You could use heat mats and heat cables, but at a much higher cost per square foot.
Two or three strings of lights run under each of 2 sections next to the house. At the margins of heated space, it’s colder at night; this is where the hardier leopard lilies and arugula seedlings will go. I’ll adjust the number of lights for the more tender succulents as the weather grows colder. In late January, average temperatures will begin their upward climb.
If you try this, don’t use strings with burned-out lights as they often have hot spots that could cause trouble. Be careful not to crush the bulbs; one bulb not functioning can cause part of or the entire string to go out. Keep replacement bulbs handy. These miniature incandescent lights are inexpensive, but they might not last more than 1-3 years.
Wash hands after handling these lights; there might be lead in the wiring.
Enclosing the Porch for Edible Plants
Not letting the colder edges outside the bubble remain empty, I’ve placed potted peas, sustainable bunching onions, lavender seedlings, lettuce, and other cool season greens there. The ‘Sugar Snap’ peas in gallon pots are in flower and setting pods—smaller than normal, but delicious!
As it gets colder outside (below the mid-20’s), I’ll move the unsold pots of lettuces and mixed brassicas to the edge of the porch. If the temperature rises too high, opening the “door” will cool it down.
Leeks, dinosaur kale, Swiss chard, and pansy ‘Frizzle Sizzle’ have done well planted in front of the south side of the porch, a lovely warm microclimate. Wind speed is moderated, and the plastic reflects sunlight and warmth to these small gardens. I use the exterior space surrounding the enclosed porch for pots of unplanted shrubs and perennials that need several degrees of protection. A layer of oak leaves over those flats protects them even more.
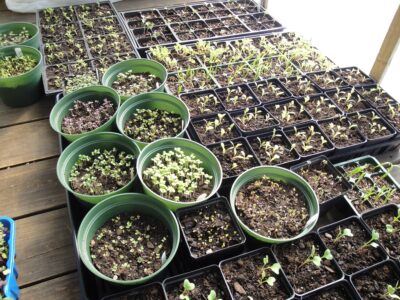
Transplants and new seedlings of brassicas and lettuce.
(***Update***: Now that I’m participating in a few farmers’ markets, flats of plants line up in the front of the enclosed porch. Young seedlings tolerate cool conditions—40-45°— and stay on the covered porch (photo, above) for a couple of days before moving them outdoors. Then, another series of transplants will replace them. I covered flats in the holding area outdoors with plastic to protect plants from a hard freeze, although, when a week older, they can be exposed to normal temperatures. 3/13/2024)
Potted Herbs and Tender Plants
Potted bay laurel and ‘Compactum’ marjoram are zone 8 plants and not likely to survive in this climate if left outdoors. Enclosing the porch gives them a safer place to overwinter.
Other herbs that normally die down for the winter can stay green and produce cuts for the kitchen. Those include Italian oregano, chives, and mint. Parsley, sage, and thyme will retain higher quality foliage, and begin growing earlier after winter passes. Even the dill hung in there for a while. Keeping stock plants in the porch ensures there will be something to propagate for spring sales.

Sweet pepper ‘Aura’.
The more tender edibles and houseplants, including basil, sweet peppers, calathea, bromeliads, and ficus, go out to the porch during the daytime. They’ll come back inside for the night. The peppers have ripening fruits and new flowers opening, which I pollinate by hand (simply tickle or tap the open flowers).
There’s an avocado dug from the garden after it had sprouted from a discarded pit. A terra cotta colored petunia, a ‘Profusion’ zinnia in bloom, a variegated English ivy… Tinantia pringlei, golden creeping jenny, clay and ceramic pots that might crack in the freezing cold…
Enclosing the Porch for Me, Too!
I put the wicker chair back out on the porch. This is the perfect place to enjoy a cup of hot chocolate and laptop news on a cold sunny day.
Have a wonderful holiday season. Or simply enjoy what Nature has to offer. Thanks for visiting!

Headings
Page 1: Enclosing the Porch for the Winter (Average Temperatures, Priority: Plants, The Best Option), Preliminary Plans, Enclosing the Porch: First, The Support System (Brace Yourselves, Next Up: The Vertical Posts, On the South Face)
Page 2: Enclosing the Porch: Second, Wrapping It Up (The West Side, The East and South Sides, How?), Warming Up to This, Enclosing the Porch: A Winter Retreat for Succulents (An Arctic Blast, and I Don’t Mean Fun Times with Santa, Blown Away Or Not?, Why Not LED’s?, Enclosing the Porch for Edible Plants, Potted Herbs and Tender Plants, Enclosing the Porch for Me, Too!)