2022
Updated 12/15/2025
Enclosing the Porch for Growing Plants in Winter
Average Temperatures
Winter weather is in a rush to make its presence known here in northern North Carolina. Average nighttime low temperatures in October are in the 50’s F, falling to the 40’s by the end of the month. In 2022, though, many nights were frosty. In this article, I’ll describe how enclosing the porch can add more growing space for sun-loving tender plants—those killed by freezing temperatures.
I moved to this beautiful acre outside Elkin NC in USDA plant hardiness zone 7b, in October 2021. The average lowest extreme temperatures in winter are 5-10° F, with January the coldest month. But that won’t stop most gardeners from finding ways to extend the growing season, and, in fact, encourages us to do so.
Abnormally cold weather prompted me to gather all plants that would have been damaged or killed by frost. Both daytime and nighttime temperatures have fallen 10-20° below average on many days in October and November. On the other hand, we’ve also enjoyed a few shorts-and-tee-shirt days hovering well above average.
Priority: Plants
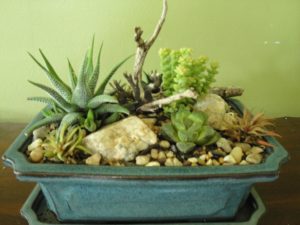
Succulents in this dish garden can begin stretching toward the light after less than a week in insufficient sunlight.
Priority went to succulents and tropical plants intolerant of cooling temperatures. Some I’ve had for decades and don’t want to lose. A collection that started in spring as 12 flats of tender plants blossomed to 40 flats by autumn. You see my problem?
Miniature succulents, succulent gardens in bonsai trays (photo, above), bromeliads, aroids (Alocasia, pothos, philodendron), amaryllis, leopard lilies (Drimiopsis, Ledebouria), tradescantias, ferns, ficus, begonias… I propagated all these houseplants for the Surry County farmers’ markets, where I’ve been a vendor (“Wellspring Gardens”) since April 2022.
Plants requiring warm temperatures fill every sunny window indoors. In the basement, more plants snuggle close to the 4′ fluorescent shop lights.
From autumn to spring, I carried many flats of houseplants outdoors to the sunny porch when it was warm enough, above 50° or 60°F. And later in the day, I brought them back indoors again. Almost every day. That first winter here, in ’21-’22, was quite mild.
That’s in addition to the dozens of flats of herbs and cool season greens (lettuce, spinach, arugula, broccoli, kale, etc.) started for the farmers’ markets and my own gardens. After 3-4 weeks of growth, they could safely be hardened off outdoors, exposed to colder temperatures—even frost—before planting or selling them.
The Best Option
I need an easier way to accommodate all these plants. The greenhouse kit I purchased remains in its box, in the back yard (will be built “soon”). Another option is to keep the plants in the porch, after enclosing it. In winter, this south-southwest-facing porch receives full sun from morning until sunset. Perfect!
How hard could it be to tack a big sheet of clear plastic to the structure? That will work in the daytime, when the sun’s out. But during cold overcast weather and at night, supplemental heat will be needed. Later in this article, you’ll see what I did to keep the tender plants comfortable.
Preliminary Plans
The goal was to create an inexpensive makeshift greenhouse environment from readily available materials, employing rudimentary carpentry skills. Winter winds, primarily from the west, can be fierce at times. This necessitated strong bracing for the structure to prevent the plastic from breaking loose.
At the hardware store, I bought a 12 x 100′ roll of clear 4-mil plastic for enclosing the porch and creating low tunnels in the garden for winter greens. You can find sheets and rolls of clear plastic in the paint department. Although it won’t last as long as greenhouse film, it is less expensive. A more attractive alternative is clear acrylic film or sheets—or real windows—but I’m looking for the most economical solution for now.
Plastic degrades in sunlight, and faster in hot sunlight. So, if used on the porch only during the cold months, it should last a few years. That’s based on many years’ experience using plastic to protect plants from cold winter weather.
The plan is to leave the wooden support grid in place all year. After weather warms up in spring, I’ll remove the plastic panels, still stapled to their 1 x 2″ x 8′ posts, clean them, and store them in the basement. In the future, enclosing the porch in permanent materials (floor-to-ceiling operable windows) is a strong possibility.
***Updates***:
***Plastic used in the garden lasts longer than the plastic used to enclose the porch. After 2 full seasons, the porch plastic is showing signs of weakening in the hottest spots because the enclosed space heats up significantly, shortening the life of the plastic. If I don’t vent the plastic or open the front door and use a fan to blow the heat into the house, the porch heats up to 90-105° F on a sunny winter day. The air under plastic in the garden doesn’t get that hot because the plastic is removed or vented to prevent overheating the greens. 1/14/2024
***Recently, I bought a large roll of 6-mil greenhouse film on sale. It should last 3-4 years, and there’s plenty to cover other structures (in the planning stage). I used the staple gun and 1″ x 2″ x 8′ posts for the new plastic. Because this product is clearer than the hardware store’s plastic, it transfers more of the sun’s energy to the inside of the porch…so it gets hotter in the sun. That’s probably okay in the dead of winter when it gets very cold, but in autumn, some plants showed a bit of sunscald. If it stays unusually warm over the next month as it did in October, I’ll tack up another layer of plastic on the inside to filter the sun. 11/5/2024
***I added another layer of greenhouse film inside the existing layer, anticipating a very cold week in December 2024. I used small pieces of styrofoam stuck on the protruding screws to keep the layers separated. Simply stapled to the posts, this kept the porch significantly warmer on cold nights (10-18° warmer than outside temperatures). It also filtered some of the sun’s energy, so temperatures are more moderate on sunny days. We’ve had a few bouts of unusually prolonged cold, windy weather, so it was worth the effort. 12/2024
Enclosing the Porch: First, the Support System
Before cutting the plastic, I had to figure out how to put this whole thing together, preferably without piercing the aluminum siding. Where to start? How to seal it from drafts? What about a door?
The front porch measures approximately 20′ x 8′, so the 1 x 2″ x 8′ wood posts from the hardware store fit well. I used a hand saw for a few cuts. Posts with large knots, not visible when purchased in bundles, were returned to the store. Those are weak spots that could break in high winds. These posts have a smoother side—the side in contact with the plastic.
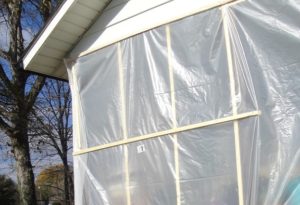
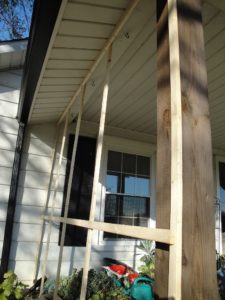
6 x 6″ timbers with 1 x 2″ x 8′ posts across the front of the porch.
Four 6 x 6″ timbers support the roof along the front edge of the porch, and the attic above is insulated. The timbers are secured 3″ inside the outer edge of the decking. Because the 1 x 2’s are attached at the top of the timbers and extend 8′ down, past the edge of the decking, the posts are slightly off vertical when viewed from the side.
I didn’t attach plastic directly to the bottom of the timbers because I wanted it to fall all the way to the ground on the 3 sides. That would help warm up the concrete block foundation and the ground underneath the decking. The goal was to retain the maximum amount of heat in the enclosed porch.
The porch is elevated 2 steps up from the ground. That made my time on the ladder somewhat less daunting (bad knee). I took my time and was very careful. Safety first.
Brace Yourselves
Hardware included:
- Hillman Red Exterior 8 x 1 5/8″ deck screws, with a special drill bit in the package
- 3″ galvanized corner braces with smaller screws
- a few nails
- plenty of 3/8″ heavy duty staples for the staple gun; they’re cheap, so buy an extra box
Although the deck screws are supposed to require “no pre-drilling”, a few of the 1 x 2’s split. I used a couple of nails to hold them together.
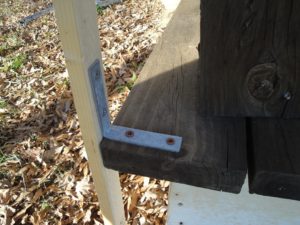
Brace was placed with the front edge of the post flush with the front edge of the floor.
Holding a 1 x 2 post firmly against the house and the edge of the floor, I positioned a brace, then marked where the first screw would go. The west and east sides would have five 1 x 2’s each.
I used a reversible drill to screw braces to the floor. For each of the east and west sides, one brace went next to the house, one on the outside corner, and one in the middle. The other 2 posts on each side were screwed to the edge of the decking without braces.
I used 2 longer deck screws—instead of the smaller screws in the package—for the horizontal half of the brace attached to the floor. This made a stronger attachment. Because the long screws would have gone through the 1 x 2’s and pierced the plastic, I used shorter screws on the vertical part of the brace (photo, above).
Next Up: The Vertical Posts
Once the braces had been secured on the west and east sides, the vertical 1 x 2″ posts were next. I attached five 1 x 2″ posts to the decking—about every 2′—on the west side and 5 more on the east side. Each post was screwed on at the bottom securely enough for it to stand straight. A carpenter’s level established true vertical and horizontal before I tightened any screws.
Then I fastened the middle horizontal post, and the top horizontal post as close to the ceiling (overhang) as possible. I can add more supports at any time, if necessary.
Where the ground level was higher near the house, I cut the posts so they stopped right above the soil. In other areas, the 8′ length doesn’t extend that close to the soil, but that’s okay. The excess plastic made a flange over the ground, on which I placed heavy pots and cinder blocks to block air infiltration. I haven’t trimmed any of the 12′ wide plastic, but I can play with that later. Incidentally, the flange helped keep the basement drier during a recent rainstorm. For now, it stays.
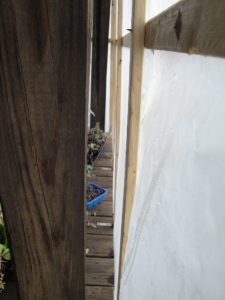
The west side with 5 vertical and 2 horizontal 1 x 2″ x 8′ posts.
The braces and posts were sturdy, but there was too much play in the sides. So, I drilled another 3″ brace inside each of the upper 2 corners adjacent to the house, through the siding in the ceiling and into the vertical 1 x 2 (photo, below). A wooden beam hides inside the ceiling. First, I hammered a nail through the aluminum, then replaced it with a deck screw, stabilizing the sides.
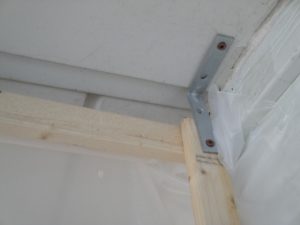
Brace secures vertical post to the ceiling, near house. Clear tape, barely visible on the right, seals plastic to siding.
On the South Face
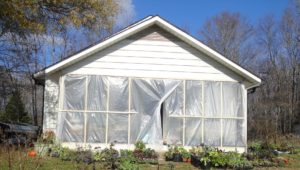
Posts: 1 2 3 4 door 5 6 7 8
Here’s the finished 20′ south face of the porch. Imagine the vertical posts are numbered, from #1 at the left (west) corner to #8 at the right corner, with a larger gap in the middle for the “door”. The numbers might not exactly correlate with the posts, but you get the idea. The door has not been finalized. Posts #1 and 8 were added previously to the corner timbers, when I worked on the east and west sides.
Across the front, I fastened braces to the floor and then added 2 middle posts on each side of the door (#2, 3, 6, 7). The other 2 new posts were fastened to the top of the central 6 x 6″ timbers (#4, 5), screwed directly to the edge of the decking. All 1 x 2″ x 8′ posts angled out slightly, below the edge of the floor.
Then the horizontal members went up: top and middle. Later, I had to remember to leave some extra plastic at the top of the outside corners to accommodate the slightly angled vertical posts (and longer dimension at the floor). Some of the posts were a bit bowed, so I’ll tape the gaps at the top from inside the porch.
At this point, all braces and support posts are in place. Progress!
Headings
Page 1: Enclosing the Porch for the Winter (Average Temperatures, Priority: Plants, The Best Option), Preliminary Plans, ***Updates***, Enclosing the Porch: First, The Support System (Brace Yourselves, Next Up: The Vertical Posts, On the South Face)
Page 2: Enclosing the Porch: Second, Wrapping It Up (The West Side, The East and South Sides, How?), Warming Up to This, Enclosing the Porch: A Winter Retreat for Succulents (An Arctic Blast, and I Don’t Mean Fun Times with Santa, Blown Away Or Not?, Why Not LED’s?, Enclosing the Porch for Edible Plants, Potted Herbs and Tender Plants, Enclosing the Porch for Me, Too!)