Page 2
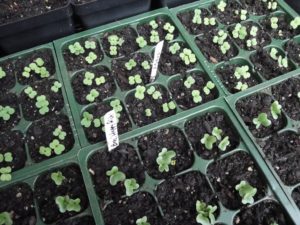
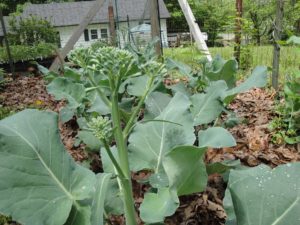
Miniature broccoli ‘Happy Rich’ and arugula ‘Astro’ getting an early start in late winter.
3. Timing is important for seedlings.
As gardeners, we live by the clock, by the calendar. Some swear by seeding and planting according to the phases of the moon. We watch how the seasons transition from one to the next. We anticipate those first blooms on the daffodils and daylilies, and the first ripe tomato and peach. And we listen for the “cheeps” of baby birds and the cicadas’ trill. Everything in nature occurs with respect to the calendar, to the seasons.
Starting seeds and harvesting their fruits follows a similar rhythm. So, we’ll begin by ordering seeds early—before the New Year, if possible. With tremendous Covid-generated interest in garden projects, some of the seed varieties I ordered early had already sold out.
Check the seed packet for information regarding the best time to start seeds indoors for spring crops. Some say 4, 6, or 8 weeks before the last spring frost. Others might indicate starting seeds indoors, but planting out in sufficiently warmed soil, 2 weeks after the last frost. Others should be directly seeded in a prepared garden. And here in NC, cool season greens and peas can be sown in the middle of winter! The seed packet also has instructions for depth of planting.
You might be wondering whether those days-to-harvest estimates pertain to seeds sown or to plants being transplanted into the garden. If crops are traditionally seeded directly into the garden (beans, peas, carrots, corn), harvest time is days from seeding. Plants often grown in cell packs for setting out at a few to several weeks of age (tomato, pepper, broccoli, zinnia) have a days-to-harvest (or days to bloom) estimate based on day of transplant. Those estimates are estimates, and the actual day of harvest will vary depending on weather and cultural conditions.
But don’t worry about not having plants ready for the garden on the first day the weather turns suitable. There’s time for them to catch up, especially in regions with long growing seasons.
The Fall Growing Season
For crops later in the season, find out when your first frost is expected to arrive in autumn, and schedule accordingly. There might be enough time for a second crop of warm season zucchini, basil, bush beans, or cucumbers. Count the number of days to harvest backward from the date of the first fall frost to see if there’s enough warm weather remaining. Those “days to harvest” indicate when the crop begins to bear fruit, so add a few weeks for a longer harvest season.
Always check with local forecasters to see how the weather is trending. When that first fall frost is imminent, prepare to cover tender plants with a tarp or sheets to prevent damage. Most years, fall weather is delightful for a few more weeks after the first frost. That gives the last crop additional time to ripen.
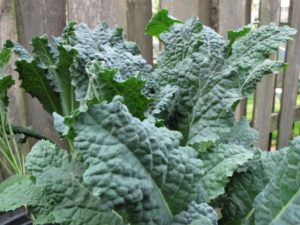
Dinosaur (‘Lacinato’ or ‘Toscano’) kale, one of the leafy brassicas.
If time is tight, think about crops that tolerate cool to cold weather. Parsley, cilantro, all the brassicas, lettuce, spinach, green onions, and pansies and violas for the flower gardens can be sown in late summer to early or mid-autumn.
Keeping Records
Recording data, successes, and failures in a journal will help determine next year’s schedule for starting seedlings. You might have discovered that sowing peas in late spring resulted in a very sparse crop (because they prefer cool weather) or that your kids need to plant pumpkins earlier in the season for their perfect jack-o’-lanterns.
You’ve learned to sow cilantro seeds every few weeks for a decent crop when you need it, and that this herb lasts longer in cool to cold weather.
The Cooperative Extension Service
Your local agricultural extension service (in the U.S.), affiliated with your state’s agricultural university, publishes a schedule of commonly grown crops and when to sow and transplant seedlings. Where I live, in North Carolina, the chart depicts 3 distinct climate regions in the state.
Contact your local office to find out how to take a soil sample. For a small fee, you can find out which nutrients your soil needs. Local agents can recommend plants for hummingbirds and pollinators. They can advise you on how to prune fruit trees or ornamentals in your garden. And they can diagnose disease and insect problems and help home gardeners and farmers with a wide range of topics.
Starting Seedlings Outdoors
If you don’t have sufficient artificial light or windows that get full sun, sow seeds in the garden at the recommended time. Certain crops do well when sown directly in the garden due to their rapid growth. Peas, beans, carrots, and sunflowers germinate readily when sown in prepared garden soil. Others can be directly sown in the garden, but require vigilance to avoid losses to insects, slugs, and erosion.
Alternatively, sow seeds in pots outdoors, in a protected location and in better light. This bypasses the damage caused by cutworms, hiding in the soil, and slugs, which decimate very young seedlings. Watch the plants carefully, and water often enough to prevent soil from drying out. Properly maintained, these plants grow vigorously and won’t require further hardening off. Plant them in the garden or in larger containers before they become potbound, so root growth is unchecked.
Don’t Start Seedlings Too Early
A common mistake is to start tomatoes and other fast-growing species too early indoors. Weeks before they can be planted outside and without greenhouse conditions, these plants might grow to a leggy 3′ tall! Tomatoes at 6-7 weeks of age are ready for transplanting to the garden, while cucumbers and squash in small pots are overgrown at that age.
…Or too late: May is too late to start seeds for broccoli or cabbage in the southeast. Instead, save those seeds for a late summer or autumn sowing. Gardeners in colder climates might be able to grow cool season crops all summer. I highly recommend printing one of those locally sourced seed starting charts and sticking it to the refrigerator.
Cool Season Crops
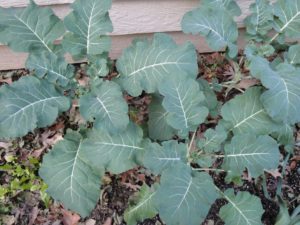
Broccoli ‘Arcadia’ in winter, growing in a warm microclimate against the house.
Learn about different main season crops and cool season crops. Once you feel comfortable in the garden, you’ll undoubtedly want to broaden your experience and try different species.
Many gardeners close down their gardens after the first frost kills tomatoes and basil. But consider some of the easy crops grown when it’s chilly or downright frosty. At that time, insects and diseases are gone, for the most part, and digging in the garden is…a pleasure! Before the first fall frost occurs, have seedlings ready to replace the tomatoes and peppers.
For increased garden efficiency, grow another crop that can be harvested in spring. Properly hardened off cold tolerant plants can be set out in mid- to late winter where winters are moderate (USDA hardiness zones 7-9). I welcome the opportunity to pick something from the garden every day of the year. And those brassicas (arugula, broccoli, cabbage, cauliflower, collards, kale, mustard greens, pac choi, tatsoi, etc.) are among the healthiest foods we can eat, so I really enjoy these cool season greens.
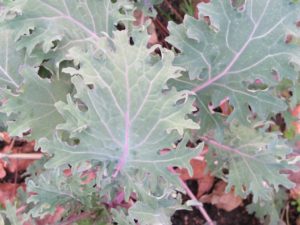
‘Red Russian’ kale.
Lettuce, beets, Swiss chard, spinach, peas, and green onions also tolerate cold weather. A few can produce greens through the summer, while others sail through the winter months. Some produce harvests through the winter in this zone 7 garden with little or no protection. Many greens and a few flowers (pansy, viola, dusty miller, snapdragon) thrive in these “shoulder seasons”, bridging the gap between the summer growing season and cold weather.
In fact, I use colorful edible greens as ornamentals in the front gardens, in both summer and winter. ‘Bright Lights’ Swiss chard, curly parsley for its rich green color, violas for edible flowers, purple mustard greens, and ‘Red Russian’, ‘Lacinato’, and ‘Dazzling Blue’ kales…beautiful and edible!
Extending the Growing Season
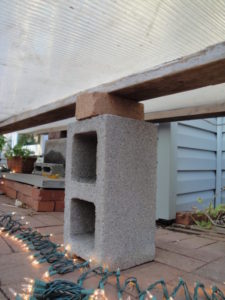
Setting up the cold frame in autumn.
There are ways to extend the growing season using simple materials. These devices create growing conditions that feel one or more climate zones warmer than ambient air.
Cold frames and low tunnels, for example, protect young seedlings that would perish if planted out too early in the year. Tender seedlings can begin their hardening off process under a protective covering.
In the twinwall polycarbonate structure assembled every autumn (photo, above) in the old Maryland garden, non-hardy succulents, edible greens, and seedlings spent all or part of the winter. Sealed on the sides with plastic sheeting and with a few strings of incandescent Christmas lights, the temperature stayed above 40°, even on the coldest nights.
Horticultural supply companies offer several types of systems for protecting plants in winter. Your garden center might stock “caterpillar tunnels” or you can order one. If you’re the least bit handy, you can put together something yourself using a support framework (PVC pipe, galvanized conduit, cattle panels, hay bales), a clear covering (4- or 6-mil plastic sheeting, greenhouse plastic [more expensive, but lasts longer], an old storm door), and fasteners. A strong wind will blow it apart, so secure it very well.
Any enclosed space requires ventilation for fresh air and to prevent overheating. Open a corner on a sunny winter day or entirely remove the top and close it in the afternoon.
Seedlings Transplanted Into Bigger Pots
I always transplant a few edibles into larger pots for customers who delayed planting but want to enjoy growing freshly picked produce. Recently at the farmers’ market, I sold golden-fruited zucchinis in 1/2-gallon pots, with beautiful fruits 6″ long. Hard to resist! They won’t grow all season in those pots but must be transplanted to the garden or into larger containers.
The tomatoes in large pots and cucumbers producing fruits in 12″ hanging baskets were popular. Cucumber ‘Diva’, my favorite for slicing, had a few fruits beginning to develop. And a variety called ‘Supremo’, a pickling cucumber that also can be eaten fresh (pick at 3-4″), had fruits at each node.
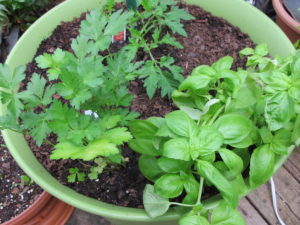
Tomato on the north side, and herbs on the south side.
Most home-grown crops can last all season when planted in roomy containers, with special attention paid to water and nutrients. Tall indeterminate tomatoes do very well in 20″ wide containers (about 18 gallons). You’ll still need to stake them, pinch out excess suckers, and fertilize regularly to keep them producing fruits. Even in those large pots (photo, above), which I used for a few years, leafy plants normally required watering every day or two.
Growing seedlings in cell packs for just 1-2 weeks too long stresses them, often preventing them from maturing to a crop you can harvest. Plants that mature as heads, such as broccoli, cabbage, cauliflower, and head lettuce, fail if kept potbound. Tap-rooted sunflowers should not be kept in pots very long. Don’t delay transplanting them to the garden or into larger pots once their roots have filled the cells.
Bunching Onions
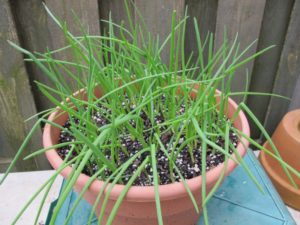
Potted green onions.
‘Nabechan’ is a delicious Japanese bunching onion. I’m growing several plants in each 1/2-gallon pot to sell at the market. This variety must be started from seeds because bunching onions don’t make bulbs or “sets” as regular bulbing onions do.
Potted or growing in the garden, bunching onions can be harvested over and over again from the same plant. When harvesting a green onion (or scallion), cut below the soil, aiming for 1/2″ above the bottom of the white part of the stem. That part of the stem remaining in the ground will regrow, and you’ll have another green onion to pick in 2-3 weeks. “Sustainable bunching onions”, I call them.
In the winter, keep a 12-14″ pot with a few dozen bunching onions close to the kitchen. Give it lots of direct sunlight. Some protection from alternate freezing and thawing, such as growing it on a porch or in a cold frame in very cold climates, is helpful.
These seedlings are slow to get going and fairly delicate to handle, but with time and practice you can enjoy sustainable bunching onions that will keep producing for more than a year. They potentially can last for a few years.
The Brassicas
Brassicas, including cabbage, broccoli, and cauliflower, will not form full-sized heads if the seedlings have been kept potbound in cell packs or small pots. Cramped quarters for the roots and hit-or-miss fertilization render them less productive.
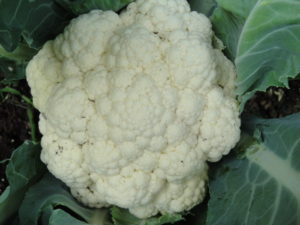
Cauliflower from the garden.
For best results, avoid an interruption in their growth, keep them moist (not wet), and fertilize potted seedlings every 7-14 days, depending on soil quality. Lack of boron, a micronutrient, causes hollow stems. Check the fertilizer label or have the soil tested.
With generous portions of aged cow manure and compost incorporated into the top 5-6″ of garden soil, the brassicas will take off. Brassicas need good drainage, evenly moist soil, and a pH close to neutral. Manure can raise the soil’s pH a bit, which is fine for these plants, since they prefer a neutral pH. PH stands for potential of hydrogen and is represented by a scale from 0 to 14. Neutral is 7.0, while numbers below 7 are acidic and above 7 are alkaline.
Fertilize brassicas in the garden with fish emulsion, Sea-Plus, more aged cow manure, or similar organic fertilizers every 2-3 weeks. Microbes in the soil break down organic matter and make simpler nutrients available to plants. In winter, though, when soil microbes are inactive, use a soluble synthetic high-nitrogen product formulated for foliage plants every 6 weeks or so.
Brassicas In My Garden
Miniature broccoli ‘Happy Rich’ in mid-spring.
This year, I purchased two packs of broccoli ‘Green Magic’ from a garden center. They were at least 6 or 7 weeks old. I don’t grow regular broccoli every year as a spring crop, but there was plenty of space in the garden. I normally rely on the miniature broccoli ‘Happy Rich’, and harvest small heads, stems, and leaves (all edible) from late winter to mid-summer. But I felt like growing broccoli, and perhaps selling heads at the farmers’ market.
Today in the garden, ‘Happy Rich’ is still producing cut stems, since plants regrow when cut. Extra bunches go to the farmers’ market and, a few times, went into the omelet prepared by a chef on site. The ‘Green Magic’ plants headed up weakly and weren’t marketable, but were consumed at home. Side shoots should develop for several more weeks and their quality has been market worthy.
Eventually, summer heat will kill all the broccoli plants. Some of the ‘Happy Rich’ flowered for the pollinators. They have stately 5′ tall stalks of pure white flowers. In late summer, I’ll sow seeds of heading broccoli, more ‘Happy Rich’, and others, for late summer and fall sales, and for the kitchen.
Instead of burying or composting several older, potbound plants of ‘Happy Rich’, I planted them into the garden 2 weeks ago to see if they might produce something. These were the dregs…the worst…but they grew surprisingly nice new foliage and are starting to grow tender stems and little heads. This is worth trying with leafy plants. Really good soil enriched with aged cow manure and compost makes a huge difference!
***Update***: Mini broccoli ‘Happy Rich’ survived the hot summer, lightly shaded by a large white oak tree during the early to middle afternoon hours (perfect!). They yielded harvests all season, right up to the Arctic Blast, which blew in on December 23-24, 2022. For its nutrient content and because this planting of ‘Happy Rich’ provided harvests for 9 whole months, I have declared this plant My Favorite Vegetable! Winter 2022
Lettuce
Crops such as lettuce and spinach grow fast and need a constant supply of nutrients, moisture, and their own space to develop properly. These are among the earliest crops started from seeds, sown here in early February. If weather is not severely cold, 4-week-old seedlings can be hardened off and planted out in late February or March, and every few weeks in succession.
When they begin to bolt, or go to flower, cut all remaining healthy leaves, as they will only continue to decline in warm weather. Lettuce becomes bitter, although certain varieties (‘Nancy’ green butterhead, ‘Sparx’ romaine, ‘Muir’ summer crisp, ‘Skyphos’ red butterhead) retain good flavor in warming—but not hot—weather.
After the heat of summer is over, I’ll start new crops of lettuces every couple of weeks, which will be harvested within 1-2 months.
Sow head lettuces one seed per cell. Or sow a few seeds, but thin out the weakest ones, letting only one remain. With today’s seed prices, however, heavy thinning is wasteful, so don’t oversow the seeds. Toss the thinnings into a salad. If they look healthy, move them to their own cells and grow them on. I often see head lettuce sold in crowded multi-seeded cell packs, but competition among the seedlings in a potbound state can lead to failure for any heads to develop. For seeded plants, it’s best to avoid competition from the start.
Leaf lettuces (photo, below) are more forgiving, and will grow productive stems from a few seeds in one pot.
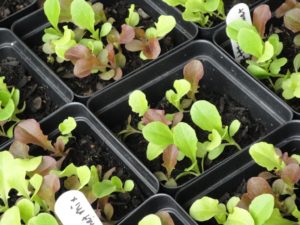
Leaf lettuce can be multi-seeded in pots. Later, I transplanted them into 6″ pots.
4. Is the temperature suitable for seedlings?
Each crop germinates best within a limited range of temperatures, indicated on the seed packet. Some prefer warm soil, in the 80’s or low 90’s F, while others won’t sprout above 75°. Most seeds sprout quickly at higher than room air temperature. Seeds germinate slowly or erratically when it’s cooler, although lettuce and spinach germinate successfully in the 50’s and 60’s F. They won’t germinate at all at the extremes.
Garden soil temperature is higher than air temperature when the sun is shining directly on dark soil. If it’s too cold, the seeds won’t germinate, and they might be eaten by birds or rodents, or washed away in the next rainstorm. You could always experiment with the timing, recording the results for future reference.
These hardened off seedlings tolerate the high 20’s and this light dusting of snow. March, 2023.
After seeds germinate indoors in containers, lower the temperature, but give that species what it needs to grow well. Broccoli and other early greens can stay outside if it’s in the 40’s and above, after hardening them off. Transplanted into the garden or into larger pots, and hardened off, most cool season greens can tolerate temperatures below freezing (photo, right—hardy herbs and greens).
Pepper seedlings need temperatures in the 60’s-low 70’s when they’re young and while it’s chilly outside. Tomatoes can tolerate a few degrees lower than that, but neither tolerates frost. During a stretch of rainy weather, the soil might not have sufficiently warmed up for these crops even if frost is gone. Our main season crops don’t like being planted in cold, wet soil, regardless of the month on the calendar.
Miniature Incandescent Lights For Warmth
For the 2022 season of the Elkin Farmers’ Market, I sowed seeds indoors starting in early February. Infrastructure for my horticultural business is laughably rudimentary at best but has worked well enough for now. Maybe you could try something like this.
Sunflowers starting to germinate.
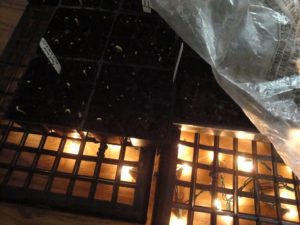
I used a 100-bulb string of indoor/outdoor miniature incandescent Christmas lights to provide warmth for germinating seeds. I laid the lights (not LED’s) on the hard floor, under 6-8 inverted netted plant flats. On top of the flats, labeled cell packs and pots of seeds sat above this source of gentle warmth. Then I loosely covered the flats with a sheet of clear plastic film, which retains humidity and warmth generated by the lights. Plant labels in the packs elevated the plastic sheet above the soil.
Lights stayed on 24/7, until germinating seedlings moved outdoors in the sunshine during the daytime. Plants that needed warmth were placed back over the lights for the night but were left uncovered. Most plants started this early in the season were cool season vegetables, which didn’t mind outdoor temperature in the 40’s and 50’s.
Although the floor-level temperature was in the high 50’s, those little seeds basked in near-tropical 75-85° warmth under the plastic film. Exercise caution; larger incandescent bulbs will burn combustible materials! In confined spaces, even those miniature lights can melt through plastic film in contact with them. Don’t use strings of lights with burned out sections. Check with greenhouse supply companies for information on heat mats, which are safer.
Water Temperature
I keep the thermostat set at 60°F at night in winter, and in the mid 60’s during the daytime. When watering tender warm-season seedlings and tropical plants, use lukewarm water (85°) instead of cold tap water.
Before watering outdoor plants in summer, test the water coming from the hose if it has been sitting in the sun. It might be too hot for any plants.
Headings
Page 1: 1. Start with clean materials for seedlings. (Pasteurizing Potting Soil), 2. Grow disease resistant varieties… (…Especially Tomato Seedlings, It’s so hot out there!, A Few More Tomato Tips, Growing Heirloom Seedlings, Basil Downy Mildew, Avoid High Humidity)
Page 2: 3. Timing is important for seedlings. (The Fall Growing Season, Keeping Records, The Cooperative Extension Service, Starting Seedlings Outdoors, Don’t Start Seedlings Too Early, Cool Season Crops, Extending the Growing Season, Seedlings Transplanted Into Bigger Pots, Bunching Onions, The Brassicas, Brassicas In My Garden, Lettuce), 4. Is the temperature suitable for seedlings? (Miniature Incandescent Lights For Warmth, Water Temperature)
Page 3: 5. Start seedlings in small batches. (My Simple Infrastructure), 6. Seedlings need strong light. (Growing Seedlings Under Shop Lights), 7. Cull the weaklings and anomalies. 8. Prevent damping-off disease from killing your seedlings. (Actinovate), 9. Seedlings and plants need fertilizer. (The Elements, Read the Label)
Page 4: 10. Prepare the soil for your transplants. (Start With Good Drainage, Air Pore Space, Gypsum and Lime, Add Nutrient-Rich Amendments, Bury It), 11. Try succession planting for maximum yield. (Crop Rotation, Mulch), 12. Stop the pests before they ruin your garden. (Slugs and Snails, Larvae of Moths and Butterflies, Spider Mites and Thrips, Deer and Rabbits), Concluding