Tag Archive | shoulder season

Seedlings For Your Garden: 12 Tips


2022


seedlings, zucchini


Starting Seedlings For Your Garden


Busy spring! This lengthy article focuses on starting and caring for seedlings and getting them established in the garden. If I’m not working on the seedlings, I’m working in the gardens, creating new beds and expanding those started last fall and winter. Winter weather was delightfully mild to allow planting right through the cold season. The weeds and I have come to an understanding, and in the next article, I’ll tell you how in “Patches for Pollinators”.

Foremost on the agenda has been starting plants to sell at our local Elkin Farmers’ Market. It’s been a challenge this year, keeping plants in good condition with high heat, heavy humidity, and frequent rainstorms. If I had a climate-controlled greenhouse, there might have been fewer losses. But, for the most part, my company, Wellspring Gardens, is producing more seedlings than I can sell at the market.

Some of that overproduction is destined for the vegetable gardens. It will yield small harvests of produce to sell at the market in addition to what’s needed in the kitchen. This is new territory for me, adding produce to the plants offered at the farmers’ market.

I might even consider canning, which I’ve never done…but let’s not get ahead of ourselves. That would be helpful, though, considering the rapidly rising prices at the grocery store. For that reason alone—the impact of rampant inflation on our wallets—it’s wise to learn how to grow at least a few vegetables.


sun's path

The sun’s path across the sky, Charlotte NC.


Watching how the sun tracks across the sky from month to month reveals good spots for the sun worshipers and areas where leafy greens should thrive in partial sun. This is my first summer in this house. The massive oak trees create shifting shade patterns that cause me to periodically rethink the plans.

So, let’s begin!


12 Tips For Starting Seeds


1. Start with clean materials for seedlings.


pepper 'Glow' seeds and cell pack

Sweet pepper ‘Glow’, started in 9-cell packs.


This calls for packaged seedling mix or fine-grained potting soil. Don’t use “dirt” from the garden, with its pathogens, insects, weed seeds, and worms that disrupt soil structure around tiny roots. In addition to the unknowns lurking in garden soil, its high clay content causes drainage issues in containers.

Soil used previously for potted plants is not a good medium for your seedlings. It’s often depleted of nutrients, might contain pathogens, and the organic matter has partially decomposed. If it’s only one season old, it’s probably safe for potted annuals, when mixed with fresh potting soil, or incorporated into the backfill for that new sourwood tree. Or simply throw it under the shrubs or into the compost pile.

Because seedlings are susceptible to soil-borne diseases, play it safe and start with pasteurized bagged seedling mix or potting soil. This, however, doesn’t guarantee a successful outcome, as many disease spores are air-borne. But we can increase the odds of success by using clean materials.

When reusing cell packs, pots, and flats for seeding, wash them in a 10% bleach solution, and rinse well before proceeding. Don’t smoke around plants, and wash hands thoroughly before working with them. Tobacco and other plants in the nightshade family (Solanaceae, including tomato, pepper, eggplant, and potato) can fall prey to the same disease organisms. Spores can transfer from tobacco products to your hands to the plants.


Pasteurizing Potting Soil

For bagged soil that’s questionable, you can pasteurize it in the oven. Don’t heat soil that contains timed release fertilizers. Use an oven-safe covered pot or baking dish, wet the soil, and heat the oven to 200°F. When the soil registers 140° on a meat thermometer, lower the oven temperature and maintain soil at that temperature for 30 minutes. This kills most pathogens. Wait for it to dry somewhat and to cool thoroughly before using. Various websites recommend different temperature levels from 140° to 300°. At the high end, beneficial microbes are killed off as well.

Let it cool down outdoors. Considering the pervasive “earthy” odor coming from hot soil, you might prefer buying a new bag of seedling mix or accept a small risk with the open bag in the garage.

Another method of pasteurizing (not sterilizing) soil is to place a heat-resistant container of soil in a black plastic bag. Place the bag in a sunny place outdoors on a warm day, and let the sun do the work for you. This is called solarization, and can raise the temperature inside the bag to 140-160°F. To prevent damage to the beneficial microbes, take the temperature, and maintain it at 140° for 30 minutes, opening the bag a bit to prevent overheating.

Most bagged potting soils and seedling mixes already have been heat-treated to eliminate pests. Close the bag securely and store in a cool dark place. The last and only time I pasteurized soil was nearly 50 years ago because that’s what the experts recommended.


2. Grow disease resistant varieties…


While fungicide and bactericide formulations—both organic and conventional—are available, I’d rather grow disease resistant varieties and not rely on spraying. Keep in mind that resistance is not 100% effective, particularly when plants are exposed to stressful weather or cultural conditions.

Certain varieties are more flavorful than others, but all well-grown fruits and vegetables from your own garden taste better than those purchased from grocery stores. Picked when vine-ripened perfect, anything coming from the garden will be superior to what’s found elsewhere except, perhaps, at farmers’ markets and farm stands. Freshly picked produce also has the highest nutrient content.

Digging in the garden is great exercise; proceed slowly at first. Working outside in nature feels good, and self-sufficiency is never amiss. A few steps from the back door gathering a green onion, spinach, dinosaur kale, and a little ripe sweet pepper for the veggie omelet is more rewarding than I can describe. You’ll see!

Those are just a few of the many benefits of growing our own vegetables. Using disease resistant varieties, if available, makes the job so much easier. Many new gardeners gave up after having suffered the disappointment of losing an entire crop to early blight or bacterial leaf spot. And we also have to deal with deer, rabbits, and insects!

Although this article concentrates primarily on edibles, flowering plants also have their own set of disease organisms. Again, look for resistant varieties, grow them in conditions that don’t favor infection, and look for remedies at the garden center.


…Especially Tomato Seedlings

tomato disease septoria?

Disease beginning on ‘Rutgers’ tomato.

Tomatoes and peppers, two of the most popular crops for home vegetable gardens, are vulnerable to many diseases. They’re caused by fungal, bacterial, or viral pathogens. In some areas, nematodes also can be a problem. Usually, we can harvest some fruits before disease claims them, but resistant plants last longer in the garden. Plants infected with viruses should be removed and destroyed. For fungal and bacterial pathogens, products at garden centers will help. Always read the labels.

Tomato diseases include Alternaria stem canker, early blight, late blight (Phytophthora; very few varieties are resistant to this one), Fusarium wilt, grey leaf spot, leaf mold, tobacco mosaic virus, tomato mosaic virus, tomato spotted wilt virus, and Verticillium wilt. Catalog listings use initials to indicate disease resistance. For tomatoes, AS, EB, LB, F, GLS, LM, TMV, ToMV, TSWV, and V, respectively, represent those diseases.

Tomatoes are weedy plants and normally produce good crops, despite many organisms that target them. Peppers are susceptible to several races of bacterial leaf spot, and basil to basil downy mildew. Some zinnias are plagued by powdery mildew. Weather conditions, such as high humidity and frequent rain, exacerbate these disease problems.

Most hybrid (or “F1”) tomatoes have some resistance to one or more pathogens, but not to all of them. ‘Big Beef Plus’ is resistant to a wide variety of diseases. ‘Damsel’ and ‘Defiant PhR’ are resistant to late blight. Hybrid seeds carry a higher price than open pollinated varieties due to the cost of research that developed them and the extra steps needed to produce hybrid seeds each year.

It’s so hot out there!


shading tomato flowers


If you live in a hot climate, look for tomato varieties that have been bred to produce better at high temperatures. The pollen in tomatoes and peppers, and others, can die at high temperatures. While these plants are comfortable at 65-80°F, pollen dies above 88°, 90°, or 92°, depending on the cultivar. No pollination = no fruits! A reference to “heat” or to the “south” in the plant’s variety name indicates its higher tolerance for heat.

Researchers are investigating thermo-tolerant genetics in wild tomato species (Solanum pimpinellifolium) and incorporating them in tomato breeding programs.

One trick to preserve viable pollen is lightly shading the plant in the hot afternoon hours. Attach shade fabric—a black woven mesh—to a support over and on the west side of the tomato or pepper plants. This provides a decrease of up to several degrees in hot climates or temporarily during a heat wave. In the photo, above, mesh bags from the grocery store protect fruits from squirrels and sun scald, and lightly shade new flowers and their pollen from high heat.

The young ‘Estiva’ tomato plants (“estiva” refers to summer), a hybrid bred for heat tolerance and great taste, lost most of their diseased bottom leaves in heavy rains, but those little fruits are still growing! I’ll plant them out this weekend, after the temperatures drop well below the 108° heat index value we have now. Recent weather has been in the record-breaking mid- to high 90’s F, with high humidity. Not my favorite conditions to dig in the garden…so I don’t.  I was not bred for heat tolerance!

***Update***: ‘Estiva’ tomatoes endured this hot summer and produced fruits past the first fall frosts. I covered them on chilly nights to ripen the last of the fruits. These were among the last tomatoes to succumb to the cold, in mid-November. Autumn 2022

A Few More Tomato Tips

Your best defense against tomato disease, in addition to growing disease resistant varieties, includes these tips:

  • Stake them. Tall indeterminate types need a 6-8′ tall stake, taller for some.
  • Space them farther apart, at least 3½-4′.
  • Thin the vines to 3 or 4 main stems by removing excess suckers.
  • Remove leaves on the bottom 12″ of the plants after they’ve become established.
  • Locate them where a breeze blows through the garden. These first 5 tips address increasing air circulation around and through the tomato plants.
  • Give them lots of direct sun—a minimum of 7 or 8 hours. The more sun they receive, the shorter the window of opportunity for pathogens to germinate on damp leaf surfaces.
  • Mulch the soil under the plants to prevent disease spores lying dormant in the soil from splashing onto and infecting the foliage. More on Page 4.
  • Water in the morning to early afternoon so all foliage is dry going into the night. Try to keep the foliage dry at all times and avoid handling wet foliage.
  • Water established plants heavily (1½”/week) when needed, but avoid giving little sips every day. Young seedlings need more frequent watering until their root systems expand.
  • Clip off leaves that show early symptoms (yellowing, spotting), and dip your pruners in alcohol when moving from plant to plant.
  • Don’t smoke near the garden, and wash hands thoroughly before working with plants.
  • Rotate your crops. Don’t plant a member of the Solanaceae family where any members have grown in the past 3-4 years. There’s more about crop rotation on Page 4.

All plants grown with good soil preparation, good air circulation, proper watering techniques, adequate sun, and appropriate fertilization are less stressed. Less stress equates to lower infection rates.

Growing Heirloom Seedlings


Heirloom tomatoes are always in demand because of their exceptionally good flavor. Heirlooms are open pollinated, which means gardeners can save seeds from fully ripened fruits each year for the next season’s garden. Because they’re not F1 hybrids but have been breeding true, for the most part, for many decades, heirlooms retain their traits from one generation to the next.

These varieties, however, don’t have much built-in disease resistance. Nevertheless, I’m growing a few heirlooms, and spacing them 4′ apart for improved air circulation. We’ll see what happens.

Commercially grown tomatoes must be able to survive long distance transportation and handling without damage. They’re picked early, when green or first showing color. Varieties of these tomatoes have skins that normally are tougher.

Heirloom tomatoes have more desirable thinner skins and, therefore, travel poorly. So, you won’t see them in grocery stores unless those stores buy from local farms. Heirloom tomatoes from the grocery store might cost $5.00/lb. or more! So, yes, it is worth growing a couple of heirloom tomato plants in our gardens.

A few prolonged and heavy rainy periods this spring almost wiped out certain tomato varieties, namely ‘Carmello’, ‘Brandywine’, and ‘German Johnson’. I still have a few that show less damage than others. ‘Black Krim’ and ‘Cherokee Purple’ are doing fairly well, although they are heirlooms. Most of the remaining plants will be set in the garden. There’s usually a breeze blowing through the property, and by spacing them appropriately, I should get plenty of fruits.


Basil Downy Mildew


basil downy mildew

First symptom of BDM: yellow blotches between the main veins.


Although this dreaded disease targets only basil, it hasn’t appeared yet this year. But I’m prepared.

Last year, I grew ‘Rutgers Obsession DMR’ (DMR = Downy Mildew Resistant), an acceptable substitute for our beloved ‘Genovese’ and other susceptible sweet basils. Last year’s ‘Obsession’ did not develop any basil downy mildew (BDM)—not one speck—although wet and humid weather presented a worthy challenge. Other basil varieties in the ground or in pots succumbed to the disease within a week of infection…even young seedlings.

This year, I’m growing ‘Rutgers Obsession DMR’ and also ‘Rutgers Devotion DMR’ outside all summer. In addition, I’m seeding the old favorites, including ‘Genovese’, ‘Italian Large Leaf’, Thai basil ‘Siam Queen’, ‘Marseillais Dwarf’, and ‘Tuscany’, a lettuce-leaf basil. A few non-resistant basil plants will come indoors at night when warranted, as described below. But I’ll stop seeding susceptible varieties, except for a few pots, and concentrate on the resistant ones for the farmers’ market if the disease appears in the neighborhood.

Several other BDM resistant varieties can be purchased as seeds or as started plants.

Avoid High Humidity

basil seedlings in clay pot

Healthy sweet basil, in a pot.

If you want to grow your favorite basil varieties that are not resistant to BDM, there is a way to prevent a total loss.

BDM spores move up from the south on the breeze or on infected plants shipped into the area. The spores don’t overwinter in cold climates. If spores land on a susceptible variety, they need a relative humidity above 80-85% for a couple of hours in order to germinate.

Even during pleasant weather, the relative humidity can reach 90% or higher in the 2-3 hours around dawn. That’s when the temperature is usually the coolest and, therefore, the relative humidity is the highest.

When plants show early symptoms of BDM, remove the affected leaves. Take potted basil plants indoors for the night, every night. Indoor conditions never reach those high humidity levels, so you can still grow your preferred basil varieties successfully with a little effort. Remember to place the plants back outdoors after the sun has been up for a couple of hours.

Follow this regimen during rainy weather, although the plants might need to spend a day or two inside. Find the brightest spot to keep them during their temporary stay indoors. If possible, provide some artificial light. Unless it’s wilting, avoid watering basil indoors. Less sunlight means the plant won’t be photosynthesizing optimally or using much water, and wet soil can initiate root rot.


Headings

Page 1: 1. Start with clean materials for seedlings. (Pasteurizing Potting Soil), 2. Grow disease resistant varieties… (…Especially Tomato Seedlings, It’s so hot out there!, A Few More Tomato Tips, Growing Heirloom Seedlings, Basil Downy Mildew, Avoid High Humidity)

Page 2: 3. Timing is important for seedlings. (The Fall Growing Season, Keeping Records, The Cooperative Extension Service, Starting Seedlings Outdoors, Don’t Start Seedlings Too Early, Cool Season Crops, Extending the Growing Season, Seedlings Transplanted Into Bigger Pots, Bunching Onions, The Brassicas, Brassicas In My Garden, Lettuce), 4. Is the temperature suitable for seedlings? (Miniature Incandescent Lights For Warmth, Water Temperature)

Page 3: 5. Start seedlings in small batches. (My Simple Infrastructure), 6. Seedlings need strong light. (Growing Seedlings Under Shop Lights), 7. Cull the weaklings and anomalies. 8. Prevent damping-off disease from killing your seedlings. (Actinovate), 9. Seedlings and plants need fertilizer. (The Elements, Read the Label)

Page 4: 10. Prepare the soil for your transplants. (Start With Good Drainage, Air Pore Space, Gypsum and Lime, Add Nutrient-Rich Amendments, Bury It), 11. Try succession planting for maximum yield. (Crop Rotation, Mulch), 12. Stop the pests before they ruin your garden. (Slugs and Snails, Larvae of Moths and Butterflies, Spider Mites and Thrips, Deer and Rabbits), Concluding

Return to the top of Page 1

10 Tips for Protecting Cool Season Vegetables

2019

updated 3/1/2024


Here are 10 Tips for protecting cool season vegetables from freezing temperatures.


cool season vegetables in the garden

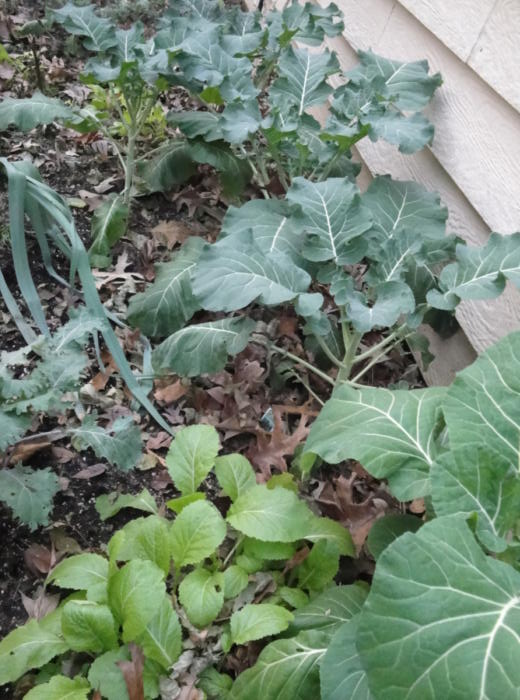
Cool season vegetables: from the top, broccoli, leeks, ‘Red Russian’ kale, light green mustard greens, and collards.


Ready For Fall?


Throughout parts of the United States, and in chilly climates everywhere, gardeners are scrambling to save their tender plants. Most of us have brought in all the houseplants. More laissez-faire gardeners do nothing special to extend the season, beyond harvesting the last of the cherry tomatoes and clearing out the frosted vines.

And there are those of us who strive to keep cool season vegetables growing even in winter. And we’ll plant more of them! Soon I’ll transplant ‘Monstrueux de Viroflay’ spinach seedlings into pots, to grow on the deck through the winter. This French heirloom spinach has huge leaves with a milder flavor. It has lower levels of oxalates, so those who have been advised to avoid eating spinach might be able to eat this variety. Ask your doctor.

In early October, I planted 2 dozen onion sets (for green onions) in a 12″ pot on the deck. Green onions are ready for harvest, in mild weather, only a few weeks after planting the sets. To preserve them in the cold, I’ll cover them with plastic sheeting (Tip #2). Green and bunching onions grow more slowly in cold weather.

I planted more sets every couple of weeks and will soon plant the remaining bulbs before they dry up. A favorite bunching onion called ‘Nabechan’ has straight sides. Not having a bulb at the bottom makes it easier to harvest. Sets are not available for bunching onions, though, so they must be started from seeds.


Where There’s a Will, There’s a Way


USDA plant hardiness zone map

The USDA plant hardiness zone map.


Potted cool season vegetables will grow under a plastic covering in cold weather. To extend the season, strings of miniature incandescent Christmas lights (Tip #6) will raise the temperature to more comfortable levels. Later in this article, I will list all 10 Tips for protecting crops in winter.

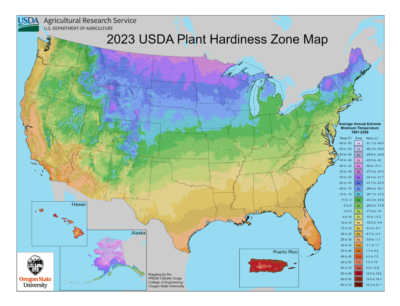
Starting with the simplest ideas and progressing to the more advanced methods, find the level you’re most comfortable with this season. Your budget, your USDA plant hardiness zone (photo, above), and the types of crops themselves must factor into your decision.

As you gain confidence and become more motivated to keep the garden producingyou might decide to try the next level. Cost savings realized by growing your own fresh food might justify the expense of new materials.

It’s only through experimentation, by taking a chance, that you might discover all the opportunities—and the limits—of gardening challenges. This is how green thumbs are cultivated.

If you’ve never grown cool season vegetables, several articles at The Farm In My Yard provide detailed information to get you started. For a greater understanding of any issue, enter the term in the search bar or click it in the tag cloud.


The Advantage of This Latitude

I’ve been growing greens in winter for decades, for my customers and for my family. Fortunately for us, living in the southeast doesn’t present as difficult a winter hardship as would living in Montreal, Montana, or Scotland. But there are options for just about every climate.

There’s no substitute for stepping outside and collecting a green onion, a mild mustard leaf, and some kale and spinach for our Sunday morning omelet. We pick what we need when we need it.


Succession Planting: Warm, Then Cool Season Vegetables


Because our favorite greens love cool weather, they grow in the garden after the tomatoes, peppers, and cucumbers have been harvested. So, with some planning, you can schedule a succession of crops. When one crop finishes up, new transplants or seeds are ready to take its place. Now, that’s an efficient use of space!


cool season vegetables

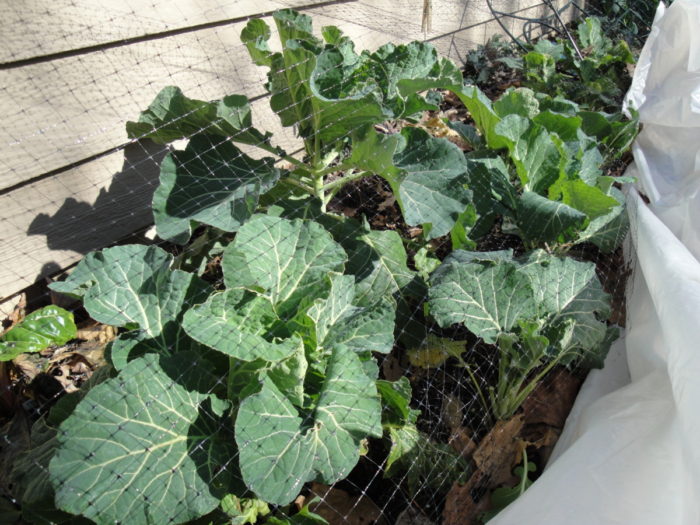
Cool season vegetables and greens replace summer tomatoes and peppers. Plastic protects plants on very cold nights and the netting deters deer.


Radishes, beets, spinach, and other fast-growing plants can be sown directly into the garden in late summer to early autumn. After they’ve been harvested, there might be time for another quick fall crop.

Certain greens and root vegetables have a shorter window of time during which they retain the best quality. So don’t let them linger in the garden. On the other hand, some cool season vegetables can be harvested over many months of growing! That’s at a time when there are fewer weeds, fewer bugs, and less drought to worry about.

If the weather is still warm for the first round of seeds, look for varieties of cool season vegetables that are more heat tolerant. Some catalogs indicate the preferred soil temperature for each crop, or you can get that information from your agricultural extension office. Soil temperature can be lowered by irrigating during hot weather. Additionally, frames covered with knitted shade cloth, made from black polyethylene (available from Johnny’s Selected Seeds and others), provide consistent shade until the weather cools. That bit of shade can make the difference between seeds germinating in August or having to wait until late September to sow them.

Here in zone 7b (average lowest winter temperatures 5° to 10°F), we enjoy productive edible crops and herbs in the garden year-round…with some protection in winter, of course. But we’ve also grown them in colder Maryland winters.

Because I’ve been “advised” by the HOA to stop growing vegetables in the garden (photo, above), they’re now in pots (photo, below) on the fenced deck. (Note to self: next move, no HOA!) Young ‘Aspabroc’ miniature broccoli plants grow in a 20″ pot, where a tomato grew during in the summer. Italian parsley lasts all winter, and sharp-tipped pine cones discourage squirrels.

***Update***: In October, 2021, after my mother passed away, I moved to a small town in northern North Carolina. More property, more nature, woods in the back (where a bobcat and I came face-to-face!), no traffic, gorgeous topography, great friends, just a couple of degrees cooler than Charlotte, and no HOA to tell me what I must or can’t do on my property. 3/1/2024


potted broccoli

‘Aspabroc’ miniature broccoli and parsley.


Peas…Yummy!

Peas grow best in the garden’s “shoulder seasons”. That’s when temperatures can be cool to warm, and when frost is no surprise. So, before the end of tomato and pepper season, you can sow a pack of pea seeds next to a trellis and begin harvesting two months later.

Edible podded snap peas and snow peas are absolutely delicious. Many are eaten on the spot. And because they grow vertically, the vines take up little square footage. During the shoulder seasons, in moderate climates, they don’t normally require a protective covering.

pea vine

Peas growing next to the house, a warmer microclimate.

If you have facilities that can accommodate pea vines, such as a lean-to or a cool greenhouse (Tips #9, #10), this crop can be grown as the temperatures dip lower during the winter months. But there is a point below which the vines will be killed in unheated structures.

Last autumn’s loosely covered pea vines (photo, right) made it just fine through the mild winter and started bearing pods in late winter.

Look for disease resistant varieties when growing any vegetables or greens under cover. Plants are more susceptible to diseases when grown in humid conditions.


Gather Information

Get to know each crop, and how much cold it can tolerate with or without protection from freezing weather. I’ve researched calendars for scheduling vegetables in this zone and have found some of them, compared to my own experience, to be overly conservative. They restrict sowing and transplanting to a narrower period of the calendar than I’m willing to gamble with.

Gardening in a warmer microclimate offers more protection than growing plants out in the open. Planting against a sunny south-facing wall or in a protected corner out of the wind provides opportunities to extend the season.


bees and butterflies feed on nectar in winter

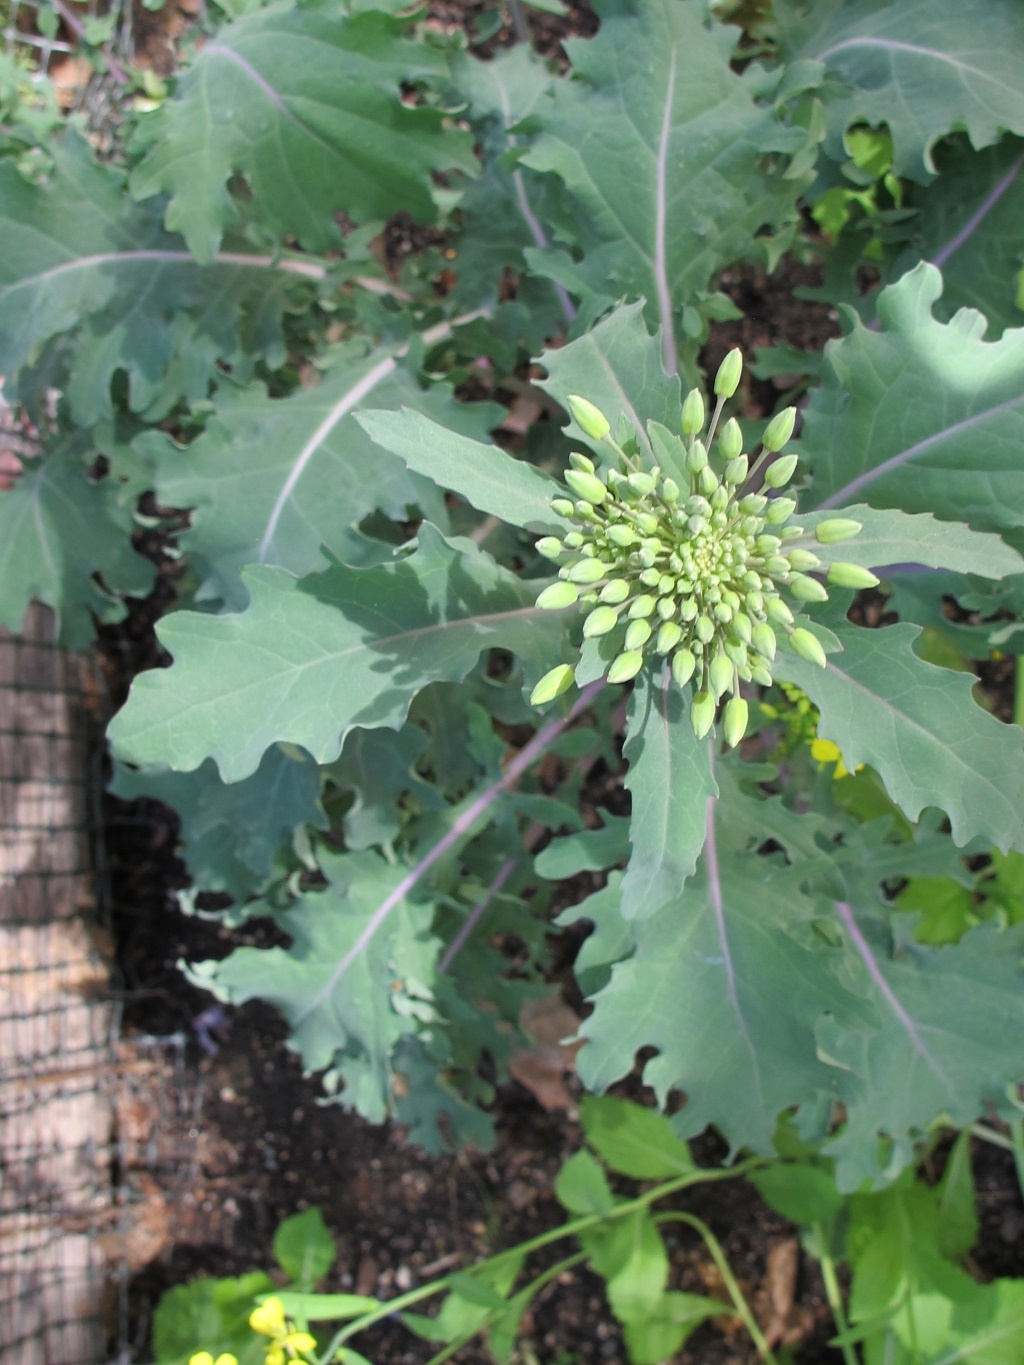
‘Red Russian’ kale in bud.


Kale, collards, spinach, Brussels sprouts, mustard spinach, arugula, leeks, and green onions can tolerate the coldest conditions, within reason. I cover the crops when temperatures dip below the mid 20’s. Even if they’re not covered, they will survive. But I want the plants to continue providing premium quality greens. If not stressed by very low temperatures all day and night, these crops will grow if daytime temperatures rise into the mid 40’s.

Cauliflower and ‘Bright Lights’ Swiss chard need to be covered earlier than other greens. Frost normally won’t kill the plants. But repeated freezing will damage the foliage, halting growth until warmer temperatures (or the protective coverings) return.

These crops and other cool season vegetables won’t need protection if grown farther south. Again, cold tolerance is variety specific, so try new cultivars now and then and see which ones work best for you. For example, ‘Green Magic’ broccoli does well when planted in early spring and again in early autumn. This variety needs a warmer temperature when forming its head. On the other hand, ‘Arcadia’ broccoli can mature in very cold weather, so this is the one I plant later in autumn. Another benefit is ‘Arcadia’s bumper crop of side shoots; in Charlotte, they produced for months.

For More Information

There is so much information online and in catalogs, books, and magazines. But, for local perspectives and information about other growing conditions, check with your agricultural extension office. And speak with helpful vendors at the neighborhood farmers’ market.

Garden clubs, botanical gardens, and garden centers selling seeds, supplies, and transplants sometimes offer classes covering various subjects. My “Cool Season Vegetables and Greens” presentations drew the most attendees. Many of my customers started with just one crop and then returned for more. A healthy addiction!

Keep Records

As you begin new garden projects, place labels with the plants, photograph progress, and take notes for future reference. Add some varieties you’ve never grown before to discover delightful new flavors. Observation of the varieties you’re growing in your garden is invaluable when planning future garden projects. There is no substitute for hands-on experience…and records of successes and failures!

Keeping detailed drawings of crop placement in the garden will help when considering crop rotation. Not growing plants from the same family in the same place every year helps decrease concentrations of pathogens and insects. But, because so many of the cool season vegetables are in the Brassicaceae family, it’s difficult to rotate these crops in our limited space.

Succession planting calls for sequential use of space, maximizing the amount of produce harvested through the seasons. It is especially important to prepare the soil before the fall or spring season, adding fresh compost, aged manure, or planting mix.

For optimal harvests, you’ll need to fertilize regularly as the plants grow. Instead of relying on memory, record the names of the products and when you applied them.

Have all underground utilities marked by your municipality before proceeding and keep a record of their locations. Call 8-1-1 to schedule an appointment.


Headings:

Page 1: Ready For Fall?, Where There’s a Will, There’s a Way (The Advantage Of This Latitude), and Succession Planting: Warm, Then Cool Season Vegetables (Peas, Yummy!, Gather Information)

Page 2: Seed or Transplant? (Seeds, Temperature, Transplants, More Favorites), Crops With Ornamental Edible Leaves (Tender Leaf Kales), Crops That Form Heads, Soil Fertility (The Importance of Microbes), Nutritional Benefits, and Ready For the 10 Tips?

Page 3: Tip #1: Move Tender Plants Indoors, Tip #2: “Quick! Cover Up!”, Tip #3: The Hot Water Bottle, Tip #4: Low Tunnels, Tip #5: Deal with the Wind, Tip #6: Add Christmas Lights, Tip #7: I’ll Have a Double

Page 4: Tip #8: A Simple Cold Frame For Cool Season Vegetables, Tip #9: A Lean-To, Tip #10: The Greenhouse, Finally!

Return to the top of Page 1