Page 2
Light For Lavender Cuttings

Lavender loves to bask in the sunshine. The sooner the cuttings get back to the sun, the sooner they can resume strong growth. But harsh sun will desiccate the unrooted cuttings. This is a race against time.
Indoors
Indoors, place the cuttings where they will get gentle direct sunlight. Sunlight helps cuttings root faster, but strong sun will dry them and overheat the air inside the bag. Bright filtered sun most of the day, as through a sheer curtain, works well. Average indoor temperatures (high 60’s to the mid 70’s F) help them root.
Don’t put the cuttings too close to a window, in hot sun. Check to make sure excess heat can escape. Lavender cuttings will not root in low light, so it might require a bit of experimentation to find the perfect light level to root the cuttings without desiccating them.
New growth emerging from the tip of the stem indicates a cutting that is beginning to root. Congratulations! Patience pays off!
Artificial Light
A 4′ long fixture with 2 daylight LED or fluorescent tubes makes a perfect nursery. Here, the plants never see a cloudy day, and you can keep a close eye on progress.
Place the lavender cuttings close to the tubes, within 4″. They should be as close as possible to the lights without feeling heat from the fixture. Keep the lights on for 16-18 hours each day.
Smaller tubes and grow bulbs emit less light, which might not be enough for lavender. But if that’s what you have, try it. Make sure the cuttings are close to the tubes and that the lights are kept on for 18 hours each day. Perhaps keeping the fixture on 24/7 for several weeks might result in faster rooting. Experiment!
Outdoors
Many of us don’t have indoor space suitable for rooting lavender cuttings. In that case, place the pots outdoors in dappled shade when the temperature is suitable. Give them more bright or dappled shade than harsh sun. Don’t expose them to hot afternoon sun and find a location out of the wind.
In a pinch, take a few cuttings and simply stick them at the edge of a planter, in light shade cast by a plant. I’ve been able to root many kinds of plants this way. Watch out for slugs, by the way, and use organic Sluggo to bait them. Scoop out rooted plants, and pot up for a few additional weeks of growing and getting used to full sun before planting them in the garden.
The cuttings in the photographs go outdoors on the deck in the morning. I take them back inside at noon or in early afternoon. It’s been way too hot and humid outside this summer—mid 90’s F, over 100° heat index for days at a time. When it cools down, they’ll spend more time outdoors.
(***Update***: The pot of cuttings in the photographs has only one survivor. Prolonged heat, frequent downpours, and mischievous chipmunks digging in the soil killed the rest. But that one well-rooted plant looks great, and will stay in its 4″ pot over the winter. 1/1/2021)
Ready to Transplant Your Lavender Cuttings?
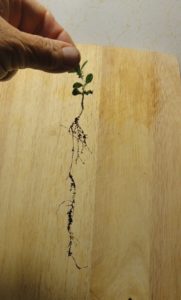
Okay…it’s been about 5 or 6 weeks and most of the cuttings show new leaves growing at the tips of the stems. That’s great! In the photo, above, this lavender grew about 1″ tall from a seed, but the roots extend 12″! In its native environment around the Mediterranean Sea, seedlings must root deeply when seasonal rains have moistened the gritty soil and before the glaring, hot summer sun dries the surface.
If you see roots at the drainage holes in the bottom of the pot, the cuttings might be ready to divide. Remove the cuttings from the pot by gently tipping the pot upside-down. See if there are enough roots to move them to the next stage. Each cutting should have a few 1″ to 2″ long roots. Handle with care, since the roots detach easily from the stems and dry quickly when exposed to air.
Cuttings Rooted in Pots
Before settling them into their permanent homes, the rooted cuttings in pots will need to grow a more extensive root system. Transplant them individually into their own small pot or into 4-cell market packs. Be sure to maintain the same soil level against the stem; never bury the stems any deeper into the soil. Use the same medium you used to root them.
If they’re rooted, give the plants a few hours of direct sun for a few days before exposing them to full sun. Let them root into the pots before planting in the garden. Rooted cuttings don’t require high humidity, so remove the plastic bag.
Cuttings Rooted in Cell Packs
If you planted the cuttings in market packs, simply push up the bottom of a cell to check root growth. Don’t pull the cutting itself. Well-rooted plants can be planted directly into the garden if you monitor them very closely. If needed, cover temporarily with a “caterpillar” tunnel fitted with bird netting. This protection admits air and sunlight, and will prevent damage from digging animals while the lavender becomes established.
If cold weather is approaching, use a clear plastic cover over the tunnel, and vent it in the daytime. This will buffer severe conditions, and could save the plants.
Harden Off the Lavender Cuttings
Harden off the cuttings by gradually introducing them to outdoor conditions (stronger light, cooler temperatures, moving air) over a period of a week to 10 days. Place the pots of lavender outdoors, in morning sun, for a few days. Every 2-3 days, increase the number of hours of sunlight they’re exposed to. It’s easy to forget them when they’re out of sight, so remember to water!
Plants receiving abundant sunshine make more food for themselves, through photosynthesis, so their roots will grow faster. By the end of the hardening off process, the plants should be able to tolerate direct sun all day without wilting or dying.
Remove flower buds appearing on young cuttings. For now, all energy should be directed toward growing a robust root system.
Any cuttings that haven’t rooted and have foliage that feels limp can be discarded. If they look like this after a month, it’s unlikely they will root. Figure out how to improve the growing conditions, and try again.
The Garden is Ready
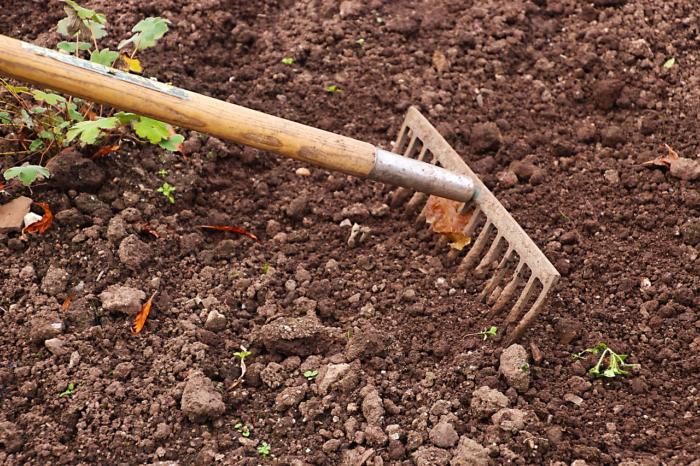
And so are the plants. Water them first. Then remove the rooted plant from its pot and gently loosen the outer roots if they form a tight root ball.
Plant the little lavenders, maintaining the same soil level next to the stem. Firm the soil around the roots to eliminate air pockets. For almost all plants, you should be able to see the top of the original root ball after transplanting.
Be sure to space them properly, according to the variety. Some mature at 16″ tall and wide, while others can grow as large as 3′ or 4′ across. Lightly shade the plants if the leaves wilt in moist soil, and make sure the root ball has good contact with the garden soil. Sticking a leafy twig in the ground on the sunny side works well enough.
During hot or breezy weather, check the soil moisture every day, although you might not have to water every day. Feel the soil a few inches down and next to the root ball. If you detect moisture, don’t water. If it wilts or the soil feels dry, water around the root ball.
When watering lavender plants, keep the foliage dry. This helps prevent disease.
To Mulch or Not To Mulch
If you use mulch in the garden, avoid placing it under the canopy of lavender plants. Where it rains regularly, mulch can hold too much moisture in the soil, so use only a thin layer or, preferably, none at all right under the plant. Keep mulch off the stems.
Avoid finely shredded hardwood mulches, and choose pine fines or small nuggets instead. They permit better air circulation around the lavender.
Planting a drift of lavender plants on a raised bed helps the soil drain faster. Plants also display better when elevated above surrounding lawn or paving.
Is Your Lavender Winter Hardy?
Each plant variety has a hardiness zone rating, usually between zone 5 and zone 9 for lavender. If you live at the colder end of that variety’s hardiness zone, the rooted plants might need the protection of a cool greenhouse or a cold frame until next spring. It depends on expected weather patterns—temperature and precipitation—over the next several months for the cultivars you’ve selected.
At this point, if it’s late in the season, you might want to delay propagating lavender until next year. For gardeners in colder climates, I’d recommend it, unless you have a heated greenhouse for overwintering plants.
Lavender is drought resistant once established in the garden, but often dies when overwatered. Improving soil drainage is especially important for cultivars planted in the colder regions of their hardiness zones. “Winter wet” is a frequent cause of lavender failure. Lavender loves about 1/3 of the soil volume taken up by drainage materials.
Plant lavender with other perennials and shrubs that share its preferred growing conditions. Although it isn’t native to the U.S., it is non-invasive.
You might enjoy reading about the history of lavender and its uses through the centuries. This article at The Farm In My Yard also includes more detailed information for growing lavender successfully.
Better for the Environment
Propagating plants is an economical means of providing new material for your gardens. Including plants in our gardens that offer sustenance to pollinators is not only ecologically preferable to lawn grass, but, with lavender, it’s also beautifully fragrant!
Traditional landscape management unfortunately calls for removing garden debris and sources of food for insects. By enlarging pollinator gardens, though, we can compensate in a small way, right in our own yard.

Headings
Page 1: Kim’s Tips for Rooting Your Own Lavender Cuttings (Patent Rights, Lavender from Seed), Prepare the Pots and Soil for Lavender Cuttings (Options for Potting Soil), Making the Cut (When to Cut, How to Take Lavender Cuttings, Rooting Lavender Cuttings in Water), Sticking the Lavender Cuttings (Actinovate, Rooting Hormone, Raise the Humidity)
Page 2: Light for Lavender Cuttings (Indoors, Artificial Light, Outdoors), Ready to Transplant Your Lavender Cuttings? (Cuttings Rooted in Pots, Cuttings Rooted in Cell Packs, Harden Off the Lavender Cuttings), The Garden is Ready (To Mulch or Not To Mulch), Is Your Lavender Winter Hardy? (Better for the Environment)