Updated 1/2/2026
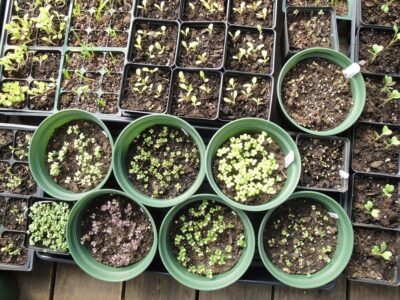
Brassicas germinated 3 days after sowing seeds in these round 6″ pots.
Sowing Seeds For The First Crops: Too Early?
We’re getting close to my favorite part of the year—warming temperatures… birds singing their special songs… starting seeds for the garden. New crops of brassicas, including arugula, broccoli, cabbage, and kale, top the list. I also grow lettuce, spinach, and other cool season greens. In this article, I’ll describe a step-by-step process for sowing seeds you can do right now, well before frost has left the area. Tomatoes, peppers, basil, and other warm season crops must wait several more weeks.
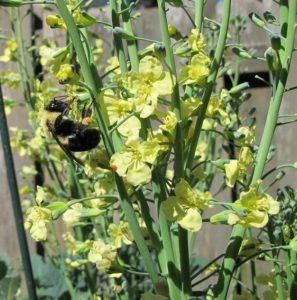
Bumble bee on ‘Arcadia’ broccoli in spring.
Some varieties of leafy greens are productive from early autumn through spring here in USDA zone 7b, in the Piedmont of North Carolina. Some of last fall’s crops flower in late winter or spring (photo, right), and are then replaced with young transplants. With cooperative weather, cool season crops offer a fantastic return on investment!
Starting in late winter, I’ll sell transplants at the Surry County NC farmers’ markets and plant them into my own gardens. In preparation for the season, though, growers have nurtured their plants for 4-8 weeks before they’re offered for sale.
It’s important to plant young plants; heading crops, such as broccoli, cabbage, and cauliflower, confined in cell packs only 1 or 2 weeks too long will not properly head up. So, it’s important to start sowing seeds and to plant the seedlings at the proper time—not too early and not too late.
When, Exactly?
If the trend in weather forecasts is favorable, I begin sowing seeds for cool season greens some time in January for planting out as early as mid to late February. That’s about 2 months before frosts are over for the season, and I do tend to tempt fate. A quick cover-up with old sheets often saves an early crop from unexpectedly cold weather. If the plants fail, I’ll start more seeds.
When winter weather runs colder than normal, I’ll delay sowing seeds for a week or two, or maybe a month. Long periods of cold, overcast, and rainy or snowy weather prevent the soil from warming up to that critical point that’s suitable for cool season greens.
Gardeners living in colder climates should adjust their gardening calendar accordingly. Yes, at this time, it might be too early for some. Most leafy greens prefer chilly weather, although many do quite well in summer as well. If they fail in the heat of high summer here, they might succeed in northern gardens (northern hemisphere) at that time. With careful variety selection and placement (light shade during the hottest hours of the day), we can stretch the harvest season for these healthy greens.
Summer Broccoli?
***Update***: This section added 12/11/2024.
The summer of 2024 tormented us with extremely high temperatures (over 100°F heat index) for many days at a time, coupled with periods of prolonged drought. The broccoli I planted in early March yielded well, but I left the plants in the garden after their main season had passed. The summer tomatoes cast dappled shade on these normally cool-loving ‘Green Magic’ broccoli plants. I cut off large broccoli leaves for the purpose of shading the tomato flower clusters and ripening fruits, preventing pollen death and sun scald in the tomatoes.
Over the hot summer, I picked small side shoots from the broccoli plants (that was unexpected). When temperatures began dropping in late summer, the broccoli yielded many more and larger side shoots! So, that year, it was worth keeping them in the garden. With partial sun, great soil, regular watering, and a thick mulch of oak leaves, they surprised me with their abundant offerings. I will do this again!
I’ve been growing miniature broccoli ‘Happy Rich’ for many years (a new crop each year, that is; photo, below). Planted where it gets light shade from the oak trees from noon to 3:00 or 4:00 p.m. on the hottest days of summer, ‘Happy Rich’ could survive to begin new growth in late summer. And it often sails right through the winter months, providing cut stems, heads, and leaves for the kitchen. In winter, the oaks are leafless, allowing more sun to reach the mini broccoli. This plant needs generous portions of aged cow manure, moist soil with a pH near neutral (7.0), and a thick layer of oak leaves to moderate soil temperature.
“How do I use these greens?”
Although I’m not a vegetarian, cool season greens are the foundation of my diet. I can’t tell you how satisfying it is to pick fresh greens for salads, sauces, veggie omelets, soups, sandwiches, and stir-fries in winter. Use them as a side dish, on pizza, with pasta, and in smoothies. Add them to lasagna, eggplant parmigiana, shrimp scampi, and even store bought canned soup! Adding them to anything you’re already preparing is a great way to get more of their densely concentrated nutrients.
Cool season greens are versatile in the kitchen but curiously underrepresented in our gardens. Considering the fact that many contain the highest levels of vitamins, minerals, fiber, and beneficial antioxidants among edible foods, it’s a wonder more gardeners aren’t growing them.
Growing your own produce from seed saves money during times of high inflation. But there are other reasons why I grow gardens year-round. You can harvest what you need for the day, so nothing goes to waste. Most crops can be grown cleanly—without pesticides—before the insects move in for the summer. Fresh greens consumed the day they’re harvested have considerably more nutrients than produce that has been sitting around for a few days. Furthermore, there are thousands of varieties to choose from that never appear in garden centers or grocery stores!
Maybe you’d enjoy experimenting with new varieties each year, as I do. Some have become my favorite foods, so they’re planted in my gardens each year. Among cool season greens, my favorites include miniature broccoli ‘Happy Rich’, gai lan, collards, ‘Nabechan’ bunching onions, Johnny’s Allstar Gourmet Lettuce mix, arugula ‘Astro’, ‘Arcadia’ broccoli, dinosaur and ‘Red Russian’ kale, spinach, and ‘Sugar Snap’ and ‘Oregon Giant’ peas.
Why brassicas are my favorite vegetables…
The brassicas—members of the Brassicaceae family, formerly Cruciferae—include arugula, broccoli, Brussels sprouts, cabbage, cauliflower, collards, gai lan, kale, mustard greens, pac choi, tatsoi, and some others. They’re particularly nutrient-dense, and this family of plants is the only one with measurable amounts of sulforaphanes. Sulforaphanes are powerful antioxidants that help prevent cancer, type 2 diabetes, cardiovascular disease, and inflammatory illnesses. They also help maintain eyesight, brain function, and healthy skin.
An enzyme, called myrosinase, is activated when brassica tissues are cut or bruised. This enzyme transforms sulforaphane precursors into the sulforaphanes themselves. But heat destroys this enzyme, so cooking the greens right after cutting them will give you no sulforaphanes. However, chopping the greens and letting them sit on the counter for 40 minutes before cooking them gives the enzyme enough time to develop these valuable antioxidants. If you can’t wait that long, eat some of the greens raw to introduce myrosinase into your system.
Because of our family history of dealing with a few chronic illnesses, I eat at least one of the brassicas every day.

Miniature broccoli ‘Happy Rich’ in the spring garden.
Preparing To Sow Seeds
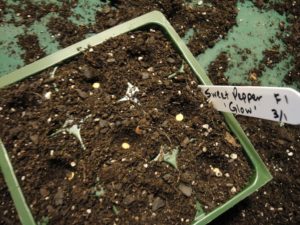
Pepper seeds sown in a 9-cell market pack.
It’s helpful to read this entire article before proceeding so you can gather materials and plan your setup. The next sections will present the sequence of steps, and Page 2 has all the details.
For starters, you will need:
- supplies (cell packs or pots, flats, labels, seedling soil or fresh fine-grained potting soil, seeds, vegetable fertilizer)
- warmth to start the seeds
- a waterproof surface
- adequate light to keep seedlings healthy and strong
- detailed records for future reference
Perhaps you’ve chosen lettuce, arugula, and ‘Black Magic’ kale seeds for your first project. You’ll need clean cell packs or pots, fresh seedling mix, and at least one flat to keep them in. You might already have used pots and flats lying around somewhere. Disinfect them first with a 10% bleach solution to kill pathogens, or at least clean them very well.
Instead of trashing the failing window blinds, I cut the plastic slats, which make decent plant labels. You can also use a plastic milk jug or buy labels at a garden center or online. Sharpie pens write smoothly, but the ink eventually fades in bright sun. Placing the label below ground or on the shady side of the plant keeps it legible for a while longer. A journal or notes on a computer are recommended for keeping records. (***Update***: Sharpie now offers markers with UV-resistant ink; look for “Extreme Fade Resistant” on the label. 6/30/2025)
I recently bought a few inexpensive heavy gauge flats from a big box store. Made by Ferry-Morse, they have no holes in the bottom and measure 10 x 20½” (inside diameter). They’ve proven their usefulness for holding pots of germinating seeds, so I’ll go back for several more. You can find similar trays from horticultural supply companies (in the “Microgreens” section) or from Amazon. Our local Walmart Supercenter stocks large black plastic trays meant for muddy boots, buy they’ll also work for the seedlings.
Temperature For Sowing Seeds
Successful germination depends on a source of warmth if your home is on the cool side, as mine is. Although lettuce and spinach can sprout at 40-50° F, they germinate erratically or not at all above 75-80°. Other greens will get off to a better start when the soil temperature is in the 70’s and 80’s. After germination, these seedlings need cooler temperatures.
What are the options? Heat mats are available. One that measures 21 x 21″ consumes 45 watts of electricity and costs about $40-60. Larger commercial sizes, for 8-10 flats, cost over $125. (***Update***: I just received heat mats from Amazon at a much lower sale price. They worked too well, so I propped seed flats on top of inverted webbed flats to prevent overheating the soil. 6/30/2025)
Maybe the top of the water heater provides suitable temperatures for starting a few pots of seeds. You might need to moderate the heat by raising the pots above the warm surface. Check them daily!
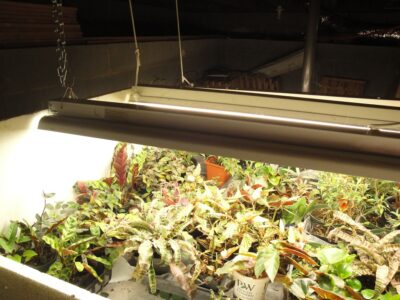
Miniature Incandescent Christmas Lights

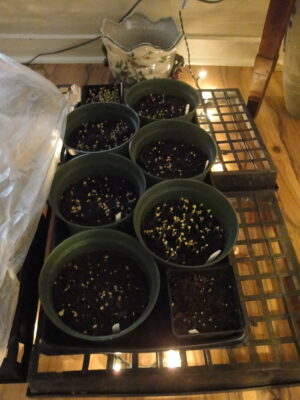
These brassica seeds germinated overnight, above the mini lights.
For many years, I’ve used indoor/outdoor miniature incandescent Christmas lights for warmth—not light—under the seeded flats. One 100-bulb string of lights (approximately 40 watts) on the hard floor of the spare bedroom and covered with 6 upside-down mesh flats (photo, above) works for me. Their gentle warmth is distributed over a large area, so I can start many flats of seeded pots at one time.
Be careful not to crush any bulbs, as this can cause remaining bulbs to burn hotter or to go out entirely. Don’t use higher wattage bulbs. Safety first! Incandescent lights are becoming harder to find, so check with online sources. I bought several from a big box hardware store’s website, although the retail store didn’t have any for sale.
You might want to test this layout before proceeding. Perhaps you have a folding table or counter space in the utility room that could serve this purpose.
When that greenhouse kit gets built, I’ll probably start seeds out there. Indoor space is very limited, and plants fill every bright window. I need to work on a more efficient infrastructure for sowing seeds and transitioning them to outdoor growing.
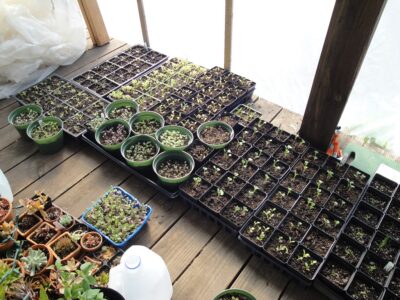
Preparing Pots For Sowing Seeds
A flat of seeds over mini lights, with plastic to hold the warmth until seeds germinate.
Each year, I start over 200 varieties of plants for the farmers’ markets, so many of the flats are shifted around almost daily. After the first round of seedlings has been transplanted, I start another. Some varieties need more time to sprout, while others, such as arugula, germinate in just 2 days.
A sheet of clear plastic over the flats holds in humidity and warmth from the mini lights. Labels identifying each variety hold the plastic above the soil. For good air circulation and to let condensation evaporate, keep the plastic open on the edges.
Light For Germinating Seeds

Your seedlings must receive direct sunlight or strong artificial light as soon as they emerge from the soil. One or two days in inadequate light causes the seedlings to weaken as they stretch toward the light, so don’t delay getting them into the sun.
From horticultural supply companies, you can find ready-to-assemble light stands with shelves and LED fixtures. There’s one with 3 shelves, six 4′ LED tubes, and an attractive powder-coated aluminum frame that costs $1,000+. Smaller units for 1-3 flats are more affordable at $100-400. They might give off enough warmth to satisfy the need for warm soil. One advantage in using this setup is that the light fixture above each shelf sustains transplanted seedlings for 2-4 weeks as long as the temperature is at acceptable levels. Cool season greens do best with a drop in temperature (below 60-65°) after germination.
You won’t need advanced carpentry skills to put something together yourself. One or two 4′ long shop lights each fitted with 2 “daylight” (full spectrum LED or fluorescent) tubes cost $30-70. Use 2 x 4’s for the supporting framework or suspend the fixture under a table or a shelf. Chains and S-hooks raise or lower the fixture, or simply elevate the seed trays to get them closer to the light.
In My Basement
In the basement and over two 6′ tables, I nailed chains and rope to the floor joists and positioned the lights as needed (photo, above). I’ve used these fixtures for decades—moved from house to house—to start seeds and root cuttings, rehabilitate plants, and grow delicate species and stock plants.
Plants that need strong light (vegetables, herbs, succulents) grow only 3-4″ below the tubes. One foot below the tubes, however, is too far away, except for most tropical houseplants. Light intensity drops precipitously with each inch of distance from the light source. Running the fixtures for 16-18 hours per day should supply enough energy for the plants to grow normally.
Seedlings won’t mind 24/7 lighting over the short term. Not turning the lights on and off every day adds to their longevity.
I prefer to start seeds without relying on electricity, using just the sun. But, at times, starting seeds under these light fixtures is convenient, particularly when they can grow there for a week or two before I’m able to transplant them.
Natural Sunlight And Temperature
Seedlings and fresh transplants enjoy the protected space on the enclosed porch.
Newly transplanted seedlings go out to the sunny enclosed porch (photo, above), which faces south. I usually keep them there, in sun that’s lightly filtered by the plastic enclosure, for their first 1-2 days. On an overcast, calm day, new transplants can go outside to the open air if the temperature is above 50°. When the wind’s blowing, though, I keep the flats on the porch and vent the plastic to admit cool air. The enclosed porch—when the plastic “door” is closed—heats up to 90° or higher on a sunny winter day.
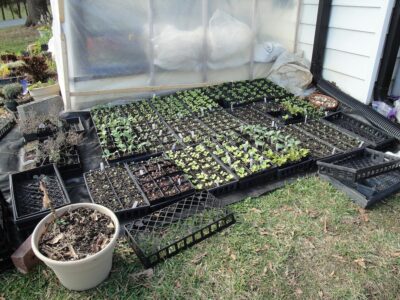
For a few nights when the porch was too cold for young plants, I brought them back indoors. Now, at the end of February, dozens of flats stay outside on black woven ground cover (a durable polypropylene fabric; photo, below), hugging the wall of the porch. That’s on the south/southeast side of my house, a warm microclimate. There’s less wind here and nighttime temperatures stay a few degrees above areas farther from the house.
Success depends on temperature, so I check expected hourly temperatures daily and the forecast for the coming week. I cover the flats with plastic or an old sheet when they need a little protection. But, at this stage, they’re becoming more resilient to temperature fluctuations.
In the morning, I’ll remove the plastic and let them bask in the sunshine. Those little seedlings double in size in a week as roots fill the pots. Once they form a root ball that holds the soil together, these plants will be ready for the market. As these seedlings grow and are moved to the large holding pen, the next crop of young seedlings takes their place.
Young brassica seedlings on SE side of porch.
How Low Can They Go?
Maturing seedlings of cool season greens tolerate temperatures in the high 20’s and 30’s. They’ll take temperatures lower than that when they’re a bit older and planted in the garden. Remember, this regimen applies to cool season greens and vegetables, not to main season crops (tomatoes, peppers, basil), which need a warm environment.
In this part of northern North Carolina, elevation 1200′, late February temperatures range from the middle to high 50’s in the daytime to the mid-30’s at night. Keep in mind that those are averages and that actual temperatures can vary considerably from the average.
As an experiment, I left 3 containers of newly transplanted ‘Freckles’ lettuce seedlings outside, exposed to 21-22° on 2 nights. They’re fine! Lettuce resists damage better than some of the other crops.
One Step At A Time
We don’t want to subject tender seedlings only a few days old to the rigors of outdoor conditions, especially wind and freezing temperatures. Indoor-grown seedlings that received less than adequate sunlight will need a more gradual transition. Some will thrive, while others—the spindly, weak ones—will look stressed or die.
When in doubt, proceed in incremental steps—gradually lowering the temperature and introducing seedlings to increasing sun and wind speeds. This is called hardening off. Assuming the weather cooperates, vegetable plants can be hardened off within one week.
Root systems grow quite fast in order to supply water to foliage and stems. Leaves adapt to prevailing outdoor conditions, growing a thicker cuticle. The cuticle is a protective waxy outer layer over the epidermis, designed to slow moisture loss from within the leaves.
Headings:
Page 1: Sowing Seeds For The First Crops: Too Early? (When, Exactly?, Summer Broccoli?, “How do I use these greens?”, Why brassicas are my favorite vegetables…), Preparing To Sow Seeds (Temperature For Sowing Seeds, Miniature Incandescent Christmas Lights, Preparing Pots For Sowing Seeds, Light For Germinating Seeds, In My Basement, Natural Sunlight And Temperature, How Low Can They Go?, One Step At A Time)
Page 2: Growing On To Transplant Size (Fertilizer), Sowing Seeds: The Process, Transplanting Into Larger Containers (The Process, Sowing Seeds and Transplanting In Multiples)
Depending on where you live, you can start cool season greens in mid-winter, late winter, or early spring. Variety selection is important. For example, broccoli ‘Green Magic’, ‘Monty’, and ‘Belstar’ are good options for spring crops, forming heads in warming weather. ‘Arcadia’ and ‘Marathon’ are good as fall crops, in cooling weather. I always grow ‘Arcadia’ in autumn because it’s the most cold-tolerant broccoli I’ve grown (often lasting all winter here in zone 7b) and it produces many rounds of side shoots after the main head has been harvested. Spinach and lettuce are other crops that have cultivars that tolerate varying amounts of frost/freezing or warm temperatures.
Arugula ‘Astro’ is my favorite variety because it can take warm or cold conditions and it self-seeds prolifically. That’s one of the earliest greens I start. At the same time, I sow seeds for miniature broccoli ‘Happy Rich’, spinach ‘Lizard’, bunching onion ‘Nabechan’, the tender kales ‘Red Russian’ and ‘Lacinato’, and some of the lettuces. After being transplanted into cell packs or individual pots, they go out to the enclosed porch or outside in moderately cool sunshine. During those late winter/early spring months, the flats might have to come back into the porch at night until the weather moderates.
Contact Johnny’s Selected Seeds and request a print catalog. There’s a lot of helpful information about growing each crop, including cold tolerance. Experience with each variety will teach you which varieties can tolerate colder temperatures and how far you can push the envelope. Keep notes!
Kim
Early sowing is a game-changer! What’s the earliest crop you confidently recommend starting in late winter?