2020
Updated 11/13/2025
Kim’s Tips for Rooting Your Own Lavender Cuttings
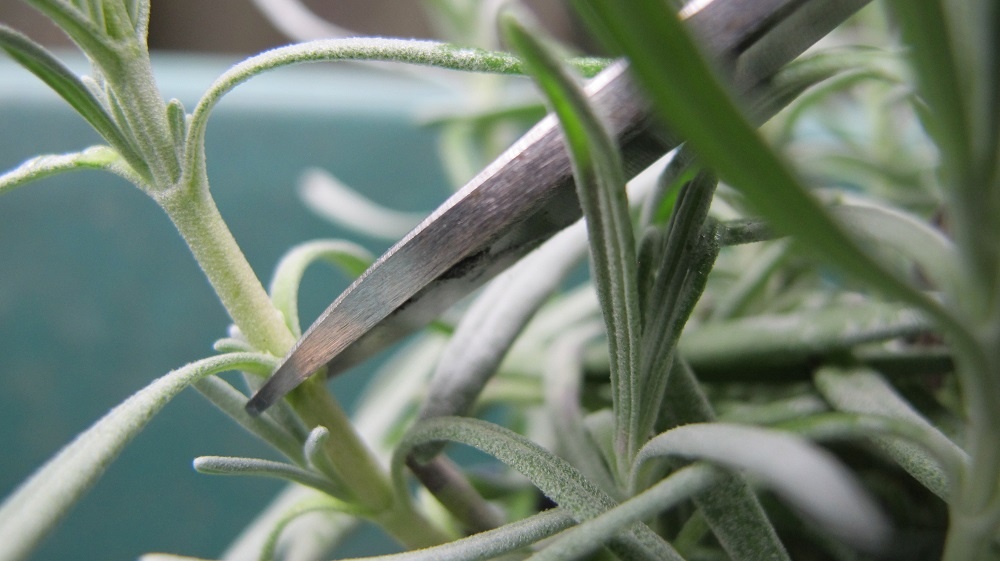
Cutting a lavender stem at a node.
How wonderful—the fragrance of lavender wafting through the back yard. You’re pleased beyond measure with these silver-leaved subshrubs in the pollinator garden, and perhaps you’d like more of them. The bees and butterflies are all over them! And the deer never touch them!! Garden centers stock several cultivars of lavender, but they are not inexpensive. Problem solved: “I’ll root my own lavender cuttings!”
The plants have performed well, and the garden is buzzing with activity. Now, you’d like to expand the garden to provide even more sustenance for all the bees and other insects… and for your own enjoyment! Admittedly, there is some work involved. Properly preparing the heavy clay soil takes effort and materials, but you know it will be worthwhile.
We need pollinators for farms and orchards, for home vegetable gardens, and to regenerate natural stands of greenery. They pollinate every third bite of food we eat.
Because it takes several weeks to root cuttings and to grow them on to the proper size for transplanting, time is on your side. So, let’s begin by taking cuttings from the plants in the garden. While they’re rooting, you’ll have plenty of time to get the soil just right for the new plants.
Patent Rights
Because it’s illegal to propagate trademarked plants for resale, I buy the newer patented lavender cultivars in trays of 60 to 200 tiny rooted plants, called plugs. Labels of branded varieties list the patent number and carry the caution, “Unauthorized propagation prohibited”.
Many varieties are not under patent protection, however, so those are the ones I propagate for sale.
Lavender from Seed
Another option is sowing seeds—‘Ellagance (sic) Purple’ and ‘Lady’ are two that you might try growing. ‘Munstead’ and ‘Hidcote’ are strains that have been around for a long time. Seeds take a few weeks to germinate, so this project is best started in spring. Plants grown from seed (sexual propagation) can vary in certain characteristics, including plant size, foliage color, flower color and size, and time to first bloom.
Plants vegetatively propagated, on the other hand, will have consistently similar characteristics. Cloned plants, from cuttings, have the same genetics as the stock plant, so the rooted cuttings will look identical to the parent.
Prepare the Pots and Soil for Lavender Cuttings
First, assemble 3½ ” or 4½” plastic pots. Bigger pots hold a much larger volume of soil, which dries out too slowly.
Lavender is susceptible to several fungal diseases, so starting with clean materials is essential. At the very least, wash the pots with soap and hot water. Better yet, clean the pots with a bleach solution, let them sit for a few minutes, then rinse thoroughly.
Another option is to use new cell packs, with 4 to 9 cells per pack. Soil in small cells dries faster, so you’ll need to closely monitor these containers.
Don’t use soil left over from last year’s plants; it could be harboring disease spores. Never throw “used” soil into the trash. Instead, add it to the flower gardens, the compost pile, or the shrub border, where it will contribute organic matter as it decomposes.
Options for Potting Soil
- Always begin with pasteurized potting soil. Mix this with clean coarse sand, charcoal bits, and/or perlite. The medium must drain well, allowing both water and air to percolate through the soil.
- Use products formulated for succulents, and add houseplant potting soil to make a gritty medium, but one which will hold some water.
- Or, simply, use a fresh bag of pasteurized potting soil, which includes perlite, and be very careful about watering.
Avoid using soil containing a large percentage of peat moss, which is acidic and stays too wet for lavender. This herb, like many others, needs close to a neutral pH (7.0).
Incidentally, most potting soils sold in garden centers contain no soil at all, and are sometimes called “soilless potting mixtures”. For our purposes, the term “potting soil” will do.
If the medium is dusty dry, mix in a small amount of water. Avoid breathing in the dust. The soil should be slightly damp. Fill the pots with potting soil, and firm lightly. Leave about ½” to 1″ of space between the soil surface and the pot’s rim.
Making the Cut
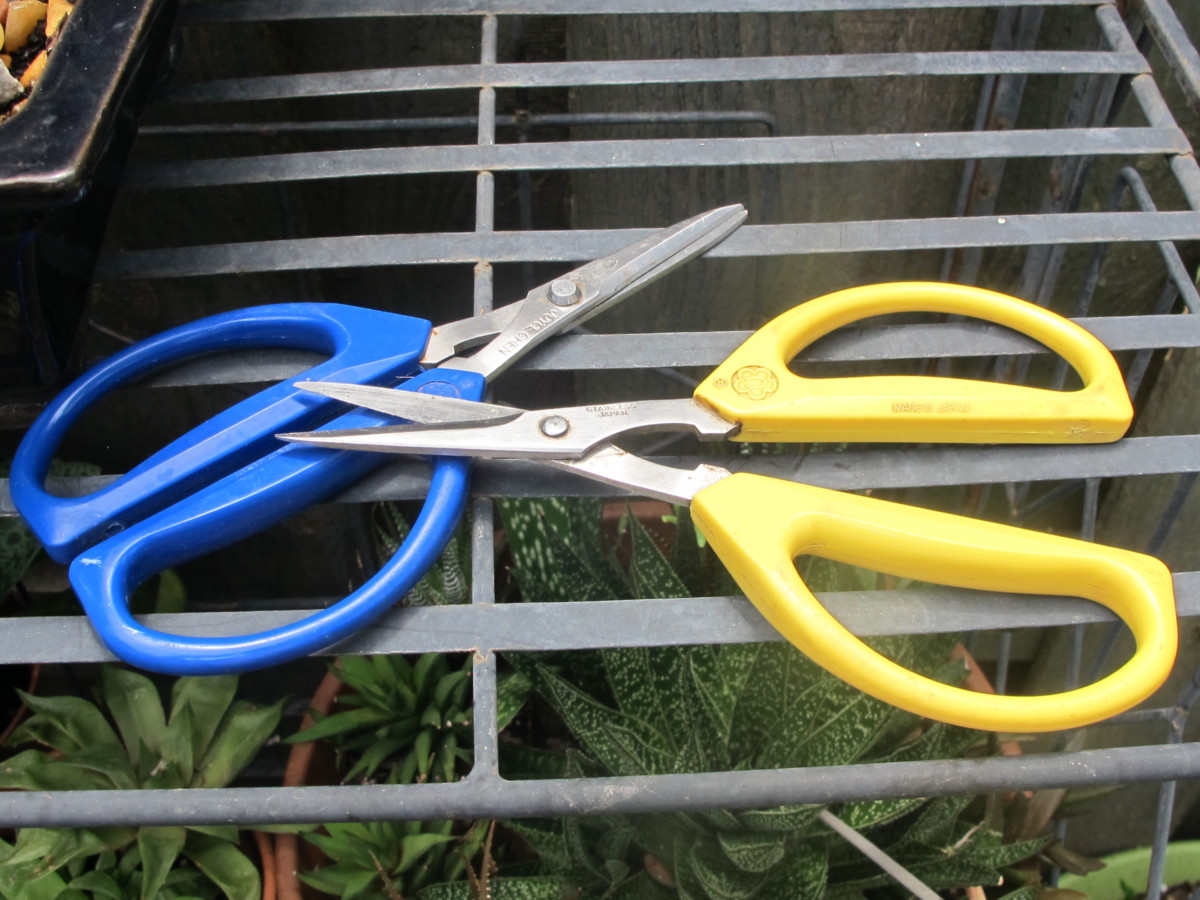
Joyce Chen scissors.
When To Cut
Cuttings taken in early to midsummer should root adequately before autumn. These are considered “semi hardwood” cuttings. The stems aren’t fully matured, but they aren’t too tender, either. Tough old woody stems will not root.
Collect lavender cuttings in the morning, when they’re fully plumped with water. Don’t use material from the bottom or the shady side of the plant. Use healthy foliage, without any spots. Cuttings from plants that have not been overfertilized with nitrogen are more likely to root successfully.
How To Take Lavender Cuttings
With clean sharp scissors, take cuttings from non-blooming, non-budded stems. Lavender cuttings from the tips of the stems, rather than from middle sections, make better propagating material. If your early blooming lavender plants were deadheaded (old flower stems cut back) early in the season, the remaining stems might already have branched out, providing fresh cutting material.
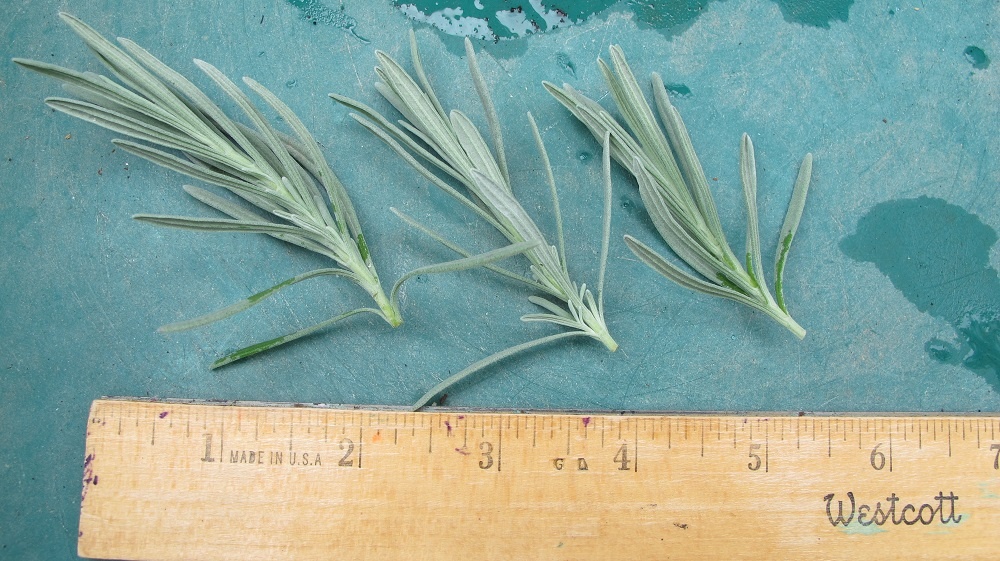
Cuttings, before removing bottom leaves.
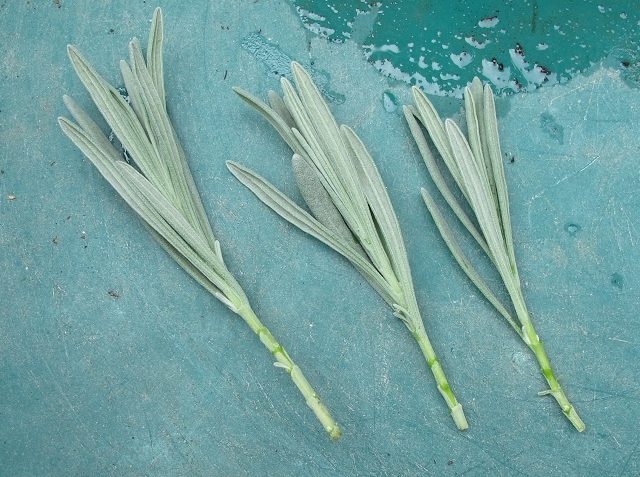
Lavender cuttings should be only 2″ to 3½” long, depending on variety. Longer cuttings have greater leaf surface area, and the cuttings might wither before roots form. When taking cuttings from any plant, consider the number of leaves, light, water, humidity, and time to root. Each plant has its own combination of variables that results in prompt, successful rooting. Long cuttings, low humidity, lack of light, and wet or dry soil will not yield rooted plants.
Make the cut where two leaves join the stem (photo at top). This part of the stem is called the “node”, and the first roots often emerge there.
Now, remove leaves on the bottom inch or so of the stem. Gently peel them off. Otherwise, leaves will rot in the soil, which could rot the stem.
Cuttings, ready for sticking.
Rooting Lavender Cuttings In Water
Coleus cuttings start rooting in water in a few days; lavender requires weeks in soil. When possible, I always root plants in potting soil rather than in water. The roots’ cell structures differ between the two methods, and those growing in water often die when trying to adapt to soil.
If you have plenty of cuttings, perhaps rooting some in water will work for you. Cuttings should be about 2½” to 3½” long. Use only an inch of water in a glass, don’t crowd the cuttings, and remove leaves in the water. Place the glass in part sun, and change the water every few days.
Pot the cuttings into gritty potting soil when the roots are only 1-2″ long. Don’t wait for roots to grow much longer than that because they’ll have greater difficulty adapting to a different medium.
Sticking the Lavender Cuttings
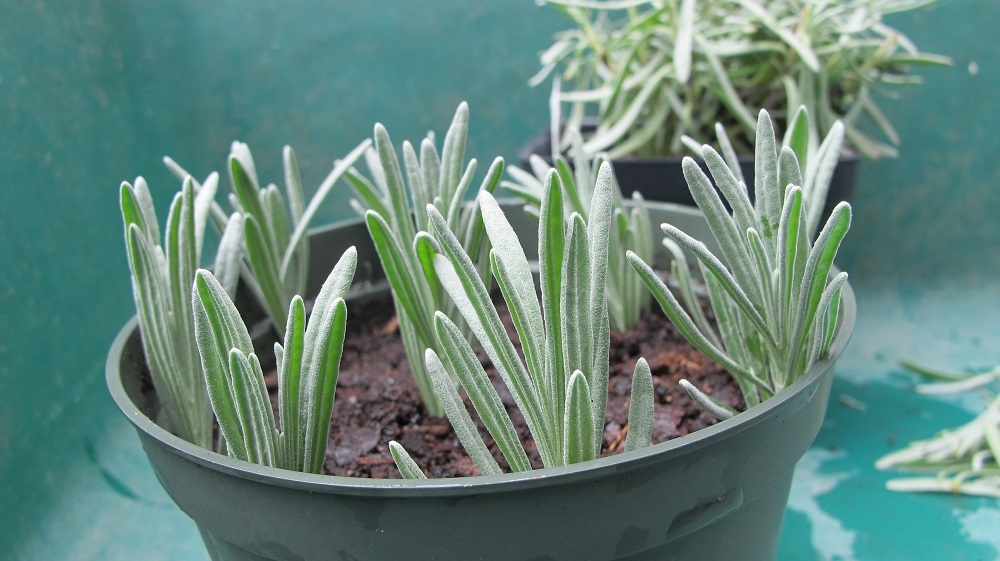
After decades of rooting plants under lights for my business, I’ve had the most success with cuttings that were stuck right next to the inside of the pot. Particles of soil touching the wall of the pot tend to permit more air to circulate around the stems. That’s precisely what lavender needs.
The stems aren’t sitting in wet soil, although there is some contact. At night, as the temperature drops, water vapor precipitates on the inside of the pot. And the humid air in that space helps the cuttings root. I believe this is the same principle seen when plants root against the bottom of a rock at ground level. The difference in temperature causes a film of water to collect on the part of the rock underground, nurturing root growth.
Lavender cuttings.
This 4½” pot accepted 9 cuttings, with 1 in the center. Avoid crowding the cuttings; space them so their leaves don’t touch each other. Lightly water in the cuttings to make better contact between the stems and the soil.
I propagate other herbs, including thyme, rosemary, oregano, sage, French tarragon, and bay laurel, in the same way.
Actinovate
When propagating herbs and perennials each season, I use an organic biological fungicide called Actinovate. This product, a bacterium called Streptomyces lydicus strain WYEC 108, prevents vulnerable plants from succumbing to several diseases. Water the solution into the soil after sticking or lightly mist the cuttings. I also use it when germinating seeds to prevent damping-off.
This fungicide is quite expensive, but it makes plant propagation much easier for me. It carries the OMRI label and is safe to use on edibles.
Always exercise caution when using materials for treating plants. Don’t breathe the dust, avoid getting it on your skin (rinse thoroughly), and don’t improperly dispose of leftover product or the container. Read the label.
Rooting Hormone
Rooting hormone powder coats the base of the cutting with a chemical fungicide and plant hormones. This product accelerates the rooting process for many plants, including shrubs that are reluctant to root from cuttings. Check to see if it’s recommended for any other plants you’re trying to root. It’s also available as a liquid dip.
I haven’t used it for many years, but, if you’ve had good results using a rooting hormone, then try it on your lavender cuttings. Always read the label. Never discard leftover powder where it can pollute streams. This product carries the Environmental Protection Agency’s Caution rating, as does Actinovate.
Raise the Humidity
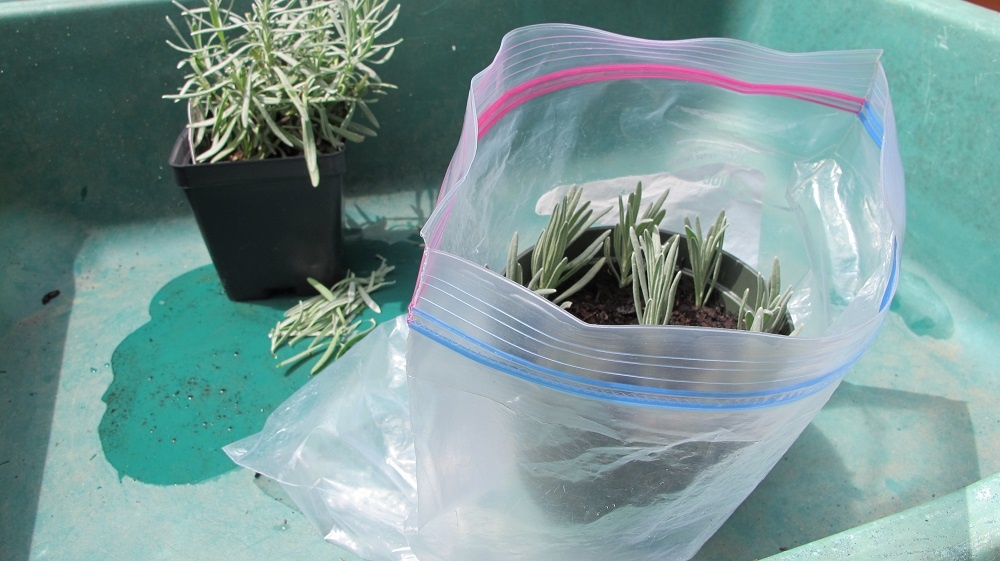
Pot of cuttings in open plastic bag.
To raise the humidity around the cuttings without causing rot, place the pot of cuttings into a clear plastic bag. Pull up the bag so it surrounds the cuttings, but don’t secure it. Fuzzy-leaved plants, such as lavender, rot (not “root”) easily in high humidity. A closed plastic bag or some other closed system raises the relative humidity to 100%. It also causes the “greenhouse effect”, raising the temperature too high when exposed to the sun.
So, keep the top of the bag open. Enough humidity will remain around the lavender cuttings. In very dry environments, the bag can be partially closed, but don’t let heat build up. Empty any water that collects at the bottom. If the soil is moist and there’s significant condensation inside the bag, open the top more widely, and let excess moisture dissipate. Wet soil will rot the cuttings.
Headings
Page 1: Kim’s Tips for Rooting Your Own Lavender Cuttings (Patent Rights, Lavender from Seed), Prepare the Pots and Soil for Lavender Cuttings (Options for Potting Soil), Making the Cut (When to Cut, How to Take Lavender Cuttings, Rooting Lavender Cuttings in Water), Sticking the Lavender Cuttings (Actinovate, Rooting Hormone, Raise the Humidity)
Page 2: Light for Lavender Cuttings (Indoors, Artificial Light, Outdoors), Ready to Transplant Your Lavender Cuttings? (Cuttings Rooted in Pots, Cuttings Rooted in Cell Packs, Harden Off the Lavender Cuttings), The Garden is Ready (To Mulch or Not To Mulch), Is Your Lavender Winter Hardy? (Better for the Environment)