Tag Archive | pH

Tips For Planting a Wire Hanging Basket


2019


Tips For Planting a Wire Hanging Basket


hanging basket, zinnia, calibrachoa, yellow, purple

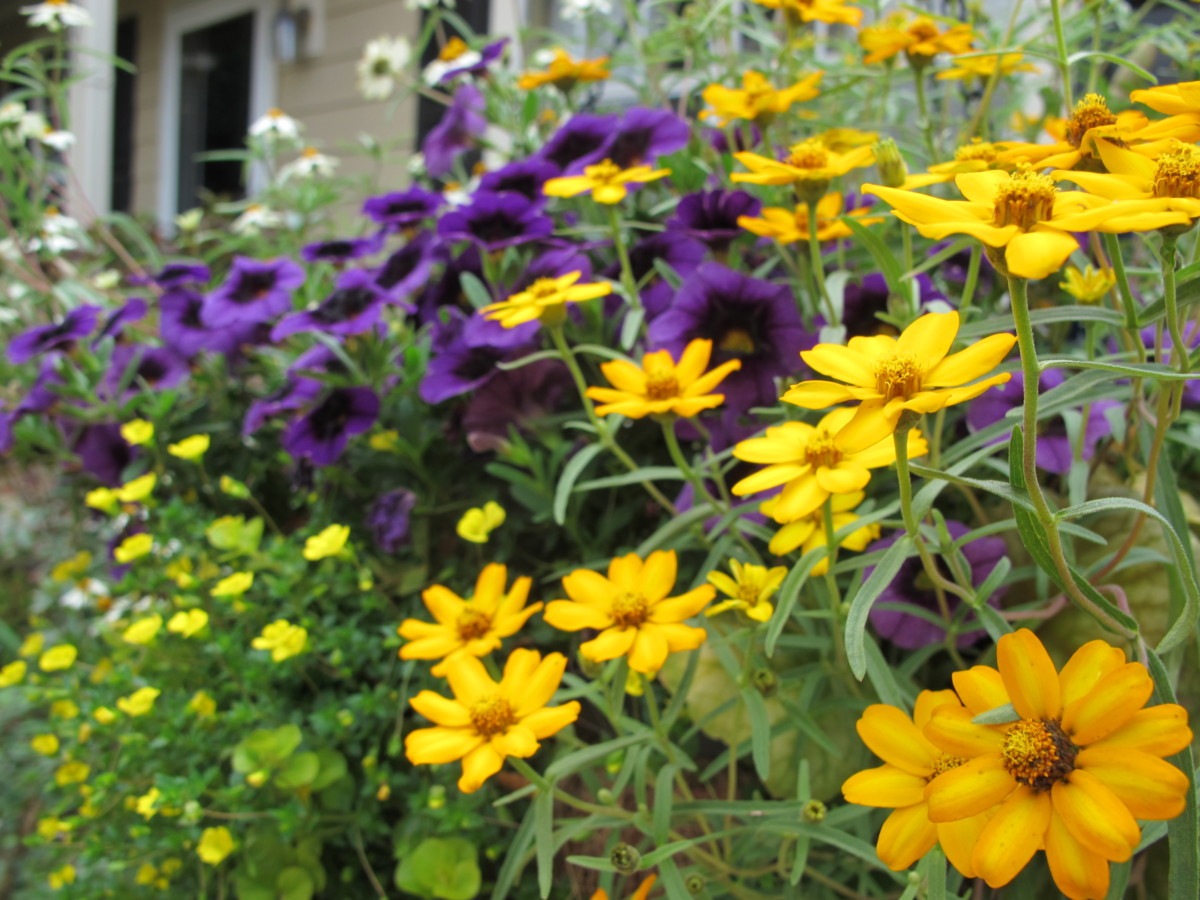
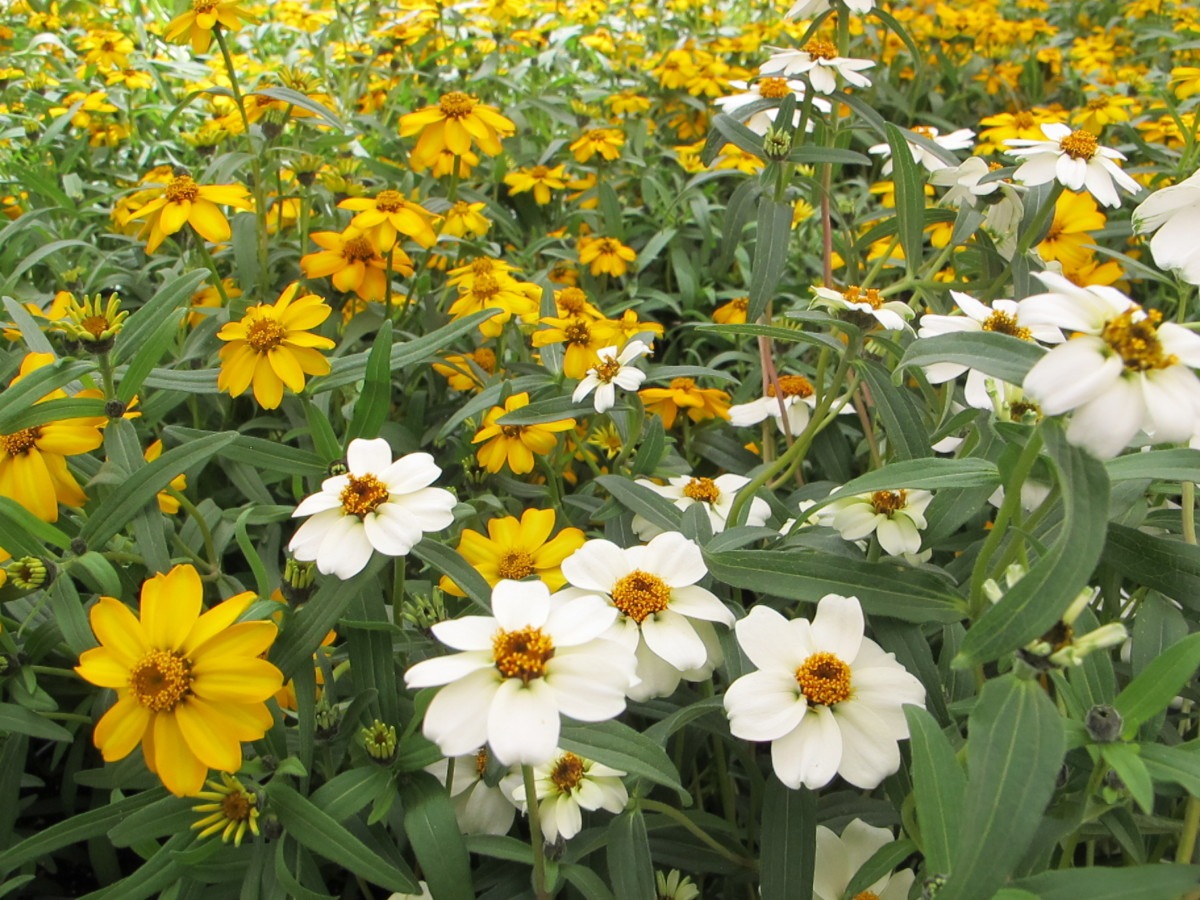
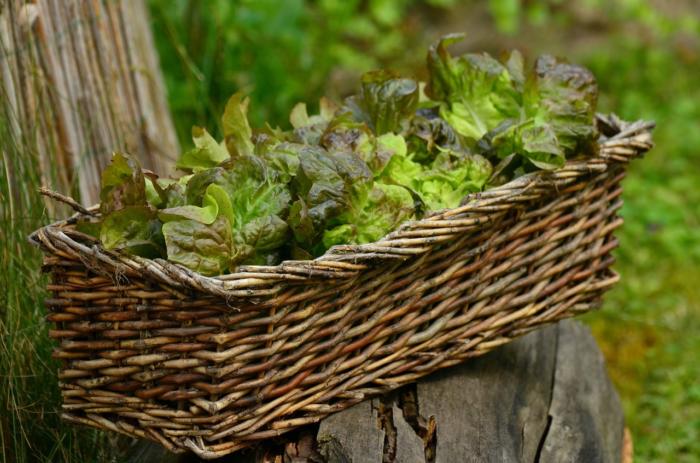
The 16″ wire hanging basket with purple calibrachoa, yellow and white zinnias, and yellow mecardonia.


Now that the weather has settled, it’s time to plant the hanging basket. Okay, it’s 43°F in Helena, Montana, so you’ll have to wait a while. But here in Charlotte, it’s already 90°. We’ve had beautiful spring weather for weeks now, and gardens all over town are showing new life.

It is confirmed once again that I could never move back to a colder winter climate. Picking tomatoes here in early June is commonplace rather than a rarity. In the past, I’ve lived where a ripe tomato for a Fourth of July barbecue won neighborhood kudos! It’s not the summer heat I look forward to but rather the longer growing season and greens that grow through the winter.

I bought several pots of annuals two weeks ago but haven’t planted them. The plan is to refresh the wire hanging basket, and to fill the front beds with color. Complicating matters, though, is when the new siding will be installed. Our building has been rescheduled to a much earlier date, so no gardening will take place until the work has been completed.


A Few Preliminaries


Can I Reuse Old Potting Soil In the New Hanging Basket?

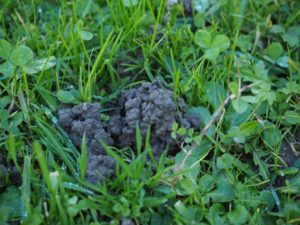
The hanging basket that held blooming violas and a few perennials over the winter will be emptied. The old soil, which still has value in the garden, will be dug into one of the flower beds. Organic components (peat moss and fine pine bark, primarily) break down, enriching the soil.

Used potting soil can be broken up and thrown under the shrubs or topdressed in a thin layer on the lawn. More options include adding it to the compost pile and using it in the backfill when planting trees and shrubs. I never throw away old potting soil, and, of course, I’ll save the perennials. But for new hanging baskets, use fresh potting soil for the best results.

Soil in large planters can be used again if it still has good tilth and hasn’t been waterlogged. It’s good idea, however, to replace the top third of soil. If diseased plants grew in it, I would discard the soil.


Refresh/Reuse

paint colors

If the metal frame looks a bit tattered, now is the time to clean and dry it. Buy a can of spray paint, in the color of your choice, and freshen it up. Look for one that will stick to the finish on the frame. Some are metal; others are vinyl-covered metal.

Maybe your mother the artist has some ideas about color. Jazz it up a little in a shady spot, or color-coordinate the paint color with the flower colors. If you prefer classic black or bright white, those are fine, too. By the way, wire hanging baskets are also called “English Garden” baskets.

For a frame that looks only a little scuffed, try using a solution of horticultural oil (more concentrated than you would use for insects) wiped over the frame. I’ve used the oil to freshen used plastic pots, which often looked like new again. Be careful—horticultural oil makes surfaces slippery.


Line the Liner

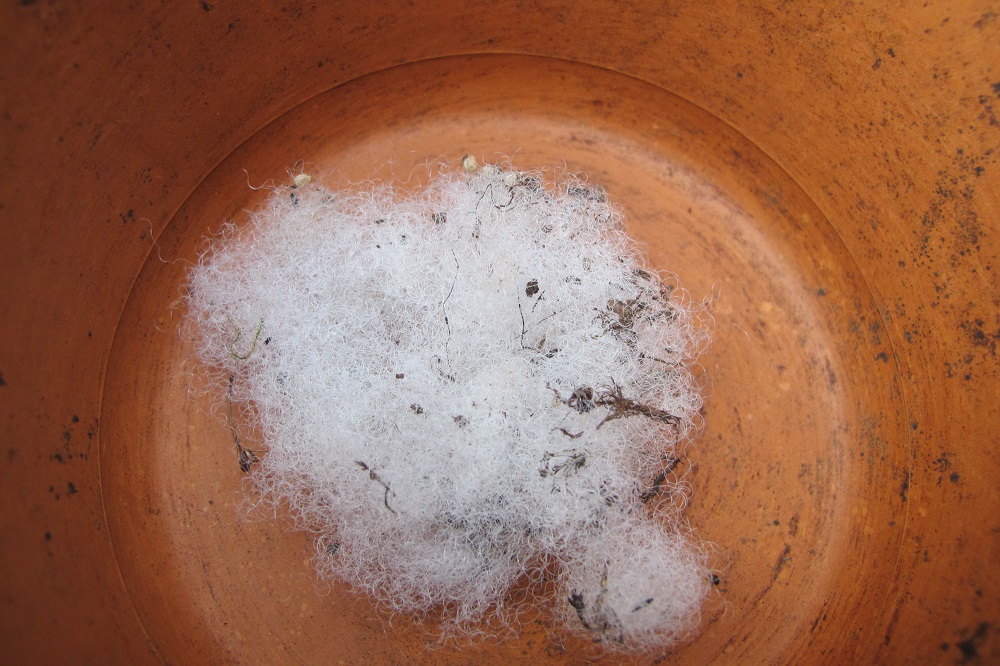
Wire baskets are available with reinforced green sheet moss, but more often with a coconut fiber liner. I’ve used both, and have found the coco liners to be more durable, although I prefer the color of the moss.

If you need a new liner, garden centers stock both pre-formed liners and bulk rolls that can be cut to the length desired. Before shopping, measure the curve of your hanging basket, adding a bit extra, for a proper fit.

A Simple Trick

Here’s a trick I’ve used for many years: line the inside of the coco liner with a sheet of plastic. Reuse an empty mulch or potting soil bag, cut so it extends above the rim. The excess will be trimmed after planting. Now, punch several holes around the bottom third of the plastic to allow for drainage. In hot or dry climates, consider leaving the bottom 1″ to 1 1/2″ of the plastic intact. The soil and plants will absorb water that collects in the reservoir.

coconut

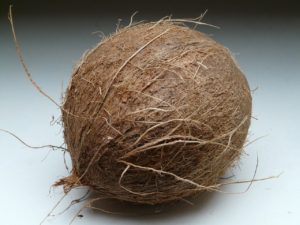
Coconut: source of coir for potting soils and coco liners for baskets.

This offers a few advantages. First, the plastic prevents soil contact with the coco fiber, delaying decomposition. A thick liner, made from coconut husks, will last an additional year or two.

Second, plastic prevents rapid evaporation of moisture from the soil. Plastic stops the hot dry wind from reaching the soil.

Third, plastic slows down infiltration of icy cold wind, delaying chilling of the soil in winter combinations.

And, fourth, soil won’t be lost through the thin, loosely woven spots in the liner. See if you can double up on the coco liner in those spots. And face the dark side of the plastic, if there is one, outward. This is less conspicuous than a bright yellow beacon peering out from the between the fibers.

Other Options

Perhaps you have other materials hanging around the shed that can substitute for a coco liner. A few layers of burlap, landscape fabric, an old blanket, or that unused fiber grow pot could work for this growing season. Still, I would line it with a plastic sheet for the reasons stated above.


wire basket, fabric liner

A repurposed grow pot, now used as a liner for the hanging basket.


Where To Place the Hanging Basket


bracket for hanging basket

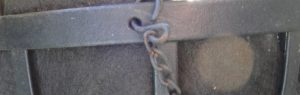
Notice how weight is distributed along the vertical part on the left, pushing bracket against the wall.


Have you decided where the shepherd’s hook will be placed? Have you already installed a sturdy bracket on the fence or deck post? Well-constructed wrought iron is costly, but it lasts a long time. Look for the thicker, heavier hooks and brackets. Visit the hardware store for special anchors and instructions if attaching the bracket to a brick surface.

Make sure the bracket or the hook is large enough to accommodate your hanging basket. This isn’t a concern with smaller baskets but is often overlooked for the large ones. Hardware is available in different sizes, so measure first, or you might find that the large hanging basket you want to use won’t fit onto the shepherd’s hook you already have.

Sometimes it’s hard to determine whether the vertical part of the bracket should be placed above or below the horizontal part. Securing the vertical side below the horizontal arm, as in the image above, helps direct the force against the wall. The bracket is less likely to pull away from the wall or post.


Sun Or Shade?


House, tree in front


Pay close attention to the number of hours of direct sunlight the chosen location will receive. As the sun changes its path across the sky from one month to the next, the amount of sunlight will vary. A location near the front door might get lots of sun in April but could be in almost full shade once the trees leaf out.

Don’t expect a blazing burst of color from plants that need 7 or 8 hours of sun if you place the hanging basket under the semi-shady deck. Plant tags often erroneously indicate “partial sun/full sun” for plants that really need full sun. Partial sun to us gardeners, by the way, is 4 hours of sun.

Ask salespeople at the garden center for advice about light requirements. Petunia, verbena, calibrachoa, lantana, zinnia, and scaevola need full sun. Lobelia, bacopa, browallia, torenia, and some of the begonias will do well in morning sun and bright afternoon shade in this hot climate. Caladium, anthurium, ‘Non-Stop’ tuberous begonias, ferns, and foliage plants can take various levels of shade.


Choosing Plants For Your Hanging Basket


Plants have upright, mounding, or trailing habits. For smaller baskets, perhaps only mounding and trailing plants will fit. If single-variety monoculture is your preference (for example, a 12″ pot of purple Wave petunias or a 10″ pot of sky blue lobelias), go for it.
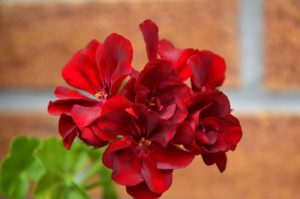
 

Geranium flower.


If you want a pot of zonal geraniums, avoid hanging it so high that all you see is the bottoms of the leaves and the pot. Place it with the flowers at eye level or enhance it with some trailing vinca vine and a few mounding white or yellow calibrachoas. Adding a trailing element creates greater interest.

salvia black and bloom

Stately Salvia ‘Black and Bloom’ attracts hummingbirds, butterflies, and bees.

The 16″ wire hanging basket, for the shepherd’s hook in the front garden, can hold 6 to 10 plants. A large perennial Salvia ‘Black and Bloom’ (photo, right; hummingbirds visit every morning!) grows in the bed behind the basket, next to a yellow-tipped arborvitae.

So, the color scheme will include blue ‘Laguna’ (heat-tolerant) Lobelia, purple calibrachoa (million bells, a small cousin of petunia), little yellow Mecardonia, and a few golden yellow and white (powdery mildew resistant) Zinnia angustifolia.

A Heuchera with orange-ish foliage might remain in the pot, if the color plays nicely with others. (A passionflower I had bought earlier in Hendersonville survived the summer in a tiny 2″ pot.)

I use this color combination in the fall, sometimes, when planting violas. It borrows from both the warm and the cool color palettes. When in doubt, combine colors next to each other on the color wheel (for example, red-orange-yellow [warm colors], or pink-blue-purple [cool colors]) or opposite each other (red-green, blue-orange, purple-yellow). Adding white calms everything down when using several colors.

(***Update***: While the annuals awaited completion of the siding installation, a few of them perished. It happens. I plugged the survivors into the basket and fertilized them. Six weeks later, you can see how nicely it filled out. That’s the basket, at the top of this article. And I planted the passionflower, a vigorous vine, in the garden for the gulf fritillary butterflies. Autumn, 2019.)


zinnia ang.

Zinnia angustifolia ‘Star’ series, disease resistant.


Consider These Color Combinations:

  • red-white
  • yellow-white. These first two options make clean, crisp combinations.
  • chartreuse, green, orange, and white look good together
  • shades of yellow-orange-cream
  • blue-yellow-white
  • red-white-yellow
  • silver or gray and shades of pink
  • purple-blue-silver-pink-white
  • lavender-purple-white
  • warm maroon-peach-coral-cream-sky blue

Generally, I avoid using gray/silver with pale yellow. Orange and pink together don’t do anything for me.

We tend to gravitate toward our favorite colors, so try adding varieties you haven’t tried before. See if you can introduce foliage color (caladium, coleus, lysimachia, heuchera, sweet potato vine, begonia) that echoes the color of a flower.

A contrast between flower and foliage forms might also bring greater interest. Adding fine foliage or delicate flowers (nierembergia, diascia, bacopa, lobelia, alyssum, euphorbia ‘Diamond Frost’, mondo grass) contrasts effectively with bolder textures.


Headings

Page 1: Tips For Planting a Wire Hanging Basket, A Few Preliminaries (Can I Reuse Old Potting Soil In the New Hanging Basket?, Refresh/Reuse, Line the Liner), Where To Place the Hanging Basket (Sun Or Shade?), and Choosing Plants For Your Hanging Basket (Consider These Color Combinations)

Page 2: Ready to Start?, Time To Play In the “Dirt”, Timed-Release Fertilizer, and Maintaining the Hanging Basket (Water, Soluble Fertilizer, Deadheading, New Varieties, Pruning Your Hanging Basket, Insects and Spider Mites, Slugs, Deer!)

Return to the top

Vegetables in Containers: How To Grow Them

2018

No Garden Space? No Problem!


Growing Vegetables in Containers


peppers and green onions in a pot

Peppers and onions.


Before I started this blog, I managed the Edibles Department for a few years at an independent garden center in Charlotte, North Carolina. As some of our customers downsized to apartment living or to a condo with a balcony, they didn’t want to give up growing their own herbs and vegetables. So, they were glad to hear that they could grow vegetables in containers…as long as the balcony was on the right side of the building. And the right side for vegetables is the sunny side of the building.

Lack of direct sunlight and adequate growing space are limiting factors. Look around, though, and you might come up with some ideas. For example, some of our customers were given permission from their condo associations to garden in common areas. Running for open association board positions yourselves is one way to garner support. I encourage you to attend board meetings, bringing your neighbors, a plan, and a promise to maintain the site.

Neighborhood community gardens are another possibility, although there often is a waiting list. With so much emphasis on eating healthy foods, little pocket parks and community gardens are popping up all over the country.


For Your Convenience

damaged tomato, squirrel

A young tomato damaged by a squirrel.

Another reason to grow vegetables in containers is simply to have them close at hand when they’re needed. A few steps out the kitchen door to a handful of cherry tomatoes and a ripe ‘Flavorburst’ sweet pepper for today’s salad has its charms.

Keeping the pots elevated on the deck prevents some animals, such as deer and rabbits, from making off with the fruits of your labor. Won’t stop the raccoons, though. (***Update***: Or the squirrels; one thought this little green tomato had something to offer. Discard any fruits that have been chewed on by animals. If needed, I’ll wrap the potted tomato plants, growing on the deck, in bird netting. June, 2019.)


Sun? Not So Much


The choices for edibles in a shady spot are limited. The ones that might succeed in bright shade are arugula, cilantro, parsley, lemon balm (interesting research with Alzheimer’s), French sorrel, and seasonal leafy greens. With just a bit more sun, basil, rosemary, oregano, and maybe a cucumber plant could grow for you.

Reflected light counts, to a degree, including light bouncing off light-colored walls. And a white surface under the pots reflects more light onto the vegetables in containers.

Remember to monitor the sun’s path throughout the seasons. Once trees drop their leaves in the fall, your balcony or patio might receive more direct sunlight than it did in the summer. This opens up all kinds of possibilities for potted cool-season greens and vegetables. Pay close attention to expected temperature changes for the duration of your crops.

Fruiting plants, such as tomatoes, peppers, eggplants, and squash need at least 6, and preferably 7 or 8 hours of direct sun. These vegetables also need warm summery weather.


Approaching Summer Solstice

Our vegetable garden is now receiving the maximum amount of light, with the sun directly overhead. In the springtime of the last two years, heavy rains caused the tree canopy up on the berm, to the south, to swell with heavy, overhanging branches. Trees now cast considerable shade early and late in the day for most of the growing season. So, I planted fewer tomato plants and more greens.

Two large ‘Big Beef’ tomatoes are beginning to ripen, and a whole lot of ‘Sun Gold’ and ‘Mexico Midget’ cherry tomatoes. So, even with less than ideal conditions, there will be something to harvest.


At Julia’s Request

Several family members from New Jersey and California recently visited us in North Carolina. I promised Julia this article about growing summer vegetables in containers.


Vegetables In Containers: Which Ones?


Sweet and hot peppers, tomatoes, and eggplants can be grown in containers, as well as zucchini, yellow summer and Patty Pan squashes, cucumbers, and green beans. Also, it’s easy to grow most herbs in pots. Green onions, carrots, potatoes, and peas can grow in pots!

It’s just a matter of the details. One of those details is to look for dwarf or bush varieties of the crops you want to grow. There’s even a variety of corn (‘On Deck’) that grows in large pots.

One of the popular combinations I used to sell included a sweet or a hot pepper planted with two herbs. Theme combinations (‘Jalapeno’ pepper-cilantro-Greek oregano; ‘Carmen’ frying pepper-Italian oregano-dwarf parsley ‘Titan’) grew in 14″ pots. Customers found them irresistible if they were bearing fruit.

Growing more varieties of leafy greens in containers has become a priority as our garden becomes more shaded. In addition, greens can grow all year in regions with moderate winters.


Starting With Tomatoes


Much of the information in “Starting With Tomatoes” also applies to other vegetables in containers.


'Blueberry' tomato

Potted ‘Blueberry’ cherry tomato.


Beginning with America’s favorite, tomatoes grow well in pots. Will it be a beefsteak or a cherry? An heirloom or a modern hybrid? A slicer or a sauce-type? Determinate? Indeterminate (it keeps growing until frost, bearing fruit all summer)? Black, red, yellow, or orange? Striped or solid? There are many thousands of varieties of tomatoes to choose from!

potted 'Terenzo' tomato, with red fruits

‘Terenzo’ tomato.

A dwarf tomato called ‘Terenzo’ (photo, right) can grow in a 10″ hanging basket, but a ‘Cherokee Purple’ heirloom or a ‘Big Beef’ needs something considerably larger. For the large varieties, I use pots at least 20″ in diameter.

The long-vining indeterminate cherry types (‘Sun Gold’, ‘Black Cherry’, ‘Mexico Midget’) can grow in a pot as small as 14″ in diameter, but they’d be happier in bigger pots. You’ll need to pay closer attention to water and fertility when using smaller pots.


Vegetables In Containers: Types Of Pots

Each kind of pot has both advantages and disadvantages.

Summer vegetables generally fare better in larger pots rather than smaller pots. Although the pot looks enormous compared to the transplant’s diminutive size, don’t be tempted to plant more than one tomato per pot. You’ll be amazed how quickly that one tomato plant fills a 20″ pot. A new transplant in a large pot runs a greater risk of root rot during rainy weather. But, placing it under an overhang will prevent this loss. It’ll be different once more roots and foliage have grown.

An indeterminate tomato, such as ‘Cherokee Purple’, ‘Sun Gold’, or ‘Black Krim’, can share a 20″ diameter pot (photo, below) with a couple of herbs, such as parsley and oregano. Plant the tomato toward the back of the pot, on the north side (northern hemisphere), and plant the herbs near the southern rim.

Terra Cotta

Terra cotta looks good and has some weight. But clay is porous, so water vapor passes through the pot to the air outside, quickly drying the soil. If you want to use your large clay pots, you could line them with food-grade plastic and punch some holes in the bottom for drainage. This will slow down the evaporation process.

Certainly, use clay pots if you prefer, but prepare to water more often.

Ceramic Pots

Ceramics are beautiful and heavy, and can be expensive. Soil temperature rises uncomfortably on the sunny side unless the pot is shaded. Try using light colored pots in the summer, which will reflect most of the heat.

If you’re unsure of the safety of the glaze, line the inside of the pot with food-grade plastic bags, poking several holes in the bottom for drainage. But, I would choose a different pot if a sticker on the bottom warns “Not for direct contact with food”.

You could also plant the tomato in a large nursery pot, and then insert it into the decorative glazed container. Make sure both pots have drainage holes. This “double-potting” allows air circulation around the interior pot and eliminates concerns about questionable glazes.


vegetables in containers, green pot

Tomato ‘Rutgers’, sweet basil, and Italian parsley in a 20″ wide pot, April, 2019.


Plastic and Vinyl

These pots are inexpensive, readily available, and easily moved. They’re also the most likely to blow over in windy weather. But this is the first choice for most gardeners. Most of these pots last a few to several years in the sun, but, eventually, sunlight will degrade the material.

Wood Containers

Untreated cedar or redwood and half whiskey barrels are suitable for growing vegetables in containers. Check to make sure the pots drain freely.


Reservoirs and Other Considerations

Earth boxes and plastic pots often have built-in reservoirs or detachable saucers. And you can purchase caster kits and trellises for increased functionality. Some gardeners have the option to move their plants from the morning sun on one side of the deck to the afternoon sun on the other side; wheels make this so much easier.

Caution: some of the reservoirs are too deep before the water begins to exit the overflow hole, and can cause young plants to rot if the soil stays sodden all the time. You could drill a hole in the side, below the overflow hole, reducing the capacity of the reservoir. Or simply tilt the pot to allow excess water to drain. Older plants, full of foliage, will absorb water in the bottom of the planter, as long as it isn’t raining for several days straight.

Mosquitoes and Tree Roots

Add a piece of Mosquito Dunks to prevent mosquitoes from maturing in the secluded reservoir. They need only a few days in warm weather to complete their life cycle. Or tip the container to drain all excess water.

A pot sitting directly on soil anywhere near trees or shrubs will invite their roots to invade. Believe me, they will try to grow in that beautiful composted soil. Elevate the pot off the ground. This also facilitates drainage from the pot.

A few pieces of broken flagstone or “pot feet” raise the pots above the surface of the deck, helping to preserve the deck’s finish.

Saucers

Use saucers under the pots, but don’t let water remain in them for more than an hour. Plant roots need oxygen as much as they need water. Water in the saucer prevents air from entering the bottom of the pot.

Saucers aren’t absolutely necessary, but help if the soil has gone too dry. Just keep filling them until no more water is absorbed by the soil. In tall pots, though, the force of gravity will prevail over capillary action, preventing water from reaching the top of the root ball. So, you’ll also need to water the top portion of soil.

During long periods of rainy weather, I remove the saucers, or turn them upside down and keep them under the containers. This is impractical, however, if the pot weighs 50 pounds. Consider removing the saucer and using a few pieces of broken flagstone or brick to elevate the pots, if necessary.


Potting Soil

pot for new chives division

Reused polyester fiberfill covers the drainage hole.

Before filling the pot, place a small handful of polyester fiberfill (from a hobby store) over the drainage hole. This prevents soil from eroding through the hole, and prevents earthworms and other critters from entering. If you pull some of it through the hole to a point at the bottom, excess water will continue to drain. This is helpful for potted plants that rot easily during long stretches of rainy weather (succulents, lavender, thyme, sage). This synthetic material doesn’t rot, so it’s reusable.

Use a good quality potting soil that drains well, but has peat moss to hold moisture. In addition to the peat moss, the mixture will have perlite (white particles that help drainage), pine bark chips (drainage), lime (to adjust the pH), compost or a starter charge of fertilizer, and often a wetting agent (to help the soil absorb water).

Amending the Potting Soil

Feel free to experiment with mixtures of different materials. Soils with a lot of bark (pine fines) in the mix tend to dry out faster. You can mix in smaller-particle loamy topsoil, spongy peat moss, aged manure, or compost to help slow water loss. Water-absorbing crystals might help, too. But moisten them before you add them to the soil. If you don’t, you’ll understand why I italicized the word “before”.

Adding a layer of undyed mulch on top of the soil helps conserve water and keep the soil a bit cooler.

While some gardeners add rocks to the bottom of the pot, I never do. It was thought the rocks increased drainage, but the opposite is true; they create a perched water table in the layer of soil right above the rocks. Water percolating through the soil profile is held in this layer by capillarity, and often rots roots trying to grow there, limiting the useful volume of soil.


Headings

Page 1: Growing Vegetables In Containers, Sun? Not So Much, Vegetables In Containers: Which Ones?, and Starting With Tomatoes (Vegetables In Containers: Types Of Pots, Reservoirs and Other Considerations, Mosquitoes and Tree Roots, Saucers, Potting Soil (Amending the Potting Soil)…

Page 2: Transplanting the Tomato, Water, Going Away?, Staking, Fertilizing Vegetables In Containers, Blossom End Rot, On PH, Pollination), Peppers and Eggplants, Cucumbers, Squash (Squash Vine Borers), Green Onions (Bunching Onions from Seed), Leafy Greens, and Picking Vegetables In Containers

Return to the top

Soil Prep 101 For Your Vegetable Garden


cool season vegetables

Cool season vegetables and greens.


Finding the Perfect Spot for Your Vegetable Garden


For the purpose of this post, I’ll assume that your vegetable garden will be flush with the surrounding lawn, rather than in a raised bed. However, sound horticultural principles apply to either method. Locate the garden where it gets lots of direct sunlight, and avoid low areas that collect water after heavy rain. Place it close to a source of water.

Now that you’ve found the perfect spot for your vegetable garden, you’re ready for Soil Prep 101. The types of crops you plant in any season are weather-dependent, so make sure weather patterns in your location suit the peppers, basil, kale, or cauliflower.

Although this article concentrates on preparing beds for vegetable gardens, the principles apply to other plants as well, including new shrub borders and flower gardens for pollinators. Page 2 of this article has tips for improving the soil’s tilth, or workability, for most garden projects.

Prerequisites for this class: “How to Prepare the Soil: An Introduction” and “Yes, But Is It Sunny In the Winter?”


Swiss chard in a raised vegetable garden

Swiss chard in a raised bed.


Depending on your level of affinity for precise measurement, you can use either a measuring tape or simple paces to mark the dimensions of your garden. Gardeners who want to indulge in culinary experimentation by growing a wide variety of crops might regret not having made the vegetable garden large enough from the outset. Consider the possibility of expansion in the future.


How Much Sun Does the Vegetable Garden Need?


There is no substitute for sunlight. Without at least 6 hours of direct sun, the results will be disappointing. Anything less than that will reduce and delay the harvest.

Indirect, dappled, and filtered light don’t really count. In fact, during most of the growing season, fruiting plants perform so much better with 7 or 8 hours of sun, minimum! There are other types of crops that can be grown in less than full sun, including leafy greens (lettuce, arugula) and a few herbs (cilantro, parsley).


Layout


Tomato.

Someone out there is asking, “Do I run the rows (the long axes) east-to-west or south-to-north?” Good question! If your plans include growing several tomato plants and maybe some pole beans on a trellis, and you prefer one long plot that is accessible from both sides, I recommend east-to-west.

Long-term plants (tomatoes, peppers, etc.) will continue to get good sunlight all season. Spaced properly, they won’t cast as much shade on each other, especially as fall approaches and the sun sinks lower in the sky. But, if your garden receives sun all day, it won’t make much difference to main season crops.

Cool season crops, grown from fall through early spring, however, will get more sun when planted east-to-west. They’ll face the sun all day even though the days are short.

Taller plants should be planted on the north side of any plot (northern hemisphere), so they don’t shade smaller plants nearby. Some varieties of staked indeterminate tomatoes can grow 8′ tall!


lettuce basket, a portable vegetable garden

Lettuce growing in a basket.


On properties where spatial considerations are limited, do what you can to provide enough direct sun to those crops you can’t live without. Your crops might not be lined up in neat rows, but rather planted individually in a sunny corner over here and another by the back gate. Doesn’t matter. Do what works for you!

Container-grown crops, such as this lettuce basket (photo, above), can be moved around as conditions change.


Multiple Vegetable Garden Beds


With ample space, a series of garden beds can be laid out in a grid. When deciding where the plants will go, always keep in mind that you want to prevent tall plants from shading short plants, with few exceptions. Using straight pathways makes maneuvering the wheelbarrow and equipment easier.

Crops that prefer cooler, part-shade conditions as the weather warms can be planted between the taller plants or in the partial shade they cast. Those include late spring lettuces, arugula, cilantro, and spinach.

savoy cabbage

Savoy cabbage.

Having several plots allows for crop rotation, planting one family of plants in Plot A this year, in Plot B next year, and so on. This helps prevent the soil from being severely depleted of certain micronutrients and from allowing populations of insects and diseases to build up.

The nightshade family (Solanaceae: tomato, pepper, eggplant, potato), the cucurbits (Cucurbitaceae: cucumber, summer squash, zucchini, melon, pumpkin), and the brassicas (Brassicaceae: broccoli, cabbage, cauliflower, kale, Brussels sprouts) are groups of plants that benefit from being rotated every 4 or more years.

To clarify, one member of a family (tomato, for example) should not be planted where any member of that family (tomato, pepper, eggplant, potato) has grown in the past few years.

This is a good reason to keep a record describing where you plant each crop every year, as well as documenting successes and losses. Knowing the family names that crops belong to also helps with crop rotation.


Seed Or Transplant?


antique seed packet

Don’t go overboard if this is your first attempt. You’re not obligated to germinate every pack of seeds you bought. There’s always next season. Most seeds will remain viable for a few years if kept dry and cool.

Starting out with young tomato, pepper, or slow-growing parsley transplants might be more practical than growing them from seed, even though it is more expensive. You’ll find them at garden centers, farmers’ markets, and local hardware stores, and the growers often have good suggestions for cultivation.

If you’re late getting the vegetable garden going, transplants will save you several weeks of growing time. You can always supplement with fast sprouting varieties of seeds, such as those mentioned in the next section.

Starting plants from seed is a welcome challenge to many and is a source of fascination for children—and for adults, too. Don’t laugh, but, for me, it’s a thrill when the catalogs start showing up in the mailbox. I would never discourage you from exploring this facet of gardening. And, of course, there are so many excellent varieties available from seed that never show up in retail stores as transplants.


Seedlings For Vegetable Gardens Need Sun

Seedlings of fruiting crops need at least 6-8 hours of direct sunlight for strong growth. Use clean pots, pasteurized seed starting mix, and a waterproof tray. Provide the proper temperature for germination.

If you don’t have very sunny windows or a greenhouse, consider starting seeds under shop lights with daylight tubes. I use 4′ long fixtures that hold 2 tubes each. Seedlings growing very close to the tubes—only a few inches away—grow strong stems and roots.

Lettuces, arugula, and other leafy greens tolerate fewer hours of sun, although they appreciate full sun during the cooler months.

Avoid starting seeds too early in the season. This could result in leggy, weak plants that might not perform up to par in the garden.


seedlings

Broccoli ‘Happy Rich’ and Arugula ‘Astro’ seeded into cell packs (late winter, 2022).


Seeding Directly Into the Garden

Some crops grow easily from seed sown directly into the vegetable garden. Peas and beans, for example, and radishes, beets, and carrots are just a few species that can be planted right into prepared ground. Dinosaur kale, mustard spinach, mesclun, leaf lettuce mixes, zucchini, spinach, and cucumbers are more crops that can be directly seeded.

Read all the information on the packet, paying special attention to when to start and how deeply to sow the seeds. Although these crops germinate readily, gardeners must still watch out for pests, both above and below ground, and turns in the weather.


Spacing the Plants


It’s important to calculate how much square footage each of your plants requires, or at least to get a rough idea. On graph paper, map the proposed garden to scale. Use the plants’ spacing recommendations found on the label or the seed packet for the amount of space needed.

With a 1/4″ grid, each square can represent 6″ or 12″ of garden space. The diagram is optional, but it can help in future years when considering crop rotation.

It’s better to have more than enough room rather than not enough; plants don’t respond well to crowding. The seemingly large gaps between the major crops can be interplanted with “ephemerals”—those plants that grow quickly and are harvested before the majors achieve full size. Examples include radishes and lettuce between tomato plants, or green onions and beets between autumn-grown Brussels sprouts.


If It Looks Like This…


dry cracked soil

Clay soil shrinks as it dries, creating surface cracking.

Soil that dries as hard as a brick is impossible to work with. You can thoroughly water the area the day before or start digging a day or two after a good rain. Avoid digging or walking in the garden when the soil is wet. This compresses the soil, squeezing out tiny channels of air space that are critical for healthy root growth.

Sandy soil that drains too fast should be amended with copious amounts of organic matter. Bagged topsoil is also available, but quality varies widely. The tiny clay particles in clay loam help hold water and nutrients in the soil.

In a large vegetable garden, plan for pathways every 4′ or 5′, and restrict foot traffic to those areas. Use pavers, flagstones, pine bark, or even that old pile of bricks for the pathways. You can get very creative with stonework, and your garden can be the neighborhood show-stopper, but don’t lay out the stones until the end of the soil prep process.

Let’s begin! Please turn the page…


Return to the top

Headings

Page 1: Finding the Perfect Spot for Your Vegetable Garden, How Much Sun Does the Vegetable Garden Need?, Layout, Multiple Vegetable Garden Beds, Seed Or Transplant? (Seedlings For Vegetable Gardens Need Sun, Seeding Directly Into the Garden), Spacing the Plants, and If It Looks Like This…

Page 2: Remove Sod, Tilth, Soil Prep (The First Dig: Loosen the Clay, The Second Dig: Add Drainage Materials, Organic Matter vs. “Organic”, The Third Dig: Add Organic Matter), Fertilizers, Rake Smooth and Pave, Agricultural Extension and Soil Tests (To Lime Or Not to Lime, and What is pH?)

How to Prepare the Soil: An Introduction


trowel in soil


Along with the early daffodils comes really beautiful weather. It’s been sunny, the birds are singing…not too hot, not too cold. It’s time to prepare the soil. But first, we need to understand it.


Prepare the Soil


Herbs, vegetables, and flowers are going to be living—hopefully, thriving—in your garden for several months. For trees and shrubs, providing a good home will see them through the next decade, or the next century! It pays to give them the best conditions you can provide, and it all starts below the surface of the ground.


Axiom of the day: soil preparation is 90% of your effort.


If that sounds like work to you, you are correct! But you’re reading this presumably because past results have fallen short of expectations, and you want to improve your gardening skills. I’ve played in the “dirt” professionally for 50 years and can honestly assert: successful gardening depends on the health of the soil.

And here’s the good news. Thorough soil preparation will have benefits for many years to come. You won’t have to prepare the soil to this extent again.


The Soil Is Alive


Microbes


prepare the soil for seedlings

Seedlings in prepared soil.


Soil is more complex than meets the eye. There is a dynamic interplay among minerals, organic matter, air, and moisture. Earthworms, insects, nematodes, and tiny microbes also contribute. Healthy soil is teeming with life! These organisms play an important role in how soil functions. Without them, organic matter would not break down into those vital nutrients needed by all plants.

Vast mycelial mats of beneficial fungi, or mycorrhizae, live in close association with roots. Millions—or perhaps a billion—species of these beneficial microbes inhabit soils around the globe, many of which live within or around a particular species’ roots. Researchers estimate that there could be a trillion species of microbes living in air, soil, water, and living organisms.

Soil-borne mycorrhizae have enzymes that can unlock, or chelate, micronutrients tightly bound to soil particles, making them available to plants. These organisms can gather water and provide it to plants even though the plants’ roots don’t have direct access to moisture. And these microbes act as barriers to certain soil pathogens.

Bacillus, Streptomyces, and Pseudomonas are common bacterial microbes. Fungal mycorrhizae, such as Trichoderma, Hebeloma, and Glomus help roots absorb water and phosphorus. Other microbes, such as viruses and archaea, also inhabit the rhizosphere, the area surrounding the roots. Gardeners are familiar with the nitrogen-fixing bacteria (Rhizobium) that increase yields in legumes.

Scientists have only recently begun deciphering the enormous number of microbes and what they do for or to plants. Only a few plant families, including Brassicaeae, do not have associations with fungal mycorrhizae. Blueberries and other plants in the Ericaceae family (azalea, rhododendron) have very limited associations with mycorrhizae.

Microbes benefit from the symbiotic relationship with roots by getting carbohydrates in return. The numbers of microbes inhabiting just a tablespoonful of soil are staggering. Believe it or not, that’s greater than the number of people living on the planet! Of course, not all of these microbes are beneficial; many cause diseases in plants and animals.


Tilth

earthworm castings

Nutrient-rich earthworm castings.

Consider yourself lucky if your soil has good tilth, or friability, to begin with. Perhaps all you’ll need to do to prepare it is to add compost, aged manure, or some fertilizer periodically.

Soil stays more biologically active over a long period of time if it is not disturbed by frequent tilling. Beneficial fungi and nematodes are especially sensitive to major disturbances. Simply scratching products into the soil surface and watering them in preserves existing microbial populations in the soil.

There are several soil types distributed throughout the United States. They’re determined primarily by the kind of bedrock beneath the surface, the kinds of vegetation growing there, climate, and management practices employed through the centuries. Minerals from rock, eroded by water and wind, will be deposited downstream or downwind.


Soil Composition

Soil is composed of:

  • mineral matter (rocks, sand, silt, clay)
  • organic matter (carbon-containing [once-living] compounds such as compost, aged manure, dead roots, dead organisms). Never use fresh manure; the ammonia content can harm plants, and it might harbor pathogens.
  • living organisms (such as earthworms, nematodes, microbes, insects)
  • air
  • water

Tilth and fertility are determined by relative proportions of these materials. All kinds of soils benefit from the addition of compost and other organic materials. I confess to going a little overboard on these amendments when I prepare the soil. But the plants look great!

You might be fortunate to start with soil that has good tilth. It already has physical characteristics which promote plant growth. Or experience indicates that the roots will need some encouragement to grow beyond the original root ball.

Soil that is a rocky clay, for example, dries to the consistency of brick, and will need lots of amendments to improve drainage and to encourage roots to grow vigorously. On the other hand, sandy soils need materials that will improve water and nutrient retention. Instead of repeatedly failing with plants that can’t adapt to your soil, try starting out with those that can. Working the garden over the years will condition the soil sufficiently so you’ll be able to grow more species.


foxglove

Biennial foxglove (Digitalis purpurea).


Simply digging a hole in the ground, adding a cupful of compost, and plopping the plant in place won’t do the trick in heavy clay or rocky soils. Depth of topsoil, drainage patterns, ratio of clay to organic matter, air pore space (the space between particles), and, of course, fertility and pH, all enter into the equation.

The rich, black ground in our West Virginia garden needed no amendments at all; the foxgloves grew 7 feet tall! Still, I added organic matter every time new plants went into the ground.


From Awful to Awesome


First, the Awful Bit

Our first house in Maryland sat on the crest of a hill. Sunrises and sunsets were spectacular, but the soil was just awful. It was all clay and shale. Any organic matter that did exist blew away or washed down the slope. That “dirt” refused to yield even to the most enthusiastic shovel.

I created a vegetable garden farther down the slope, next to the greenhouse, that gave us fabulous crops of tomatoes and peppers. Digging in autumn leaves, vegetable scraps from the kitchen, and discarded material from my horticultural business greatly improved the soil. It didn’t take long for decomposition to begin and for the earthworms to show up.


wheelbarrow with compost to prepare the soil


Almost Awesome

A few years later, we moved farther south to a community that had been carved out of an old oak and hickory forest. Although the soil quality was better here than at the previous property, I continued to prepare the soil with every new project for the next 3 decades.

Before planting rhododendrons (like the one in the photo, below) in the afternoon shade, I added peat moss and pine fines to the soil. These materials were not merely thrown on top of the ground. Instead, generous quantities of amendments were incorporated (not layered) into the top 12″ to 18″ of existing soil. Then, I mixed nutrient-rich LeafGro (locally sourced compost) into the top 8″ of loosened soil.

This effort created a well-balanced mixture, composed of existing clay and loam, and the added peat moss, composted pine bark, and compost. After that, the soil remained undisturbed except for top dressings of fertilizer, compost, or mulch.


rhododendron

Rhododendron catawbiense.


I left the ditch behind the shrub border undisturbed, allowing rainwater to travel down the slope. Water that did not drain away would have meant death for the shallowly rooted rhododendrons.

Blueberries must have very acidic conditions, in a range from about 4.3 to 5.3 pH. Rhododendrons, azaleas, and hollies like their pH a bit higher than that, but still on the acidic side. Peat moss and pine fines incorporated into the soil helped provide the acidity and aeration.


calibrachoa with chlorosis

This calibrachoa has chlorosis from high pH.


Petunia, calibrachoa, pansy, and viola also benefit from a lower (acidic) pH. Plants growing in soil with closer to neutral pH will have sickly yellowish leaves with green veins (photo, above).


A Shady Oasis

Gradually, most of the back yard grew into a private woodland. Japanese snowbell (Styrax japonica), paperbark maple (Acer griseum), Pieris, Abelia, Viburnum, Kolkwitzia, and a group of monarch birches (Betula maximowicziana) were the main players. And the rhododendrons and existing vegetation, of course.

Mulched pathways meandered under the cool canopy, and all sorts of shrubs and perennials luxuriated in that rich soil. There was a small pond, a greenhouse, and no grass to mow in the back yard. Awesome. (***Update***: As it often happens, subsequent owners of the house altered the property to suit their needs and removed almost all of those plants.)


Monitor Soil Health Over Time


Preparing the soil for vegetables is not difficult, and the results will last for years. Most varieties prosper in improved soil 10 to 14 inches deep. Lettuce and radishes need only 5 or 6 inches.

Using the space efficiently and intensively calls for carefully managing the soil. Vegetables grow quickly, fruit heavily, and, therefore, require frequent additions of nutrients. 

Thoroughly preparing the existing soil will pay dividends, spelling the difference between getting a few vegetables from the garden (“Why bother?”) and having a truly abundant harvest (“Take some veggies, please!”). And, if you properly prepare the soil at the start, you’ll never have to repeat the effort to that degree.

Keep in mind, though, that, as organic matter breaks down and is absorbed by plants and other living things, you’ll need to add more compost. For top performance, plants need balanced fertilizers that are appropriate for specific uses, such as for vegetables, flowers, spring flowering bulbs, or the shrub border. That’s in addition to the compost or aged manure you originally used to prepare the soil. Lack of nutrients and compacted soils are among the top reasons for low crop yields.


Soil Testing

Contact your local Master Gardeners program, or the agricultural extension office, for information on soil testing. The results will indicate which amendments to add, and whether the pH is appropriate for the plants you want to grow. The report also includes a breakdown of the soil components: clay, silt, sand, and organic matter. Normally, I add more organic matter than soil tests recommended.

Soil pH is a measure of acidity or alkalinity. Neutral is 7.0, with acidic values below that and alkaline values above 7.0. A simple soil test will indicate pH and nutrient levels. Soil pH affects the availability of nutrients to plant roots, with most vegetables preferring pH levels between 6.0 and 7.3.

Years ago, a landscape client wanted to prepare the soil for a vegetable garden on the property she and her young family had just bought. She expressed concern for “bad things” in the ground, so I suggested that she ask for a lead test in addition to the basic tests. The cost of the basic test is very reasonable, but extra requests will raise the fee. No matter; it’s worth the cost.

The report showed a surprisingly high lead content in the soil, unusual for a newer home. So, you don’t want vegetables growing there! She submitted tests from different areas, and felt confident that the original spot was unique. Something probably had been dumped there before the house was built. Later, the family was going to have the contaminated soil professionally removed.

Lead Paint

trowel in soil
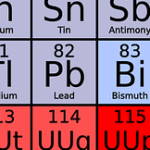
In 1977, the Consumer Product Safety Commission banned the use of lead paint in residential properties. If you live near an industrial region, a busy highway, or where lead paint might be a concern, I strongly advise testing for lead before you prepare the soil. Local zoning authorities should have records on past property use. For more information, contact the National Lead Information Center at 800 424-5323.

Lead poses a serious health risk, especially to young children. There is no level of lead that is considered “safe enough”. And most of us grow our own vegetables for the health benefits, after all.

For now, gather your tools and your help, and pace yourselves. This is not something to be accomplished in the hour before your daughter’s softball game. So, you might as well turn it into a party—arrange for pizza delivery at the end of the day! You certainly will have deserved it.


pizza


Return to the top